Your coupon for will be reflected when you check out!
✖
Your coupon for
✖
Hello!
You're visiting the PartSelect site in U.S.
Would you like to shop on the Canadian site?
Stay on this site
Go to Canadian site
✖
Model Number Locations
1Select Category Type
Select Category Type
2Select Product Type
Select Product Type
3Select {MODEL} Type
Select {MODEL} Type
Sample Model Number Tags
Model numbers can be made up of numbers (1005400, for example) or a combination of letters and numbers (LAT1000AAE). The model number will most likely appear on either a paper sticker or a metal plate. Your appliance's model number tag may look similar to the sample model number tags shown here (model number highlighted in yellow):
Model has been saved to My Models. If you're not signed in, your lists are available on this device and will expire within 30 days.
Model has been saved to My Models.
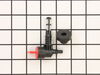
Made of durable rubber and plastic components, this Fuel Valve and Bushing are designed for use in over 150 models of generators and pressure washers. This item is sold as a kit, including the valve a...
$19.38
In Stock
Order now and your part arrives in 2-3 business days!
The Oil Seal is a manufacturer-approved rubber part which provides a seal between the crankcase and crankshaft by attaching around the axle shaft on the crankhouse housing. Installation is rated as "M...
$6.59
In Stock
Order now and your part arrives in 2-3 business days!
Introducing the Briggs and Stratton Starter Pulley, a vital component for your appliance repair needs. Crafted with quality and precision, this pulley plays a significant role in your engine's start-u...
$15.80
In Stock
Order now and your part arrives in 2-3 business days!
This Fuel Filter is a white plastic part attached within the fuel delivery system between the fuel tank and carburetor. Installation is rated as "Easy" and requires a set of pliers and a screwdriver. ...
$3.99
In Stock
Order now and your part arrives in 2-3 business days!
Discover the power of optimal engine performance with the Briggs and Stratton Starter Clutch. A vital piece of your garden equipment's engine, this starter clutch engages your machine's flywheel while...
$37.32
In Stock
Order now and your part arrives in 2-3 business days!
Discover the Briggs and Stratton Armature-Magneto, a vital component for optimal operation of your lawn and garden equipment engines. This premium-quality ignition coil significantly contributes to sp...
$58.83
In Stock
Order now and your part arrives in 2-3 business days!
This fuel line is compatible with several different makes and models of small engine equipment and is sold as an individual part. Equipped with the securing clamp, this rubber fuel line is used to tra...
Put some dish soap on the rubber, push into the tank hole, slip 1x2 into the handle of the tank and over the new part and pry down pushing it into the hole. Took about 2 minutes.
old valve easily pulled out with screwdriver and pliers
install difficult due to 40 degree cold temp and bushing didn't want to squeeze into fuel tank hole
install required lots of liquid soap on bushing, which popped into place by using upward prying pressure from 3"X24" plywood braced into under-shelf of gas tank
... Read morer /> used same technique to insert valve upward into bushing