Your coupon for will be reflected when you check out!
✖
Your coupon for
✖
Hello!
You're visiting the PartSelect site in U.S.
Would you like to shop on the Canadian site?
Stay on this site
Go to Canadian site
✖
Model Number Locations
1Select Category Type
Select Category Type
2Select Product Type
Select Product Type
3Select {MODEL} Type
Select {MODEL} Type
Sample Model Number Tags
Model numbers can be made up of numbers (1005400, for example) or a combination of letters and numbers (LAT1000AAE). The model number will most likely appear on either a paper sticker or a metal plate. Your appliance's model number tag may look similar to the sample model number tags shown here (model number highlighted in yellow):
Model has been saved to My Models. If you're not signed in, your lists are available on this device and will expire within 30 days.
Model has been saved to My Models.
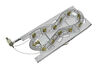
When connected to electricity the dryer heating element glows red hot and generates heat. When air is blown over it, it heats the air which is used to dry the clothes. The heating element fits inside ...
$56.11
In Stock
Order within the next 7 hrs and your part ships today!
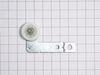
This Idler Pulley includes the tri-ring and gasket and everything included here is manufacturer-certified. This part maintains correct tension on the drive belt in order to spin the drum properly. If ...
$25.95
In Stock
Order within the next 7 hrs and your part ships today!
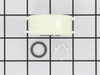
This drum support roller is sold individually. Most dryers require two. The tri-rings are included. This is a drum support roller for a dryer. It is a genuine replacement part. This part is sold separ...
$18.88
In Stock
Order within the next 7 hrs and your part ships today!
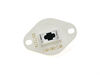
The internal-bias thermistor (Thermistor, Dryer Thermister, Dryer Thermistor) prevents the dryer from overheating by monitoring and controlling the temperature of the inside of the dryer drum. It is l...
$35.67
In Stock
Order within the next 7 hrs and your part ships today!
If your washer shakes or vibrates loudly when it reaches its max speed, check that the leveling legs are even. To ensure that the washer is firmly on the ground using all four legs, adjust the legs so...
$7.29
In Stock
Order within the next 7 hrs and your part ships today!
The idler pulley with bracket ensures proper tension on the dryer’s drive belt, allowing the drum to spin effectively. This assembly includes the pulley and arm, making it ideal for replacing a worn o...
$27.24
In Stock
Order within the next 7 hrs and your part ships today!
This touch-up paint can be used on a wide variety of household appliances. It is most often used on washers, dryer, refrigerators, dishwashers, ranges, freezers, trash compactors, or microwaves. It is...
$12.58
In Stock
Order within the next 7 hrs and your part ships today!
Questions And Answers for 11069133414
Be the first to ask our experts a question about this model!
✖
Ask a Question
Ask our experts a question on this model and we'll respond as soon as we can.
Remove the kick plate from the bottom of the dryer by sliding a putty knife along the top edge to release the plastic clamps, one on each side about 4" in from the edges. The kick plate folds out and down. You will see the heat shield on the right, held in by one hex head screw. Remove screw and heat shield. The element is positioned in a
... Read moren open-front housing and is fastened to the left side of the housing by two hex head screws, located on the "rail" of the element and right near the two wires. Remove the hex-head screws that hold the element in place and disconnected the two wires by pulling them out by hand or with needle nose pliers. The only difficulty here is the cramped working area...I recommend a stubby socket driver for these two screws. Most of this I had to do by feel because I could not see the screw heads. Once the screws are out and the wires have been disconnected, slide the old element straight out toward you. You may need to disconnect a small plastic hose located to the left front of the element, but this hose just pulls right off. Vacume the dust & lint build-up out of the whole area, wipe out the element housing and clean up the whole underside of the dryer prior to installing the new element. Installation is reverse of removal. It also might be a good opportunity to clean out your exhaust duct and the vent to the outside. (Never use the aluminum foil-accordian-type duct.) If the exterior dryer vent has any kind of screen over it, remove it and get rid of it. Screens collect lint, lint builds up and burns out elements.
1) Disconnected power cord from wall. 2) Disconnected vent hose from back of dryer. 3)Removed dryer rear panel. 4)Disengaged tension spring on idle wheel arm. 5) Removed worn idle wheel. 6)Installed new Idler wheel assembly. 7) Vacuumed dust from rear of dryer (optional, recommended). 8) Reinstalled rear cover, vent hose and power cord. E
... Read moreasy repair 15-30
I recommend you order the idler pulley as soon as you start to hear the unusual noise indicating metal against metal. Replace the idler pulley before it fails and possibly causes more damage to the drive system. Simply removed the power cord at the back of the dryer and then the multiple screws holding the back panel in place as well as
... Read more the clip holding the exhaust vent in place. You may need to remove the top panel to access a few of these screws. A diagram of the belt routing is in the paperwork I found behind the front lower panel of the dryer. This too is easily removed with just a few screws.


 Diagram and Parts List for Kenmore Dryer")


 – Part Number: 72017")