Your coupon for will be reflected when you check out!
✖
Your coupon for
✖
Hello!
You're visiting the PartSelect site in U.S.
Would you like to shop on the Canadian site?
Stay on this site
Go to Canadian site
✖
Model Number Locations
1Select Category Type
Select Category Type
2Select Product Type
Select Product Type
3Select {MODEL} Type
Select {MODEL} Type
Sample Model Number Tags
Model numbers can be made up of numbers (1005400, for example) or a combination of letters and numbers (LAT1000AAE). The model number will most likely appear on either a paper sticker or a metal plate. Your appliance's model number tag may look similar to the sample model number tags shown here (model number highlighted in yellow):
Model has been saved to My Models. If you're not signed in, your lists are available on this device and will expire within 30 days.
Model has been saved to My Models.
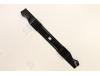
This authentic replacement blade is manufactured for use with Craftsman walk-behind lawnmowers and is designed to deliver clean, efficient cuts. Measuring 21 inches in length, the blade features an an...
$29.79
In Stock
Order within the next 12 hrs and your part ships today!
This OEM Hinged Mulch Plug Assembly includes both the plug and the spring. It is a black, plastic assembly which is rated as "Easy" to install, requiring a screwdriver, and socket set. This part seals...
This trail shield, also referred to as a rear skirt, is designed for use with various makes and models of lawn mowers and is a genuine OEM part. This trail shield is sold as an individual part without...
$13.41
In Stock
Order within the next 12 hrs and your part ships today!
The Blade Support (Bell Blade Support) fits between the bottom of the blade and the blade bolt to provide support for the blade. It is installed underneath the cutting deck on the blade. Installation ...
Also referred to as a Lock Nut or Flange Lock, this nut is designed for use with various lawn and garden equipment. The purpose of this part is to hold parts in place while resisting loosening when pr...
$5.95
In Stock
Order within the next 12 hrs and your part ships today!
This high-quality fuel bowl O-ring is a genuine replacement part supplied by the original equipment manufacturer for use with lawn and garden equipment. It is designed to create an airtight seal for t...
$7.68
In Stock
Order within the next 12 hrs and your part ships today!
Removed front wheel assembly (5 screws) Removed rear wheel/handle assembly (3 screws and disconnect control cable with pliers), removed blade (1 bolt)...transferred all to new deck with new screws and washers (deck screws are easy to remove and replace as they screw into plastic)...Before installing blade I sprayed under deck with truck u
... Read morendercoating spray to help prevent rust)....entire process took about an hour and now I have a like-new mower. Note that Honda stopped making this motor this year, so it's very much worth saving.


_WW_1.gif "1P65Bu_Air_Cleaner Diagram and Parts List for 2013 MTD Lawn Mower")
_WW_2.gif "1P65Bu_Carburetor Diagram and Parts List for 2013 MTD Lawn Mower")
_WW_3.gif "1P65Bu_Crankcase Diagram and Parts List for 2013 MTD Lawn Mower")
_WW_4.gif "1P65Bu_Crankshaft_And_Crankcase_Cover Diagram and Parts List for 2013 MTD Lawn Mower")
_WW_5.gif "1P65Bu_Cylinder_Head Diagram and Parts List for 2013 MTD Lawn Mower")
_WW_6.gif "1P65Bu_Flywheel_And_Shroud Diagram and Parts List for 2013 MTD Lawn Mower")
_WW_7.gif "1P65Bu_Fuel_Tank Diagram and Parts List for 2013 MTD Lawn Mower")
_WW_8.gif "General_Assembly Diagram and Parts List for 2013 MTD Lawn Mower")
_WW_9.gif "Label_Map Diagram and Parts List for 2013 MTD Lawn Mower")
_WW_10.gif "Quick_Reference Diagram and Parts List for 2013 MTD Lawn Mower")
 – Part Number: 942-0741A")


 – Part Number: 787-01869B-0638")

")


