Your coupon for will be reflected when you check out!
✖
Your coupon for
✖
Hello!
You're visiting the PartSelect site in U.S.
Would you like to shop on the Canadian site?
Stay on this site
Go to Canadian site
✖
Model Number Locations
1Select Category Type
Select Category Type
2Select Product Type
Select Product Type
3Select {MODEL} Type
Select {MODEL} Type
Sample Model Number Tags
Model numbers can be made up of numbers (1005400, for example) or a combination of letters and numbers (LAT1000AAE). The model number will most likely appear on either a paper sticker or a metal plate. Your appliance's model number tag may look similar to the sample model number tags shown here (model number highlighted in yellow):
Model has been saved to My Models. If you're not signed in, your lists are available on this device and will expire within 30 days.
Model has been saved to My Models.
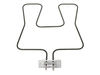
The GE Appliances Bake Element is a top-quality replacement part designed specifically for electric ovens. Located at the bottom of the oven, it provides the necessary heat for baking. Its installatio...
$57.37
In Stock
Order within the next 12 hrs and your part ships today!
First I turned the circuit breaker switch off for the stove unit. I then removed the two screws that hold the element in place at the back of the oven. I then pulled the element out about 3 inches and disconnected the two wires. I attached the new element, bolting the wires into place and then screwed the element back into place on the
... Read moreback wall of the oven. I flipped the breaker switch back on, and turned on the oven. I was done in roughly 15 minutes. The most difficult part was having to shine a flash light into the oven to replace the part, and negotiating the hard cold kitchen floor.
I first removed the two screws holding the element in place. Then I pulled the element out about 2 or 3 inches and then took out the 2 small screws holding the 2 wires in place. I then removed the old element and discarded it and installed the new one in the reverse order that I took out the old one. It was quite easy to do, only took abo
... Read moreut 10 to 15 minutes total time.