Your coupon for will be reflected when you check out!
✖
Your coupon for
✖
Hello!
You're visiting the PartSelect site in U.S.
Would you like to shop on the Canadian site?
Stay on this site
Go to Canadian site
✖
Model Number Locations
1Select Category Type
Select Category Type
2Select Product Type
Select Product Type
3Select {MODEL} Type
Select {MODEL} Type
Sample Model Number Tags
Model numbers can be made up of numbers (1005400, for example) or a combination of letters and numbers (LAT1000AAE). The model number will most likely appear on either a paper sticker or a metal plate. Your appliance's model number tag may look similar to the sample model number tags shown here (model number highlighted in yellow):
Model has been saved to My Models. If you're not signed in, your lists are available on this device and will expire within 30 days.
Model has been saved to My Models.
This an authentic OEM 40-Watt replacement light bulb, used in a number of household appliances. It is specially designed to withstand extreme temperatures, which is why these replacement bulbs are mos...
$17.75
In Stock
Order now and your part arrives in 2-3 business days!
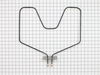
This bake element goes in the bottom of your range and is 220 volts and 2300 watts. This closed hinged style element with screw-in terminals measures at 15-1/4 inches long and 18-1/4 inches wide. The ...
$49.81
In Stock
Order now and your part arrives in 2-3 business days!
This set of 3 clock timer knobs let you set and change the settings on your range clock. These genuine OEM knobs are made of black plastic and measure approximately 1-inch long.
$34.85
In Stock
Order now and your part arrives in 2-3 business days!
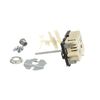
This tilt lock hinge mounted surface element kit includes a 6 inch, two wire, 1350 watt surface element, and a terminal block with all three-wire units. These high rise elements do not come with an attached trim ring.
$51.29
In Stock
Order now and your part arrives in 2-3 business days!
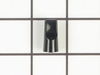
This part is the replacement light socket for your oven. The oven light socket provides power to the light, and at the same time holds the light bulb in place.
$15.91
In Stock
Order now and your part arrives in 2-3 business days!
This light bulb lens covers the interior light bulb in an oven, range, or stove. No tools are necessary to replace this part. Simply slide off the wire bracket to remove the existing light bulb lens. ...
$21.89
In Stock
Order now and your part arrives in 2-3 business days!
This large broiler pan is found in the bottom of your oven and is used to catch drippings from broiling foods. This part includes the grate and bottom pan and is made of porcelain. The grate measures ...
$40.84
In Stock
Order now and your part arrives in 2-3 business days!
This repair took between 15 and 30 minutes BUT ONLY because my 10 year old son did the repair. He couldn't wait for his father to come home from work. His only complaint was the tight fit to reach the back of the oven (he wanted to take the oven door off but I said no). He removed the 2 screws that held the element in place and then pu
... Read morelled it from the oven until he could remove the screws that held the wires in place. He was concerned that a little of the insulation came out with the wires, but this was no issue. The new element hooked right up (we figured out that we had to use the 2 new screws for the wires because the old ones did not fit very well). We used the same 'old' screws to attach the element back to the oven. Plugged the oven back in and it works fine. My son was so proud and I didn't have to help any more than shining a flashlight for him.
The heating element in the lower oven of my 18 year-old GE double oven broke into two pieces and would not heat. Because of the age of the oven, a replacement part was unavailable through GE. I came across PartSelect.com through an Internet search and ordered the part online. Total cost was $33.50, counting s/h. FedEx delivered the new
... Read more element less than 48 hours after I placed the order online.
IMPORTANT: FLIP the BREAKER to stop electricity from going to the oven. Replacing the heating element is a two step process: 1. Remove the old element. 2. Install the new element in its place. (NOTE: This job is much simpler if you lift and remove the oven door BEFORE you begin. NOTE also: There are no slots in the screws, so you must use a small socket wrench--not a screwdriver-- to remove the screws.) STEP 1: Two screws go through the small metal plate attached to the element prongs. These screws hold the element to the back oven wall. Remove the screws, then pull the element forward a few inches to gain access to two screws which hold the element prongs to wires that come through the back oven wall. (One wire and one screw for each of the two prongs.) Remove the two screws. Remove and discard the old element. STEP 2: Install the new element by doing Step 1 in reverse. Oven is now repaired! (It took more time to type these instruction than it took to repair the oven.)