Your coupon for will be reflected when you check out!
✖
Your coupon for
✖
Hello!
You're visiting the PartSelect site in U.S.
Would you like to shop on the Canadian site?
Stay on this site
Go to Canadian site
✖
Model Number Locations
1Select Category Type
Select Category Type
2Select Product Type
Select Product Type
3Select {MODEL} Type
Select {MODEL} Type
Sample Model Number Tags
Model numbers can be made up of numbers (1005400, for example) or a combination of letters and numbers (LAT1000AAE). The model number will most likely appear on either a paper sticker or a metal plate. Your appliance's model number tag may look similar to the sample model number tags shown here (model number highlighted in yellow):
Model has been saved to My Models. If you're not signed in, your lists are available on this device and will expire within 30 days.
Model has been saved to My Models.
This chrome drip pan is designed for gas cooktops and ranges. The pan has an approximate diameter of 8 inches, and the hole in the middle has a diameter of roughly 4 inches. The purpose of this part i...
$14.95
In Stock
Order now and your part arrives in 2-3 business days!
This is a burner grate for your surface burner, and it is compatible with your range stove top. The purpose of this part is to provide a balanced and stable surface for you to set your cookware on whi...
$47.95
In Stock
Order now and your part arrives in 2-3 business days!
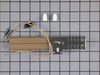
This flat style gas oven igniter is 5.53 inches long and comes with a bracket and wire nuts. Its amperage range is between 3.2 and 3.6 amps. May be different in appearance but will function as the orginal part.
$59.95
In Stock
Order now and your part arrives in 2-3 business days!
I removed the broiler burner assembly held in by 5 screws across the inside top of the oven, as I removed the assembly the igniter slid out from the back of the oven and was attached to the assembly with a cannon plug, I disconnected the cannon plug and removed the whole assembly out of the oven and replaced the igniter which was attached
... Read more by two screws and reassembled in the oven. Where I live in remote Alaska calling a repair technician is not an option, either figure it out or have a new appliance barged in.
2) Remove oven door. There requires that you remove the two square drive (SD) bolts on the inside, partially close the door and lift it off the hinges.
3) Remove the grills.
4) At the back remove the rear shield (aluminum panel held by 2 SD sheet metal screws
... Read more.
5) this exposes the broiler igniter and its two wires. If its been replaced in past, there should be two porcelain screw-on wire connectors. Undo the connectors by turning them counter-clockwise. With a volt-ohmmeter, measure the resistance across the igniter. If its open circuited, its broken. If not, then its in the circuit board, and this help stop here. If this is the original igniter, it ends in a plastic connector. Disconnect by pulling it apart from its mating plug and again, check the continuity of the igniter. If its defective, reconnect the connector and cut each wire on the igniter side. Strip back about 1/2 inch of insulation on each lead.
6) inside the oven, using the SD driver, remove the 4 screw securing the broiler burner from the roof of the oven. The burner can now be removed, pulling the burner away from the gas jet on the right.
7) The igniter is now exposed and can be remove by removing the two SD drive screws.
8) Replace with the new igniter, being careful not to touch the black element, and feeding the wires though the rear oven wall.