Your coupon for will be reflected when you check out!
✖
Your coupon for
✖
Hello!
You're visiting the PartSelect site in U.S.
Would you like to shop on the Canadian site?
Stay on this site
Go to Canadian site
✖
Model Number Locations
1Select Category Type
Select Category Type
2Select Product Type
Select Product Type
3Select {MODEL} Type
Select {MODEL} Type
Sample Model Number Tags
Model numbers can be made up of numbers (1005400, for example) or a combination of letters and numbers (LAT1000AAE). The model number will most likely appear on either a paper sticker or a metal plate. Your appliance's model number tag may look similar to the sample model number tags shown here (model number highlighted in yellow):
Model has been saved to My Models. If you're not signed in, your lists are available on this device and will expire within 30 days.
Model has been saved to My Models.
This is an authentic LG water inlet valve for a top-load washer. It is designed to control the flow of water into the washer. If your washer is filling slowly, making loud noises, overflowing, or stop...
$146.72
In Stock
Order now and your part arrives in 2-3 business days!
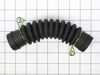
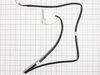
This is a drain hose assembly for top-load models of LG washing machines. This hose specifically is used to allow water to drain from the tub to the drain pump of the washer. This hose is made of plas...
$40.77
In Stock
Order now and your part arrives in 2-3 business days!
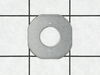
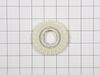
Introducing the customized screw designed exclusively for LG washers. Manufactured with safety and efficiency in mind, installation is straightforward when you adhere to correct safety regulations. Sh...
$20.61
In Stock
Order now and your part arrives in 2-3 business days!
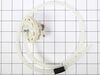
This water-level pressure switch in your wash monitors and regulates the water levels throughout the fill, wash, and rinse cycles. You will usually find it inside the control panel or near the tub. It...
$62.98
In Stock
Order now and your part arrives in 2-3 business days!
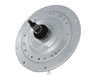
This clutch housing assembly with mode shifter, or washer drive shaft and shifter assembly, is made for your washer. It connects the appliance wash plate to the motor so the washer can shift the drive...
$289.26
In Stock
Order now and your part arrives in 2-3 business days!
This part is the replacement switch assembly for your top-load washer. It contains the switch mechanism and the connecting wire that hooks the door latch to the electrical system of the washer. The li...
$146.72
In Stock
Order now and your part arrives in 2-3 business days!
Ensure smooth functioning of your LG washer with our genuine LG Washer Shifter Coupling. This vital part helps your washer shift seamlessly between agitation and spin mode, enhancing the efficiency of...
$38.88
In Stock
Order now and your part arrives in 2-3 business days!
Enhance the lifetime of your LG washing machine with the genuine Original Equipment Manufacturer (OEM) Motor Assembly Clutch. This crucial component aids in shifting the drive system between spin and ...
$122.59
In Stock
Order now and your part arrives in 2-3 business days!
Questions And Answers for 31553
Be the first to ask our experts a question about this model!
✖
Ask a Question
Ask our experts a question on this model and we'll respond as soon as we can.
Watch this video on youtube:https://www.youtube.com/watch?v=8ZKgP6hu8Fk very similar
Keep all parts separate and in order in a plastic box with dividers 1. Disconnect washer from wall. (electrical and hot/cold hoses, drain tube) 2. Remove center cap from bottom tub plate 3. Remove small bolt under cap 4. R
... Read moreemove bottom Tub Plate 5. Remover washer 6. Remove larger 38mm nut (I bought the correct deep well socket) Ive seen other video use a pipe wrench) 6a. Remove the large washer under nut NOTE- I did not remove the tub, total hassle, found it unnecessary, Yes the washer was heavier but nothing that cant be managed. 7. Place a blanket on the floor and lay the washer on its back to access the bottom. NOTE Everthing is nuts and bolts at this point. 10mm socket worked on all 8. Remove Nut & washer on rotor. Remove rotor-its has a line of magnets and the edges are sharp. Just wiggle it a bit. wear gloves if need be. 9. Remove bolts from Stator, user a small flat blade screw driver to undo 1 or 2 (some) electrical connections. Lay the stator aside. Move the electric connector(s) out of the way. 10. Remove the grounding wire at 6 oclock position 11.Remove the rectangular pack and the 3 oclock position by removing 2 bolts. It has a small arm that reaches out to the clutch arm, slide the piece out to the widest part of hole in clutch arrn an wiggle it loose. Almost there.... 12. Remove all the 10MM headed bolts from the clutsh and drive assemble The inner bolts are a slightly different style, keep the two sets separate. 13. Remove the clutch and drive.
NOTE: if the drive doesnt come out with a slight pull, you have missed a bolt(s)-inspect and remove as need be
14 Wipe clean the pocket in the outer wash tub that accepts the seal on the top of the drive. Lubricate the new drives seal completely with a little dishwasher detergent so it slides smoothly and seals well.
15. Assembly is the reverse:
Last Notes: *Install all bolts for the clutch and drive hand tight as you get everything lined up. *Once all bolt are in the clutch and drive are hand tight, tighten the bolts in a cross pattern as you would a wheels lug nuts *Snug the bolts used to attached the clutch and drive firmly 1/8 to 1/4 turn past snug *Make sure you clock the stator to the correct position, again hand tighten bolts then final tighten in a cross pattern. *The nut and washer in the rotor tighten to 1/4 to 1/2 turn past snug, its tight. *The large 38 MM nut on the top of the drive assembly torque is 88 ft lbs. Have a partner or friend hold the tub while you torque the large nut. If you don't have a torque wrench you can rent one from a number of auto-part chain stores. *I used a 1/2 Impact gun to remove the 38mm nut, Never use that kind of power to reassemble as it will damage parts.
I diagnosed by running a full wash. I watched it and when the water should have stopped it kept running. I unplugged the washer from the power and the water kept running. This told me the inlet valve was the issue and not an electronic issue. I stopped the water by closing the water valve manually. Replacing the inlet valve was very easy
... Read more. Hardest part is moving the washer out of the laundry room. The videos online show very simple steps. Maybe 8 screws to remove and a couple of hoses and five electronic connectors. Take a photo of connectors before removing them to ensure you reconnect properly.