Your coupon for will be reflected when you check out!
✖
Your coupon for
✖
Hello!
You're visiting the PartSelect site in U.S.
Would you like to shop on the Canadian site?
Stay on this site
Go to Canadian site
✖
Model Number Locations
1Select Category Type
Select Category Type
2Select Product Type
Select Product Type
3Select {MODEL} Type
Select {MODEL} Type
Sample Model Number Tags
Model numbers can be made up of numbers (1005400, for example) or a combination of letters and numbers (LAT1000AAE). The model number will most likely appear on either a paper sticker or a metal plate. Your appliance's model number tag may look similar to the sample model number tags shown here (model number highlighted in yellow):
Model has been saved to My Models. If you're not signed in, your lists are available on this device and will expire within 30 days.
Model has been saved to My Models.
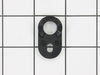
This evaporator fan motor grommet, or condenser fan grommet is built for refrigerators. It provides a cushion between the fan motor and the motor mounting bracket. It is made or round, black plastic a...
$13.95
In Stock
Order within the next 7 hrs and your part ships today!
This 40-Watt light bulb is sold individually and is a genuine OEM replacement option for your home appliances. It is specially designed to withstand extreme temperatures, so this bulb is compatible wi...
$19.10
In Stock
Order within the next 7 hrs and your part ships today!
This part comes with 3 round pin connection terminals.
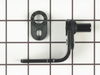
This fan motor circulates the air through the refrigerator grille and cools the compressor and condenser coils. It also helps to evaporate extra...
$215.62
In Stock
Order within the next 7 hrs and your part ships today!
This genuine GE Freezer Wire Shelf, also known as SHELF FZ, is an essential replacement part designed for maintaining your GE freezer's functionality. This sturdy wire shelf ensures ample and organize...
Our refrigerator is a double door unit with ice and water in the left door. The right door was the one with the problem. It was 5:15 AM when the problem occured. I could see that the door was out of alighnment and had dropped down - preventing it from closing. I lifted the door and closed it. I wrote down the model number and found a
... Read more detailed drawing of the appliance on the web site "partselect.com". When the hing earrived I compared it to the broken one. I removed all the food stored on the door, put several pieces of wood under the door to shim it to the same height as the adjacent door. I then removed two bolts from the refrigerator with a 1/4" socket set. I put the shim from the old hing aside for later. I removed two bolts from the door with the same socket -Note a metal tab had to be bent silghtly so the wrench could go on the head of the bolt- I removed the plastic cam and made note of its orientation and that of the shim above it on the door. I put the shim and new cam in place on the door and installed the 2 bolts. I inserted the pin of the new hing into the hole in the cam (I had just mounted) on the door. I put the shim (the one put aside earlyer) behind the hing and replaced the two bolts. I held the shim and hing up against the door as I tightened the two bolts. When I was satisfied that the bolts were tight I removed the wooden blocks that were holding the door up so the door was supported by the new bottom hing assembly. The door now opperates perfectly and the refrigerator was not taken out of service for the repair. Total time including cleanup was a little over 15 minutes.
Unplugged refrigerator, removed three screws to take out part, disconnected the wires and removed bad unit. Removed fan blade from old unit and attached to the new unit. Attached wires, placed the new motor back in. Plugged it back in, within 20 minutes panel between freezer and refrigerator was cool to touch.
This is a sibe-by-side refrigerator/freezer that needed a new lower hinge set for the fridge door.
First I removed everything from inside the fridge door, closed it, then loosened the top hinge bolts with an 8mm socket on a 1/4-inch ratchet. Using an 8mm nutdriver, I removed one bolt and loosed the other just far enough to be
... Read more able to lift the hinge and swing it out of the way. (These bolts are long. The nutdriver is faster than the ratchet but you need a ratchet or a wrench to first break them loose.) Then I just lifted the door off the bottom hinge and set it aside.
The plastic lower front grill was covering the lower hinge but that grill is just held at the ends by spring clamps -- popped off easily so I could get to the hinge bolts. Again, 8mm bolts, just remove & replace hinge. I also had to replace the upper half of the door closer cam, which is screwed to the bottom of the door, being careful that the holes lined up: cam, shim, door holes.
Now the tricky part was lifitng the door back on the lower hinge. (It helps to have an assistant at the bottom to locate the hole for you.) Once the door was up, I swung the top hinge over, ran the two bolts in finger tight with my nutdriver, checked & adjusted the spacing* of the fridge door and tightened the bolts. This was all very easy! (*^_^*)
*On a side-by-side, you'll want the door to be straight up & down with a consistent gap top to bottom with the freezer door. The hinge has some slack for adjustment by positioning the door, then tightening the bolts. You'll see what I mean.


 – Part Number: 40A15")