


793396 LG Washer Dryer Combo - Overview
Models starting with 793396
Click on the best match to narrow your results.
Keep searches simple, eg. "belt" or "pump".

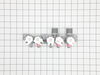
Water Inlet Valve
PartSelect #: PS12374721
Manufacturer #: AJU75152601
This is an authentic LG water inlet valve for a top-load washer. It is designed to control the flow of water into the washer. If your washer is filling slowly, making loud noises, overflowing, or stop...
$147.13
In Stock

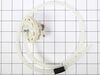
Washer drain Hose Assembly
PartSelect #: PS8749199
Manufacturer #: AEM73732901
This drain hose is a genuine OEM replacement part supplied by LG for use in their washing machines. It is a light gray pipe with a diameter of 1.25 inches. The drain hose is connected to the drain pum...
$44.04
In Stock

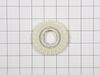
Washer Switch Assembly sensor
PartSelect #: PS3529177
Manufacturer #: 6501EA1001R
This water-level pressure switch in your wash monitors and regulates the water levels throughout the fill, wash, and rinse cycles. You will usually find it inside the control panel or near the tub. It...
$63.16
In Stock

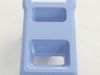
Cap,Softener
PartSelect #: PS3534726
Manufacturer #: MBL62061501
This part is the replacement fabric softener cap for your washer. It is also known as the washer dispenser drawer insert. It is made of blue plastic and is approximately 4 1/4 inches by 2 1/4 inches. ...
$38.99
In Stock

Coupling
PartSelect #: PS3534815
Manufacturer #: MCJ61861201
Ensure smooth functioning of your LG washer with our genuine LG Washer Shifter Coupling. This vital part helps your washer shift seamlessly between agitation and spin mode, enhancing the efficiency of...
$38.99
In Stock


Common Symptoms of models starting with 793396
[Viewing 7 of 7]Leaking
Fixed by
these parts
these parts

Show All
Water Filling Issues
Fixed by
these parts
these parts
Show All
Spinning Issues
Fixed by
these parts
these parts
Show All
No hot or cold water
Fixed by
these parts
these parts
Show All
Will Not Start
Fixed by
these parts
these parts
Show All
Does not dispense fabric softener or detergent
Fixed by
these parts
these parts
Show All
Draining Issues
Fixed by
these parts
these parts
Show All
Keep searches simple. Use keywords, e.g. "leaking", "pump", "broken" or "fit".
Water continued leaking into washer after the end of cycle through the water inlet valve.
-
Flora from MIAMI, FL
-
Difficulty Level:Very Easy
-
Total Repair Time:30 - 60 mins
-
Tools:Screw drivers, Wrench (Adjustable)
12 of 17 people
found this instruction helpful.
Was this instruction helpful to you?
Thank you for voting!
Water overflow in washer basin
I diagnosed by running a full wash. I watched it and when the water should have stopped it kept running. I unplugged the washer from the power and the water kept running. This told me the inlet valve was the issue and not an electronic issue. I stopped the water by closing the water valve manually. Replacing the inlet valve was very easy
... Read more
. Hardest part is moving the washer out of the laundry room. The videos online show very simple steps. Maybe 8 screws to remove and a couple of hoses and five electronic connectors. Take a photo of connectors before removing them to ensure you reconnect properly.
Read less
Parts Used:
-
Ed from LAKE WORTH, FL
-
Difficulty Level:Really Easy
-
Total Repair Time:30 - 60 mins
-
Tools:Pliers, Screw drivers
10 of 14 people
found this instruction helpful.
Was this instruction helpful to you?
Thank you for voting!
Washer was slowing filling with water when turned off.
The problem was the valve suppling water to the bleach dispenser was not closing completely. This also caused some water leaking towards
the front of the washer. Replacing the entire valve assembly was very
easy. Unplug the washer, turn off the water, remove the 2 screws that attach the control panel, disconnect the water supp ... Read more lies, unplug the 5 solenoids, remove the hose clamps from the 2 hoses, remove the 3
screws that attach the valve assembly and remove it. Reassemble in reverse order, I did find that applying some water based personal lubricant to the 3 high pressure seals made assembly much easier.
Read less
Parts Used:
-
Michael from La Honda, CA
-
Difficulty Level:Very Easy
-
Total Repair Time:30 - 60 mins
-
Tools:Pliers, Screw drivers
8 of 11 people
found this instruction helpful.
Was this instruction helpful to you?
Thank you for voting!