


81073 LG Dryer - Overview
Sections of the 81073
[Viewing 1 of 1]
Keep searches simple, eg. "belt" or "pump".
 – Part Number: 4581EL2002L")
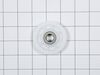
Roller Assembly (Pack of 4)
PartSelect #: PS17269866
Manufacturer #: 4581EL2002L
This part is sold individually. The drum support roller is found in your dryer. It is used to hold the drum in place in the cabinet while letting the drum rotate on the support rollers. It is recommen...
$144.18
In Stock

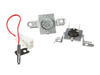
Hi-Limit Thermostat And Thermistor Kit
PartSelect #: PS16878105
Manufacturer #: AGM30045804
This dryer thermistor temperature sensor helps monitor and regulate the temperature inside a dryer. This part includes the wire harness. If your dryer overheats, does not produce enough heat, or takes...
$93.89
In Stock

Dryer Thermostat
PartSelect #: PS3530485
Manufacturer #: 6931EL3003D
This thermal fuse acts as a high-limit thermostat, and shuts off the heating element when the dryer overheats by cutting off power to the dryer. If the thermal fuse has blown, the dryer will not start...
$17.80
In Stock


Lint Filter
PartSelect #: PS7787727
Manufacturer #: ADQ73373201
This lint filter assembly for your dryer catches lint and debris from your clothes. You can find it near the door. It helps keep the air flowing properly and stops lint from blocking the exhaust ducts...
$73.45
In Stock

Dryer Thermostat Assembly
PartSelect #: PS3530482
Manufacturer #: 6931EL3001F
This is a thermostat for various models of LG dryers. This thermostat specifically is the rear high limit thermostat, and it is designed as a safety device to shut off power to your dryer if the inter...
$63.22
In Stock

Safety Switch Assembly
PartSelect #: PS16551445
Manufacturer #: EBF61496102
Introducing the LG Dryer Safety Switch Assembly, a crucial and authentic product for your LG Dryer. This switch assembly, emphasizing safety, is diligently crafted to prevent your dryer from operating...
$44.83
In Stock

Pulley Idle
PartSelect #: PS3523032
Manufacturer #: 4560EL3001A
This genuine LG product is an Idle Pulley meticulously designed for LG electric dryers. It plays a crucial role in maintaining the correct tension on the drive belt, enabling it to spin the drum effec...
$28.31
In Stock

Heating Element Assembly
PartSelect #: PS3527791
Manufacturer #: 5301EL1001J
They are all strung with a coiled wire made of a nickel and a chrome alloy. This wire receives, but resists, a controlled electric current and as a result, the wire heats up. The heat produced is used...
$238.26
In Stock

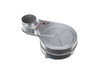
Blower Wheel
PartSelect #: PS3528491
Manufacturer #: 5835EL1002A
Get your dryer back to optimum performance with the LG Blower Wheel. Specially designed and engineered to precise specifications, this genuine OEM part attaches directly to the drive motor shaft, enha...
$93.05
In Stock

RACK
PartSelect #: PS7796052
Manufacturer #: MGR62082001
This dryer rack is designed to fit seamlessly inside LG front-load dryers. It measures approximately 29 inches. The rack is positioned inside the dryer where it provides a flat surface for items like ...
$23.06
In Stock

Exact Part matches for your search term
[Viewing 1 of 1]
SVC-INNER DOOR PROTECTOR;81073,DO130
This part number matches the current model number 81073
PartSelect #: PS16630204
Manufacturer #: DE81-06312A
$33.95
Special Order
Questions And Answers for 81073
We're sorry, but our Q&A experts are temporarily unavailable.
Please check back later if you still haven't found the answer you need.
Common Symptoms of the 81073
[Viewing 4 of 4]Noisy
Fixed by
these parts
these parts


Show All
Not Heating
Fixed by
these parts
these parts

Show All
Won’t Start
Fixed by
these parts
these parts
Show All
Drum Not Spinning
Fixed by
these parts
these parts
Show All
")


Keep searches simple. Use keywords, e.g. "leaking", "pump", "broken" or "fit".
Dryer making a thumping and squealing noise when running
Had to replace front drum support rollers. Removed screws underneath top in back that held bracket that keeps top in place. Slid top towards rear and lifted up. Removed 4 screws that hold plastic front panel in place (inside..2 on each corner) Unplugged front panel electric plugs to remove panel. Opened door..removed 2 screws at bottom of
... Read more
door opening. Removed screws on top of front panel. Unplugged door switch plug. Removed front panel. Removed right front roller with 9/16th wrench for nut. Adjustable for back of stud. Lifted up on drum to get roller out. Reversed to install. Left roller a bit harder to get to stud. Removed and installed same as right side. Did not attempt to replace rear rollers. Have them if needed but very much more involved to replace.
Read less
Parts Used:
-
Mark from WAVERLY, OH
-
Difficulty Level:Easy
-
Total Repair Time:30 - 60 mins
-
Tools:Screw drivers, Wrench (Adjustable), Wrench set
109 of 139 people
found this instruction helpful.
Was this instruction helpful to you?
Thank you for voting!
Dryer would run with no heat
I actually went to mr fix it on u tube. Great instruction on how to take dryer apart. First I unplugged the dryer. I found I could reach the heating system by removing the lint tube in the back of the dryer. I put my I phone with the light on inside the back of the dryer and tested the connections to see if all were working. The thermal f
... Read more
use was not working. I removed the two wires , red on top and white on the bottom. Then used a small Phillips screwdriver to remove the two mounting screws and removed the fuse. I then used a vacuum to clear any lint from the back of the dryer and inside the dryer. This took me about an hour and a half. I did it this way because I did not want to disassemble the entire dryer to get to the components. I received the fuse in 3 days and tested it. It was fine. I then put it in the dryer screwed it in place, connected the wires. Replaced the lint tube. This took about 10 minutes. Dryer is running great.
Read less
Parts Used:
-
Richard from ORMOND BEACH, FL
-
Difficulty Level:Easy
-
Total Repair Time:30 - 60 mins
-
Tools:Screw drivers
87 of 100 people
found this instruction helpful.
Was this instruction helpful to you?
Thank you for voting!
Screeching during operation
Found disassembly video and watched several times. Suspected that one of the drum wheels had seized up. Found extreme volume of lint and hair inside unit as well as a dryer sheet melted on top of heating unit. Front left drum wheel was worn down from lint and hair jamming its movement. Video made it easy, not a really complicated piec
... Read more
e of machinery. Replaced all 4 wheels due to normal wear on other three. Wanted to be sure drum evenly balanced on all 4. Parts came quickly and were easy to install. My sister and I did this together. Would not recommend doing it alone. Took time to vac and wipe down entire unit. Now it runs so quiet we have to look to see if it is operating. Got a brand new machine out of it, saved a couple of hundred dollars in repair bills, and found 11 cents inside the machine. For your own piece of mind, if you have had your dryer for several years, you need to open it up and clean it out. Its not hard... added note, we are both in our 60's... so if we can do it so can you.... Such a feeling of accomplishment, can't buy that in a store....
Read less
Parts Used:
-
CAROL from NAMPA, ID
-
Difficulty Level:Really Easy
-
Total Repair Time:More than 2 hours
-
Tools:Pliers, Screw drivers
59 of 86 people
found this instruction helpful.
Was this instruction helpful to you?
Thank you for voting!