


ABS45DF1BS General Electric Range - Overview
Sections of the ABS45DF1BS
[Viewing 3 of 3]


Keep searches simple, eg. "belt" or "pump".

Bake Element
PartSelect #: PS17626202
Manufacturer #: WB30X46987
The bake element is located on the bottom of the oven. If your oven will not heat properly it may be due to a faulty or damaged baking element. If you can see that the element has been separated or bl...
$87.95
In Stock

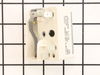
Range Burner Switch For 8 Inch Burner
PartSelect #: PS236750
Manufacturer #: WB24T10025
The 8-inch surface element switch is also known as an infinite heat switch, and is a part for your range. It controls the large surface element. It will turn the element on and off, and allow you to c...
$41.95
In Stock
 – Part Number: 40A15")
Light Bulb (40W)
PartSelect #: PS217532
Manufacturer #: 40A15
This 40-Watt light bulb is sold individually and is a genuine OEM replacement option for your home appliances. It is specially designed to withstand extreme temperatures, so this bulb is compatible wi...
$19.10
In Stock

Range Surface Element Control Switch 6 Inch 1560 W
PartSelect #: PS236754
Manufacturer #: WB24T10029
This switch controls the small burner on a range/stove top.
$47.95
In Stock

BROIL ELEMENT
PartSelect #: PS17626201
Manufacturer #: WB30X46986
This broil element is found on the roof of the oven.
$73.21
In Stock

GASKET DOOR ASM
PartSelect #: PS12577485
Manufacturer #: WB35X29720
This oven door gasket prevents heat from escaping the oven cavity when in use. It contains all of the attaching clips needed for installation.
$27.95
In Stock


RECEPTACLE PUSH-IN
PartSelect #: PS752188
Manufacturer #: WB08T10026
This part is the replacement light socket for your oven. The oven light socket provides power to the light, and at the same time holds the light bulb in place.
$15.95
In Stock

Surface Burner Switch - 8 Inch - 2100W
PartSelect #: PS236752
Manufacturer #: WB24T10027
This switch controls the large burner on a range/stove top.
$95.99
In Stock

Range Leg Leveler
PartSelect #: PS2339673
Manufacturer #: WB02K10182
Ensure the stability of your GE range with this leveling leg. An essential accessory for your appliance, it helps maintain balance and provides support. With its adjustable design, you have the abilit...
$14.95
In Stock

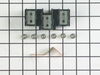
Terminal Block Kit
PartSelect #: PS953027
Manufacturer #: WB17T10011
This part provides a way of connecting individual electrical wires and offers protection of the device from electrical surges (voltages and/or currents).
$56.38
In Stock

Range Screw
PartSelect #: PS222157
Manufacturer #: WB01T10008
This part is a replacement screw for your oven. It is made of black metal and is sold individually. This screw is approximately 1/4 inch in diameter and about 1/2 inch in length. It is designed to con...
$13.95
In Stock
Questions And Answers for ABS45DF1BS
We're sorry, but our Q&A experts are temporarily unavailable.
Please check back later if you still haven't found the answer you need.
Common Symptoms of the ABS45DF1BS
[Viewing 6 of 6]Element will not heat
Fixed by
these parts
these parts


Show All
Little to no heat when baking
Fixed by
these parts
these parts
Show All
Little to no heat when broiling
Fixed by
these parts
these parts

Show All
Oven not heating evenly
Fixed by
these parts
these parts

Show All
Will Not Start
Fixed by
these parts
these parts
Show All
Oven is too hot
Fixed by
these parts
these parts
Show All


Keep searches simple. Use keywords, e.g. "leaking", "pump", "broken" or "fit".
Lower bake Element would not heat.
First I slid the stove out and unpluged it, then removed two screws,slid out element, disconected two wires, slid new element in to place, pluged two wires in ,put into place and installed two screws, pluged stove back in, and turned on to try. Works perfect.
Parts Used:
-
Ronald from Nassau, NY
-
Difficulty Level:Really Easy
-
Total Repair Time:Less than 15 mins
-
Tools:Nutdriver, Pliers
227 of 254 people
found this instruction helpful.
Was this instruction helpful to you?
Thank you for voting!
The switches failed on both front burners.
Remove nobs from both switches.
Pull out the range (the hardest part).
REMOVE THE POWER PLUG FROM THE WALL
Remove 7 screws with nut driver and take off upper back panel.
Remove 2 phillips screws from front, they hold the switch brackets.
The new switches don't fit in the bracket so discard the bracket keeping the ... Read more screws.
Removing 1 wire at a time from the old switch transfer to the new noting the letter/number ie "H1 P1" combos they are all there just not in the same places on the new switch.
When wiring is complete, using the bracket ,screws from the front screw on the switches.
Replace the back panel with 7 screws.
In my case the old nobs did not fit the shafts of the new switches. I found some at the local hardware store. I bought 4 for $0.29 each! I expect to be replacing the other burner switches shortly.
Read less
Parts Used:
-
Marc from Columbia, NJ
-
Difficulty Level:Easy
-
Total Repair Time:15 - 30 mins
-
Tools:Nutdriver, Screw drivers
97 of 105 people
found this instruction helpful.
Was this instruction helpful to you?
Thank you for voting!
Broken heating element
1)Turn off power to stove
2)remove 2 bolts holding heating element
3)pull element out of the back of the oven about 8" so that the wire connects is visable
4)pull wire clips off of heating element and remove element from the oven
5)put wire clips on the new heating element
6)push new heating element back into the ... Read more holes in the back of the oven
7)screw botls back into the oven holding the heating element in place
8)Turn power back on
Read less
Parts Used:
-
Paul from anna, TX
-
Difficulty Level:Really Easy
-
Total Repair Time:15 - 30 mins
-
Tools:Nutdriver, Pliers
74 of 87 people
found this instruction helpful.
Was this instruction helpful to you?
Thank you for voting!