Your coupon for will be reflected when you check out!
✖
Your coupon for
✖
Hello!
You're visiting the PartSelect site in U.S.
Would you like to shop on the Canadian site?
Stay on this site
Go to Canadian site
✖
Model Number Locations
1Select Category Type
Select Category Type
2Select Product Type
Select Product Type
3Select {MODEL} Type
Select {MODEL} Type
Sample Model Number Tags
Model numbers can be made up of numbers (1005400, for example) or a combination of letters and numbers (LAT1000AAE). The model number will most likely appear on either a paper sticker or a metal plate. Your appliance's model number tag may look similar to the sample model number tags shown here (model number highlighted in yellow):
Model has been saved to My Models. If you're not signed in, your lists are available on this device and will expire within 30 days.
Model has been saved to My Models.
This an authentic OEM 40-Watt replacement light bulb, used in a number of household appliances. It is specially designed to withstand extreme temperatures, which is why these replacement bulbs are mos...
$17.80
In Stock
Order now and your part arrives in 2-3 business days!
This part is for oven ranges, it connects individual wires and protects the device from electrical surges, voltages, and current. With this part, the house power is connected to the range wire harness...
$26.95
In Stock
Order now and your part arrives in 2-3 business days!
This is cookware designed for use in your range or oven. It is a two-piece dish that is used to grill or cook food while the broil function is on, meaning it can withstand high temperatures. This set ...
$47.20
In Stock
Order now and your part arrives in 2-3 business days!
This bottle of non-abrasive cooktop cleaner breaks down and gets rid of the hardest baked-on stains and residue without causing any harm to your appliance. The bottle is 10 oz and does not require a l...
Use this scraper for your ceramic/glass cooktop. It has a retractable blade and is an all-purpose tool for cooktops, mirrors, windows and tile. Use it to also remove paint, paper, dirt, stickers and more.
$8.89
In Stock
Order now and your part arrives in 2-3 business days!
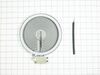
This surface element is made for under glass set-ups and supplies the heat to a cooking area on top of the range. It has an outside diameter of approximately 7 inches (1500 watts), and is a genuine OE...
$93.60
In Stock
Order now and your part arrives in 2-3 business days!
The hinge kit, or oven door hinge, is used in ranges and wall ovens. The hinge attaches to the right side of the door and controls how fast the door opens. At a specific angle, it allows the door to r...
Turned off power to unit. Tilted up Glass top and removed two screws holding rear hinges to range. Then I unplugged wire harness from lower range and placed the Glass top facing down on counter top with towel for cushion. Removed 1 screw holding center of burner to support frame, two alignment screws on perimeter, and two screws hol
... Read moreding support frame to glass top. This allowed me to slide out the old element with all wiring connections intact. Placed the new assembly in same location under support frame, noting numbered positions of two alignment screws from old unit. This is necessary to properly align heater to surface glass. Replaced all screws connecting burner to frame. Then I removed each wire one-by-one from old unit, reconnecting to same location on new unit.
Replaced top in reverse order from removal. Powered on the circuit breaker and verified proper operation of dual unit with large/small selecttor switch. Total time to repair about 30 minutes.
This is a very easy repair as the sensor had 2 screws and slid out of the back of the inside of the oven just enough to hook up the new one. I never had to back the oven out of the wall. It is a 5 minute repair. Ok I did use my son's head lamp from scouts for better light as you have to kill the power to the oven, so no oven light. And yo
... Read moreu can't hold a flashlight and do this alone.
However, I ordered the part before I took the old part out. Don't do that. There are 2 froms of Temp sensors that you can order one male and one female. I did not know that and just ordered what looked to be the right part. It turned out that I needed the female sensor. When I called the folks at part select they were terrific! They sent out the new part the next day and a UPS form via email to send the other part back.
I don't know what a service call would have been but this was very easy. I will go here first for appliance parts. Women can fix stuff too!


.gif "SUPPLEMENTAL INFORMATION Diagram and Parts List for PACS7270AW0 Amana Range")

 – Part Number: 8009")


")


