


AGBS300EP1WW General Electric Range - Overview
Sections of the AGBS300EP1WW
[Viewing 4 of 4]


Keep searches simple, eg. "belt" or "pump".

Range Rack
PartSelect #: PS6447646
Manufacturer #: WB48T10095
The oven rack is sold individually. It is chrome in color and measures approximately 24 inches wide by 17-1/2 inches deep. The rack is used to hold cookware in the oven and slides back and forth for e...
$64.63
In Stock

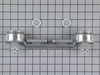
Double Burner Assembly
PartSelect #: PS232404
Manufacturer #: WB16K10026
Both burners are mounted on the same bracket.
$56.38
In Stock

Oven Thermostat
PartSelect #: PS235170
Manufacturer #: WB20K8
This part establishes and maintains the internal temperature of the oven cavity.
$144.35
In Stock

Range Knob
PartSelect #: PS225983
Manufacturer #: WB03K10034
This knob accepts a D shape shaft. Sold individually.
$34.95
In Stock

Broiler Pan - Large
PartSelect #: PS1517612
Manufacturer #: WB48X10056
This large broiler pan is found in the bottom of your oven and is used to catch drippings from broiling foods. This part includes the grate and bottom pan and is made of porcelain. The grate measures ...
$40.95
In Stock

Range Leg Leveler
PartSelect #: PS2339673
Manufacturer #: WB02K10182
Ensure the stability of your GE range with this leveling leg. An essential accessory for your appliance, it helps maintain balance and provides support. With its adjustable design, you have the abilit...
$14.95
In Stock

Natural Gas Orifice
PartSelect #: PS240693
Manufacturer #: WB28K10033
Sold individually.
$28.95
In Stock

Handle Spacer
PartSelect #: PS221948
Manufacturer #: WB01K10020
This spacer is located between the handle and the outside door panel. They are sold individually, and are usually recommended to be purchased in pairs.
$13.95
In Stock

Screw
PartSelect #: PS221932
Manufacturer #: WB01K10002
Size: 8-32 inch Sold individually.
$31.95
In Stock

Range Line Cord
PartSelect #: PS1481000
Manufacturer #: WB18K10036
Upgrade your range with the GE Power Line Cord. Designed specifically for GE gas ranges, this sturdy and reliable power cord ensures a safe and efficient connection to your power supply. Prior to inst...
$34.95
In Stock


Manuals & Care Guides for AGBS300EP1WW
Click to downloadQuestions And Answers for AGBS300EP1WW
We're sorry, but our Q&A experts are temporarily unavailable.
Please check back later if you still haven't found the answer you need.
Common Symptoms of the AGBS300EP1WW
[Viewing 7 of 7]Oven is too hot
Fixed by
these parts
these parts
Show All
Will Not Start
Fixed by
these parts
these parts
Show All
Gas igniter glows, but will not light
Fixed by
these parts
these parts
Show All
Element will not heat
Fixed by
these parts
these parts
Show All
Little to no heat when baking
Fixed by
these parts
these parts
Show All
Gas smell
Fixed by
these parts
these parts
Show All
Oven not heating evenly
Fixed by
these parts
these parts
Show All


Keep searches simple. Use keywords, e.g. "leaking", "pump", "broken" or "fit".
The oven stayed on after the switch was turned off
Check the switch with an ohm meter, 0 resistance in the closed position = a bad switch. I went to the web site found the part. ordered it next day it shows up. Removed the pot grids and all control knobs for the burners and oven lifted the top of the stove up, and off. I removed face plate behind the control knobs 3 screws, I removed the
... Read more
2 screws holding the oven switch. opened the oven and un cliped the thermostat wire from the back wall. Uncoiled new wire feed under the burner shield to the back of the unit and back down the old hole cliped in the new wire. put the 2 screws into the new switch and re-assembled the rest in the reverse order i took it off . all this while watching my 11 month old grandaughter.
Read less
Parts Used:
-
robin from Merrill, WI
-
Difficulty Level:Easy
-
Total Repair Time:30 - 60 mins
-
Tools:Nutdriver, Screw drivers
94 of 118 people
found this instruction helpful.
Was this instruction helpful to you?
Thank you for voting!
Oven wouldn't light
Checked switch using test meter and found voltage going in but no voltage out when switch was turned on. Removed all burner knobs, raised top cover and disconnected two wires from thermostat switch. Removed the thermostat probe from oven interior by pushing it through hole in top. Removed two screws holding switch and pulled out entire as
... Read more
sembly. Used a wire coat hanger pushed through hole for probe so I could see where to fish the probe into the oven. Hooked up electrical connections and tested. Everything worked well.
Received part from Partselect in one business day. Excellent service and response.
Received part from Partselect in one business day. Excellent service and response.
Read less
Parts Used:
-
Harold from Carpentersville, IL
-
Difficulty Level:Easy
-
Total Repair Time:1- 2 hours
-
Tools:Screw drivers
41 of 50 people
found this instruction helpful.
Was this instruction helpful to you?
Thank you for voting!
oven Thermostat stem broken
The repair was fairly easy, you take off all the burner knobs there are small screws on the face of the cover panel and a few on the bottom That come off the cover panel should come off after you remove the screws and the switch for the oven light the wires just clip on the switch there are two .the thermostat is held on by two small scr
... Read more
ews that are on the cover panel.you lift up the burner panel you have room to feed the thermostat wire in the stove,there is a small hole in the back were you feed the wire through then the metal part is held in place by two small clips that are in the oven on the back wall.I didnt have to trouble shoot becase I knew what part I needed because it was broken,It was a fairly easy repair hopefully this is helpful
Good Luck
Good Luck
Read less
Parts Used:
-
Joseph from Bartlett, IL
-
Difficulty Level:Easy
-
Total Repair Time:30 - 60 mins
-
Tools:Screw drivers
39 of 45 people
found this instruction helpful.
Was this instruction helpful to you?
Thank you for voting!