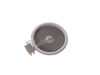
This an authentic OEM 40-Watt replacement light bulb, used in a number of household appliances. It is specially designed to withstand extreme temperatures, which is why these replacement bulbs are mos...
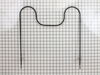
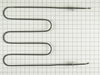
This is a 2800 watt, 240-volt Whirlpool oven bake element that is sourced directly from the original manufacturer for stoves, ovens, cooktops, or range ovens. This part should be replaced if the eleme...
This long oven sensor is also commonly known as a temperature sensor. It is designed for use with ovens and ranges. It is similar to a thermostat; it measures and regulates the internal temperature of...
This is a multi-use and multi-appliance screw. It can be used on a microwave, refrigerator, range/oven, air conditioner, dehumidifier, washer, or dryer. The measurements of this screw are 8 x 1/2 inch...
This is a replacement oven rack and it is designed for use with ranges and ovens. This is a genuine OEM replacement part. The rack provides a level and stable surface for cookware inside of your appli...
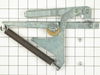
This infinite switch is for 8-inch range burners. When an element is unable to produce any heat on a modern oven, the problem may lie with the infinite switch. This switch is responsible for sending p...
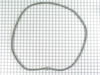
The oven door gasket on your range functions as a seal between the warm interior of your oven, and the outside. It prevents heat from fleeing your oven when the door is closed. Before making any repai...
This part is for oven ranges, it connects individual wires and protects the device from electrical surges, voltages, and current. With this part, the house power is connected to the range wire harness...
put the new element in the oven pushed wire onto connector on element held it up to match holes and put the screws back in, very easy to change. I really like the fast way I receive a part from you.
Unscrewed 2 screws holding terminal ends of the element in place. Eased the element out, until the two AC power wires were exposed. Pulled off the connectors from the element terminals (pretty tight fit - needed pliers to remove one of them).
Slipped the connectors onto the new element terminals, and eased the element back int
... Read moreo the oven wall. Secured the element with the two screws removed previously, and that was pretty much all there was to it. Closed the circuit breakers, and the element tested OK.
Overall, a no-sweat job. One thing, though: I squeezed the oven connectors tight before pushing them back onto the new element. They had loosened up somewhat after pulling them off. A tight connection here seems pretty important, as arcing and corrosion could occur over time if they're too loose.
Removed the oven door by opening slightly, then pic door up to remove. Remove 2 screws holding oven sensor in place, gently pull on sensor to remove, had to remove about 8 inches to get at plastic connector. Unplug connector, had to use an adapter cable supplied with the PartSelect kit to install new sensor, push cable back into opening,
... Read morereinstall 2 screws. The oven works fine! Note that due to thermal lag the temperature overshoots to 370 degrees and undershoots to 340 degrees, this appears to be normal oven operation. Putting door back in place was easy.