


CTC912P2N1S1 General Electric Microwave - Overview
Sections of the CTC912P2N1S1
[Viewing 10 of 10]


Keep searches simple, eg. "belt" or "pump".

Microwave Fuse
PartSelect #: PS1481237
Manufacturer #: WB27X10928
This ceramic microwave fuse is just over an inch in length. It is white in the center, and metal on both ends. This is a 20-amp fuse, and is used to power your microwave. If the touch pad on the micro...
$19.95
In Stock

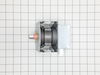
Microwave Door Interlock Switch
PartSelect #: PS237015
Manufacturer #: WB24X10047
This interlock switch is located in the door latch.
$42.95
In Stock

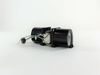
HALOGEN LAMP
PartSelect #: PS16216934
Manufacturer #: WB02X35488
Introducing the GE Halogen Lamp, an essential component for your beloved appliance. This halogen lamp is specifically designed by GE to yield optimum performance and long life. Its prime function is t...
$24.95
In Stock

Meat Probe Thermistor
PartSelect #: PS1481046
Manufacturer #: WB20T10024
This probe is used to check the internal temperature of the meat to ensure proper temperature is reached. Also known as a Meat Probe.
$56.38
In Stock

Screw
PartSelect #: PS271689
Manufacturer #: WH2X930
This screw is sold individually.
$13.95
In Stock

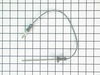
Cable Assembly
PartSelect #: PS16219547
Manufacturer #: WB27X35382
This part is the replacement high-voltage diode for your microwave. It is approximately 3 inches long and is sold individually. The high voltage diode is an electrical current control device inside yo...
$16.95
In Stock

Wall Oven Door Window Assembly
PartSelect #: PS11766932
Manufacturer #: WB56X27480
The Door window assembly is the heat resistant glass and frame in the centre of the oven door.
$170.95
In Stock

Monitor Interlock Switch
PartSelect #: PS11766871
Manufacturer #: WB24X25397
This is the replacement monitor switch for your microwave. It is black in color and measures approximately 1 inch by ¾ of an inch. This switch monitors the door latch position of your microwave and co...
$36.95
In Stock


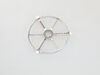
Microwave Rotating Ring Assembly
PartSelect #: PS12709805
Manufacturer #: WB02X32600
This glass tray support ring, also known as a rotating ring, is specially designed for microwaves. It is a genuine OEM part that is guaranteed to fit just like the original part. The support ring is f...
$70.51
In Stock


TRAY GLASS
PartSelect #: PS16873477
Manufacturer #: WB27X43590
This tray rotates in your microwave ensuring more even temperatures.
$117.07
In Stock
Questions And Answers for CTC912P2N1S1
We're sorry, but our Q&A experts are temporarily unavailable.
Please check back later if you still haven't found the answer you need.
Sort by:
- < Prev
- 1
- Next >
Search filter:
Clear Filter
Your search term must have 3 or more characters.
Keep searches simple. Use keywords, e.g. "leaking", "pump", "broken" or "fit".
Sorry, we couldn't find any existing answers that matched.Try using some different or simpler keywords, or submit your new question by using the "Ask a Question" button above!
Bruce
March 10, 2023
Oven and microwave will not turned on. Display is not turning on. There is power to the unit.
For model number CTC912P2N1S1
Hi Bruce, thank you for contacting us. According to our research, we would recommend checking the control panel, part number PS12753799, control board, part number PS12722613, and the power control board, part number PS12722612. We hope this solves your problem!
Was this helpful?
Thank you for voting!
Related Parts:


- < Prev
- 1
- Next >
Common Symptoms of the CTC912P2N1S1
[Viewing 8 of 8]No heat
Fixed by
these parts
these parts


Show All
Won’t turn on
Fixed by
these parts
these parts


Show All
Touchpad does not respond
Fixed by
these parts
these parts

Show All
Tray won’t turn
Fixed by
these parts
these parts


Show All
Doesn’t shut off
Fixed by
these parts
these parts

Show All
Will Not Start
Fixed by
these parts
these parts

Show All
Oven is too hot
Fixed by
these parts
these parts

Show All
Will not program
Fixed by
these parts
these parts
Show All
Keep searches simple. Use keywords, e.g. "leaking", "pump", "broken" or "fit".
Microwave completely stopped working
Turned out the issue was easily solved by replacing a single, inexpensive fuse.
First off, UNPLUG THE MICROWAVE.
The fuse is located under the plastic grill at the top of the microwave. It's held on by two screws. Once you've removed the screws and taken off the plastic grill, you go to the right side of the mic ... Read more rowave and remove another screw that holds a small metal grill in place. Removing the small metal grill is probably the toughest part of this repair. You kind of have to rock it back and forth a bit to get it to release. Once that's off, you can get to the fuse. I removed the burnt out one with a pair of needle nose pliers. I also put a small piece of cardboard under the fuse when I did this so I didn't accidentally drop it into the innards of the microwave. I did the same thing when I replaced the new fuse. I then plugged the appliance back in and made sure it worked. Once that was confirmed, I replaced both grills.
Read less
Parts Used:
-
Kim from Cliffside Park, NJ
-
Difficulty Level:Really Easy
-
Total Repair Time:15 - 30 mins
-
Tools:Screw drivers
962 of 1249 people
found this instruction helpful.
Was this instruction helpful to you?
Thank you for voting!
I diagnosed the problem incorrectly: based on a previous repair.
-
Ralph from Brandon, FL
-
Difficulty Level:Easy
-
Total Repair Time:Less than 15 mins
-
Tools:Pliers, Screw drivers
64 of 137 people
found this instruction helpful.
Was this instruction helpful to you?
Thank you for voting!
Microwave would turn on and count down, but not heating and not rotate turntable. Pressing door up would occasionally start heat.
First I disconnected the power and opened the door. Then I removed the top screws holding the top vent louvers, then removed the screw at the top of the touch pad. The touch pad removes by sliding up slightly then tilting top out. I unscrewed two screws holding the door latch assembly. Press the tab to remove and replace switch. Reco
... Read more
nnect wires, reseat latch mount by placing top bracket tab in place first, allign and secure with screws. Reseat touch pad by placing bottom tabs in first, tilt forward and press up to seat top tabs, secure with top screw. Secure vent louver screws, plug in and watch your microwave work again.
Read less
Parts Used:
-
Michael from Ridgefield, CT
-
Difficulty Level:Really Easy
-
Total Repair Time:Less than 15 mins
-
Tools:Screw drivers
40 of 65 people
found this instruction helpful.
Was this instruction helpful to you?
Thank you for voting!