Your coupon for will be reflected when you check out!
✖
Your coupon for
✖
Hello!
You're visiting the PartSelect site in U.S.
Would you like to shop on the Canadian site?
Stay on this site
Go to Canadian site
✖
Model Number Locations
1Select Category Type
Select Category Type
2Select Product Type
Select Product Type
3Select {MODEL} Type
Select {MODEL} Type
Sample Model Number Tags
Model numbers can be made up of numbers (1005400, for example) or a combination of letters and numbers (LAT1000AAE). The model number will most likely appear on either a paper sticker or a metal plate. Your appliance's model number tag may look similar to the sample model number tags shown here (model number highlighted in yellow):
Model has been saved to My Models. If you're not signed in, your lists are available on this device and will expire within 30 days.
Model has been saved to My Models.
This part is a replacement screw for your oven. It is made of black metal and is sold individually. This screw is approximately 1/4 inch in diameter and about 1/2 inch in length. It is designed to con...
$13.95
In Stock
Order within the next 11 hrs and your part ships today!
This is an oven rack that is compatible with your range. Oven racks are designed to hold and support food items while they are cooking or baking within your oven and can also be used to cool or dry it...
$59.73
In Stock
Order within the next 11 hrs and your part ships today!
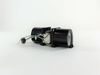
This blower motor, also known as the fan blower is supplied directly by the manufacturer for use in ovens. It is responsible for circulating hot air within the oven cavity. The blower motor helps dist...
$69.25
In Stock
Order within the next 11 hrs and your part ships today!
Enhance the performance of your GE wall oven with this premium lower cooling fan. This essential component plays a crucial role in maintaining the optimal temperature within the oven control area. By ...
$103.63
In Stock
Order within the next 11 hrs and your part ships today!
Order within the next 11 hrs and your part ships today!
Questions And Answers for CTD70DM2N1S5
Ask our experts a question about this model and we'll get back to you as soon as possible!
1 question answered by our experts.
Sort by:
< Prev
1
Next >
Search filter:
Clear Filter
Your search term must have 3 or more characters.
Keep searches simple. Use keywords, e.g. "leaking", "pump", "broken" or "fit".
Sorry, we couldn't find any existing answers that matched.Try using some different or simpler keywords, or submit your new question by using the "Ask a Question" button above!
Daniel
December 24, 2024
Error code F840 most of the time, occasionally F202. Not the temperature sensor. Can you help identify the possible part needed?
For model number CTD70DM2N1S5
Hi Daniel, thank you for reaching out. The 840 error code indicates a stuck function key on the keypad. This means one of the buttons on the control panel might be jammed or malfunctioning. The F202 error code indicates an issue with the relay board. Before replacing the relay board, we would suggest you checking the UI LCD control panel assembly, part number PS12725877. You may need to replace it to fix the issue. We hope this solves your problem!
It took a while to remove approx 30 screws to get to the blower. So my oven was sitting, torn apart while I waited on the new blower fan that I had ordered. It arrived shortly, about 5 days. When I opened the box I saw that PARTSELECT had sent me a drain pump instead of the blower fan that I had ordered. Since an oven does not require a d
... Read morerain pump and it wouldn't work to replace my broken blower fan I had to return it. I was told that I needed to send the part back in order to get a refund. After I sent their drain pump back at a cost of $13 they emailed me and said I didn't need to send the drain pump back. And they refunded me minus shipping So I had to pay shipping both ways for a part that was wrong. And I ordered it from someone else. I put the new blower fan that I had bought from another company in and replaced the 30 screws. And the oven has been working fine ever since. Thank you PARTSELECT for allowing me to tell people how you operate. They have a money back guarantee, but they don't give you back ALL your money. Thanks Again.
My less than 2 year double wall oven was showing a F97 on the right hand side of display screen on my oven, indicating to me it was a lower cooling fan issue. Purchased the parts after a lot of research (and a GE technician telling me over the phone it would be a 600 or more costly repair). I decided to bite the bullet and just do it mys
... Read moreelf to save money! I’m glad I did! I built a table for it to rest on after it got it out of the wall as it’s a heavy oven. I asked my dad to help me get it out and onto the stand. After that, it was a matter of getting to the lower fan through the back abs having to remove some panels. All went well and best part is this fixed it! I figure even if it goes out again in 2 years it’s still cheaper than paying a technician to do it! I’m a woman with zero background in repair but lots of determination and desire to save money! Just do it yourself!