Your coupon for will be reflected when you check out!
✖
Your coupon for
✖
Hello!
You're visiting the PartSelect site in U.S.
Would you like to shop on the Canadian site?
Stay on this site
Go to Canadian site
✖
Model Number Locations
1Select Category Type
Select Category Type
2Select Product Type
Select Product Type
3Select {MODEL} Type
Select {MODEL} Type
Sample Model Number Tags
Model numbers can be made up of numbers (1005400, for example) or a combination of letters and numbers (LAT1000AAE). The model number will most likely appear on either a paper sticker or a metal plate. Your appliance's model number tag may look similar to the sample model number tags shown here (model number highlighted in yellow):
Model has been saved to My Models. If you're not signed in, your lists are available on this device and will expire within 30 days.
Model has been saved to My Models.
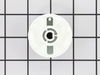
The selector knob is what you use to start the dryer. This replacement knob comes with a retaining clip. This is a very easy repair, the only tool you may need is a pair of needle nose pliers. Remove ...
$22.95
In Stock
Order within the next 6 hrs and your part ships today!
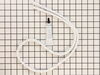
The lower front felt seal with adhesive, also known as a drum felt seal, is used in dyers and allows the drum to easily glide on the front panel. For this repair project, you will need the following t...
$28.95
In Stock
Order within the next 6 hrs and your part ships today!
This is a timer knob for your dryer. It is found on the control panel and allows you to turn your dryer on and adjust the settings. If the timer will not advance, or you notice the knob is damaged, yo...
$33.95
In Stock
Order within the next 6 hrs and your part ships today!
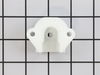
Introducing the GE Dryer Drum Bearing! This genuine replacement part is the ultimate solution for enhancing your dryer's performance. It is ideal for supporting the drum as it spins, offering stabilit...
$97.96
In Stock
Order within the next 6 hrs and your part ships today!
Experience smooth operation with this genuine Dryer Felt Seal from GE. This product is designed to allow your dryer drum to glide effortlessly on the front panel, promising a quieter, more efficient p...
No Longer Available
Questions And Answers for DBL333GA1WW
Be the first to ask our experts a question about this model!
✖
Ask a Question
Ask our experts a question on this model and we'll respond as soon as we can.
Slid off the old START knob, then pushed on the new START knob.
I created and printed a label on my computer for use with the time selector dial, which must be set at or beyond 10 minutes, before turning the START knob.
I made a label that says "Minimum" with a red arrow that points past the 10 minute setting on the
... Read moretime selector dial.
My teenage daughter was not setting the time selector dial, to a point past 10 minutes. When she turned the START knob, the dryer would not come on, because the time selector dial was not set past the 10 minute setting.
My daughter had continually twisted the START knob until it broke. I am hoping she will be able to see the large printed label I put on the dryer near the time selector, saying "Minimum" with a large red arrow pointing past 10 minutes.
I am very pleased that I was quickly able to find the exact matching START knob for my dryer and the exact same color, from PartSelect.Com
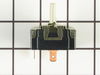
First I unplugged the dryer, then I removed the access panel on the back of the control panel. I removed the wires from the back of the switch...Here is where I messed up. I removed the switch prior to ordering the part, the bad part is the way I removed the part. When you get the new part in you will be able to see how it will be mounted
... Read more to the control panel. I had no idea, so I did what was necessary to remove it. Needless to say, I bent the hell out of the hole that the switch mounts in. In turn, the installation of the new switch did not go as easily as I would have liked. After straightening out some metal and drowning the thing in epoxy, the new switch is installed. I hooked the wires back up on the back of the switch, plug in the dryer, and dry some clothes. Standing victorious over the dryer with beer in hand, not only did I accomplish the mission but I learned my lesson... destructive removal = BAD!