Your coupon for will be reflected when you check out!
✖
Your coupon for
✖
Hello!
You're visiting the PartSelect site in U.S.
Would you like to shop on the Canadian site?
Stay on this site
Go to Canadian site
✖
Model Number Locations
1Select Category Type
Select Category Type
2Select Product Type
Select Product Type
3Select {MODEL} Type
Select {MODEL} Type
Sample Model Number Tags
Model numbers can be made up of numbers (1005400, for example) or a combination of letters and numbers (LAT1000AAE). The model number will most likely appear on either a paper sticker or a metal plate. Your appliance's model number tag may look similar to the sample model number tags shown here (model number highlighted in yellow):
Model has been saved to My Models. If you're not signed in, your lists are available on this device and will expire within 30 days.
Model has been saved to My Models.
The rubber washer is a part which is specific to dishwashers and should not be substituted by a similar part. It works with the heating element to seal the receptacle opening where the heating element...
$8.37
In Stock
Order within the next 6 hrs and your part ships today!
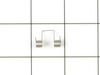
The dishwasher lid spring helps open the dispenser cover in the soap box when the control releases the latch. If your dishwasher does not dispense detergent, is broken and worn out, or the door is not...
$8.37
In Stock
Order within the next 6 hrs and your part ships today!
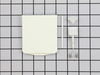
The faucet adapter for your portable dishwasher or washing machine attaches to the faucet and allows you to connect the machine to the tap. Before you install the faucet adapter on your taps, be sure ...
$48.26
In Stock
Order within the next 6 hrs and your part ships today!
This hose clamp is used in a wide variety of household appliances. Most often it is found in washers, dishwashers, refrigerators, freezers, dehumidifiers, garbage disposals, or air conditioners. This ...
$7.95
In Stock
Order within the next 6 hrs and your part ships today!
Each tandem roller holds two wheels. There are four sets of tandem rollers in this roller kit, so you will be getting eight wheels in all. They are all white, and are meant for use on the lower rack of your dishwasher.
$28.95
In Stock
Order within the next 6 hrs and your part ships today!
This touch-up paint can be used on a wide variety of household appliances. It is most often used on washers, dryer, refrigerators, dishwashers, ranges, freezers, trash compactors, or microwaves. It is...
$12.58
In Stock
Order within the next 6 hrs and your part ships today!
I have a Kenmore model that can either be totally installed under counter, left on casters or in my case installed permanently with the 'portable' covers still on. A model that is only for installation in a cabinet may be different. Open door part way and flex the plastic hinge 'pins' on the kick plate out of the door itself. Once t
... Read morehese are out you can close the door and lay the kick plate down towards you. This will expose a spring that is attached to pins on either side of the kick plate and held in place by a rubber cap. Remove the cap, pull the loop of the spring off the pin, and repeat for the other side. At this point you can remove the kick plate and set aside out of the way. There is a second plate behind the kick plate held in place by four screws. Remove the screws with a Phillips head screw driver or a 1/4 inch wrench or socket, then remove the plate and set aside. Now you have exposed the frame rails that somewhat hide the springs, one on each side. If you are lucky, like I was, only one is broken so you can use the other as a guide. Also the installation drawings that came with the part were very helpful. The information supplied by Kenmore in the parts list was no help at all. Follow the 'assembly' found in the kit to assemble the 3 parts of the spring. A this time you may want to open the door halfway then close it and reopen a couple of times and observe how the tail of the door hinge moves, this will show you where the spring is attached. The spring is mostly hidden behind the frame rails but the two connection points are visible with the help of a flashlight. If one of the springs in still connected, observe the two connection points, one on the tail of the door hinge (top of spring) and the other in a series of slots in the frame rail. With the door closed, hold the spring assembly in one hand (easier said than done) and hook the top of the assembly over the hook on the door hinge. Let it hang down in place and slip the lower part of the assembly into one of the slots. Again if one of the springs is still in place just use the same location as before. If both springs are missing, use one of th slots in the middle. Only one of my springs were broken but I installed new ones on both sides as cheap insurance against doing this again in a few months. Step by step appears a bit complicated but the whole thing only took about 10 minutes. Good luck.
This product comes in a bottle with a brush like Liquid Paper. It goes on incredibly easy. A second coat might be needed. I wanted to prevent rust from setting in so I covered the scratches and dings. The paint is a little brighter since my washer is 10 years old but it still looks great.


 – Part Number: 4317933")
 – Part Number: 72017")