EasyApplianceParts is now PartSelect! We've merged our sites to provide a better shopping experience for you.   Full Details
Back
Back
Keep typing for more specific results...
Models > EI23BC30KS3 > Symptoms > Leaking

Parts That Fix Electrolux Refrigerator EI23BC30KS3 Leaking

Leaking is a commonly reported symptom for the EI23BC30KS3 Electrolux Refrigerator, and we have put together a full guide on how to fix this. This advice is based on feedback from people who own this exact appliance. We have listed the most common parts for your EI23BC30KS3 Electrolux Refrigerator that will fix Leaking. We have included repair instructions, and helpful step-by-step video tutorials. If you are experiencing this issue, not to worry, DIYers just like you have fixed this, and shared their experience to help you!
Fixes Symptom 90% of time

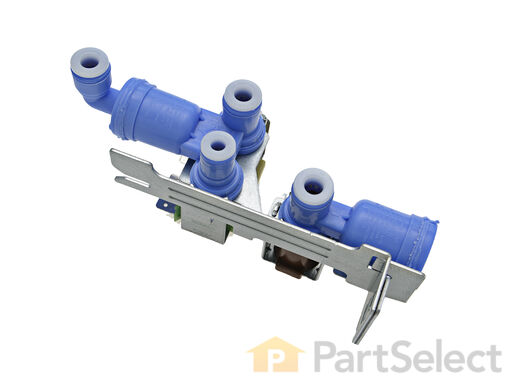
The function of the Refrigerator Water Inlet Valve (Triple Solenoid Water-Valve, Water Valve, Water Inlet Valve, Refrigerator Water Inlet Valve Assembly) is to release water from the supply line when activated, and send it through to your water dispenser or ice maker in your refrigerator. The water inlet valve is located at the back of the refrigerator, and connects to the water supply. The valve can break from material fatigue or normal use. If your water inlet valve is malfunctioning, you could be getting a lack of water to the inside of your refrigerator. Your ice maker may not produce cubes or your water dispenser may not work. The water inlet valve must be replaced if the solenoids no longer have continuity or the valve has internal blockage. This valve measures approximately 7 inches long and 4.5 inches wide, and is constructed of plastic and metal. It comes in blue, and includes the valve and mounting bracket.

$ 32.99
  In Stock
PartSelect Number PS7784018
Manufacturer Part Number 242252702

Replacing your Frigidaire Refrigerator Refrigerator Water Inlet Valve

Replacing your Refrigerator Water Inlet Valve

Customer Repair Stories

icemaker stopped making ice
Even though my wife said that our icemaker broke, there was actually nothing wrong with it. It was the valve that let water flow in during the 'harvest' cycle.
A real easy way to test the icemaker without voltage and current measurements, is to fill the tray by hand with a little cup of water; wait till the water freezes and see if the maker dumped the ice into the bin.
  • David from New Bern, NC
  • Difficulty Level:
    Really Easy
  • Total Repair Time:
    15 - 30 mins
  • Tools:
    Nutdriver, Screw drivers
350 of 417 people found this instruction helpful.
Was this instruction helpful to you?
Thank you for voting!
water leaking out of refrigerator
In my specific appliance the water valve is located in the bottom right hand corner looking at it from the back. To get to it I remove the thin layer of cardboard the covers the back of the fridge. I then proceeded to disconnect the 1/4" copper tubing which is the water feed coming out of the wall. Then I removed the screws that hold the valve assembly in place. I took the water valve out and removed the electrical connections as well as the plastic tubing which feed the water dispenser and the ice maker. To install the new water valve it was just a matter of reversing steps.
  • Jose from Alexandria, VA
  • Difficulty Level:
    Easy
  • Total Repair Time:
    15 - 30 mins
  • Tools:
    Nutdriver, Pliers, Wrench (Adjustable)
600 of 710 people found this instruction helpful.
Was this instruction helpful to you?
Thank you for voting!
Fixes Symptom 5% of time

This is the replacement water filter base for your refrigerator. It is made of plastic and is mainly white in color. The water filter lines will each have a blue release collar at the top. The water filter base is found at the top of your refrigerator, beneath the console, and it is the part that the water filter presses into. If the O-rings have gone bad, and the filter is leaking, or the locking device has failed and the water filter is not locking in, you may need to replace the water filter base. This part is sold individually and is an OEM part sourced directly from the manufacturer.

$ 87.17
  In Stock
PartSelect Number PS976499
Manufacturer Part Number 240396002

Replacing your Frigidaire Refrigerator Water Filter Base

Replacing your Water Filter Base

Customer Repair Stories

Water was leaking from the filter area when in-door water dispenser used
Silly me. It couldn't possibly be the filter because it's worked for the last 9 months with no problems. Decided to replace the water filter base first. Repair was easy. I saw someone had trouble removing tubes from old base and I gave it a couple of tries to no avail so decided to cut the lines instead. Made it even easier. After repair, water continued to leak. So, replaced the filter itself and voila - leak fixed. Make sure you check the filter first. My mistake turned a $40 - 10 second repair into a $100 - 20 minute repair. Good Luck!
  • Todd from Gotha, FL
  • Difficulty Level:
    Easy
  • Total Repair Time:
    15 - 30 mins
  • Tools:
    Screw drivers, Socket set
13 of 17 people found this instruction helpful.
Was this instruction helpful to you?
Thank you for voting!
No water flow to in-door water/ice dispenser
Unscrewed the water line cover. Removed the platic case around the water filter base. Everything went well until I tried to remove the two water hoses. After I finally figured out that I had to push in the release washer while pulling the hoses out, things went well. Unfortunately it took several hours of wasted time and several searches on the internet to finally figure this part out. From there on out it went smoothly. Old base came out with two screws. Reversed process for reinstall of new base. Water hoses just slipped back into place and locked themselves in. Just takes a little patience.
  • Richard from St. Louis, MO
  • Difficulty Level:
    A Bit Difficult
  • Total Repair Time:
    15 - 30 mins
  • Tools:
    Nutdriver, Screw drivers
28 of 33 people found this instruction helpful.
Was this instruction helpful to you?
Thank you for voting!
Fixes Symptom 1% of time

$ 63.65
  In Stock
PartSelect Number PS17996096
Manufacturer Part Number 5304537408

Customer Repair Stories

Freezer drawer gasket damaged and leaking cold air
Remove old gasket by pulling it away from the frame. Work all the way around the gasket till it is entirely separate from the door. Remove the old gasket by slipping it over the door. Note the orientation of the new gasket will have the small bead towards the door - slip the new gasket over the door so that it is in the inside of the freezer door. Press the small bead into the slot in the door. Work all the way around, pressing the bead in with your fingers. When it's all secure, close the door and check for no gaps. Takes 5 minutes and no tools - very easy. Make sure you order the correct COLOR of gasket - it comes in black and white. The black looks best on stainless steel door.
  • James from HOUSTON, TX
  • Difficulty Level:
    Very Easy
  • Total Repair Time:
    Less than 15 mins
4 of 5 people found this instruction helpful.
Was this instruction helpful to you?
Thank you for voting!
Freezer was accumulating a sheet of ice in the bottom
determined it was an air leak. Freezer portion has no drain. A fan in back blows air in through vents to keep unit defrosted. There was a gap across the entire top of gasket where it seals up against the frame. Simply pull the old gasket out of its track around the entire door. No tools needed and the door does not need to be removed. Fit the new gasket into the track until it is securely seated around all 4 sides of the door. That's it. I still had a small gap between the top of the door gasket and the freezer frame. The freezer frame may have warped a little over the years. I applied a thin strip of weather stripping to the freezer body where it meets up against the new gasket. That did it.
  • Brant from WALLINGFORD, CT
  • Difficulty Level:
    Really Easy
  • Total Repair Time:
    Less than 15 mins
6 of 6 people found this instruction helpful.
Was this instruction helpful to you?
Thank you for voting!
Fixes Symptom 1% of time

$ 56.38
  In Stock
PartSelect Number PS1765304
Manufacturer Part Number 241806601
Fixes Symptom 1% of time

$ 75.61
  In Stock
PartSelect Number PS17990263
Manufacturer Part Number 241778315

Customer Repair Stories

Original refrig door gasket was fraying
It's too easy to describe.

What's more important is that someone read this and see that you can save hundreds of dollars doing this repair yourself. I'm sure many handy people think that about everything they repair, but this repair is insanely easy and the $ savings ridiculous.
When I called the place I purchased the refrigerator from, they were more than happy to sell me the part with a 35% markup (your price was reasonable) and (when i asked) they told me that sending someone to my home to make the repair would cost about $400 ($200 per door) including the "home instal" fee.
I removed the old gaskets and put on the new ones (on both doors) in under 10 minutes. I confess that I did the job under the auspices of my very handy son but he'll agree with everything I just wrote. To the unhandy: go forth and replace your own gaskets.
  • Barry from CHEVY CHASE, MD
  • Difficulty Level:
    Very Easy
  • Total Repair Time:
    Less than 15 mins
11 of 12 people found this instruction helpful.
Was this instruction helpful to you?
Thank you for voting!
Old door gasket was worn and edge was cut
Pulled the old gasket out if groove on the door, cleaned inside the groove, squirted some windex in the groove to ease the new gasket in the groove, then proceeded to work the gasket into the groove. Made sure gasket was all the way in the groove around the perimeter of the door. Done!
  • Ed from PETALUMA, CA
  • Difficulty Level:
    Really Easy
  • Total Repair Time:
    15 - 30 mins
16 of 21 people found this instruction helpful.
Was this instruction helpful to you?
Thank you for voting!
Fixes Symptom 1% of time

This manufacturer-approved air filter system for refrigerators eliminates odors and any impurities. It does this by neutralizing and removing odor-causing molecules. For best results, it is important to change the filter every 6 months to ensure that food is kept fresh, and the humidity is controlled. This part measures about 7 inches wide and 5 inches deep. Follow installation instructions provided by the manufacturer when installing this part to ensure accurate results and further guidance. Remember to unplug the refrigerator from the power source before starting this project. The air filter may be located in different places depending on your appliance, but is usually on the inner right or left side. See your manual for exact location. Our customers rated this as a very easy repair that takes only a few minutes; just locate and remove the old air filter and insert the new one to complete the repair, which requires no tools.

$ 35.95
  In Stock
PartSelect Number PS1993820
Manufacturer Part Number EAFCBF

Customer Repair Stories

NO PROBLEM JUST DECIDED IT WAS TIME TO CHANGE FILTER
VERY EASY SLIDE OLD ONE OUT AND PUT NEW ONE IT
  • Gregory from POTTSTOWN, PA
  • Difficulty Level:
    Really Easy
  • Total Repair Time:
    Less than 15 mins
3 of 4 people found this instruction helpful.
Was this instruction helpful to you?
Thank you for voting!
you r label (this end in arrow is wrong
placed filter in sideways
  • melvin from BASKING RIDGE, NJ
  • Difficulty Level:
    Really Easy
  • Total Repair Time:
    Less than 15 mins
15 of 25 people found this instruction helpful.
Was this instruction helpful to you?
Thank you for voting!