


EL88TRRWQ03 Whirlpool Refrigerator - Overview
Sections of the EL88TRRWQ03
[Viewing 5 of 5]


 Diagram and Parts List for Whirlpool Refrigerator")

Keep searches simple, eg. "belt" or "pump".

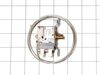
Refrigerator Door Switch
PartSelect #: PS12728638
Manufacturer #: W11384469
Door switch turns the light off when you close the door.
$29.37
In Stock

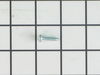
Refrigerator Screw
PartSelect #: PS11742240
Manufacturer #: WP400021-1
Sold individually.
$11.95
In Stock
 – Part Number: 72017")
Refrigerator Touchup Paint (White)
PartSelect #: PS385132
Manufacturer #: 72017
This touch-up paint can be used on a wide variety of household appliances. It is most often used on washers, dryer, refrigerators, dishwashers, ranges, freezers, trash compactors, or microwaves. It is...
$12.58
In Stock

Freezer Fan Blade
PartSelect #: PS11738973
Manufacturer #: WP2169142
If your refrigerator or freezer is too warm, or making noises, you may need to replace the fan blade. The fan blade attaches to the evaporator motor, which is in the freezer section, to help circulate...
$26.95
In Stock

Refrigerator Screw
PartSelect #: PS11742754
Manufacturer #: WP489478
Sold individually.
$7.95
In Stock

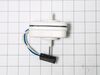
Light Socket Kit
PartSelect #: PS371236
Manufacturer #: 4387478
The light socket in your refrigerator houses the light bulb and connects it to the power source. If your refrigerator light is not coming on when you open the door, you may need to replace the light s...
$49.28
In Stock

Refrigerator Screw
PartSelect #: PS11749498
Manufacturer #: WPW10170540
Sold individually.
$11.95
In Stock
 – Part Number: 350930")
White Appliance Paint (12oz)
PartSelect #: PS347819
Manufacturer #: 350930
Appliance spray paint is a great way to cover up any chips and scratches that have appeared on your appliances. Instead of replacing the part entirely, this is an easy fix. This is also a great way to...
$26.17
In Stock

Refrigerator Cabinet Mount Screw
PartSelect #: PS11742757
Manufacturer #: WP489491
Sold Individually - 2 screws needed to mount each handle.
$7.95
In Stock

Refrigerator Screw
PartSelect #: PS11740623
Manufacturer #: WP3-24838-048
Sold individually.
$7.95
In Stock

Defrost Timer
PartSelect #: PS11740630
Manufacturer #: WP3-81329
This device acts like a clock. It continually advances and alternates between activating the cooling cycle and the defrost heater.
$91.68
In Stock

Meat Drawer - Clear
PartSelect #: PS11742205
Manufacturer #: WP4-60040-004
Discover a top-quality, genuine Whirlpool product: the upper crisper/meat drawer. Perfectly designed to keep your fruits, vegetables, and meats fresh and delicious for longer periods of time, this dra...
$94.63
In Stock
Manuals & Care Guides for EL88TRRWQ03
Click to downloadQuestions And Answers for EL88TRRWQ03
We're sorry, but our Q&A experts are temporarily unavailable.
Please check back later if you still haven't found the answer you need.
Sort by:
- < Prev
- 1
- Next >
Search filter:
Clear Filter
Your search term must have 3 or more characters.
Keep searches simple. Use keywords, e.g. "leaking", "pump", "broken" or "fit".
Sorry, we couldn't find any existing answers that matched.Try using some different or simpler keywords, or submit your new question by using the "Ask a Question" button above!
Lisa
July 6, 2024
Where is the drain line located
For model number EL88TRRWQ03
Hello Lisa,
Thank you for writing in. The drain line (tube) is located behind the crisper drawers at the very back wall of the fridge. We hope this helps.
Was this helpful?
Thank you for voting!
- < Prev
- 1
- Next >
Common Symptoms of the EL88TRRWQ03
[Viewing 8 of 8]Light not working
Fixed by
these parts
these parts


Show All
Noisy
Fixed by
these parts
these parts

Show All
Fridge too warm
Fixed by
these parts
these parts
Show All
Too warm
Fixed by
these parts
these parts
Show All
Frost buildup
Fixed by
these parts
these parts

Show All
Fridge too cold
Fixed by
these parts
these parts
Show All
Will Not Start
Fixed by
these parts
these parts
Show All
Freezer section too warm
Fixed by
these parts
these parts
Show All


Keep searches simple. Use keywords, e.g. "leaking", "pump", "broken" or "fit".
Lights inside refrigerator not working
I used a flat-head screwdriver to pop out the old light rocker switch. Then, I unplugged the wires, plugged them into the new light rocker switch, and then popped the new switch into the hole. That's it! Lights began working again.
Parts Used:
-
Clint from Rayville, MO
-
Difficulty Level:Really Easy
-
Total Repair Time:Less than 15 mins
-
Tools:Screw drivers
132 of 235 people
found this instruction helpful.
Was this instruction helpful to you?
Thank you for voting!
Light Would Not Go On In The Refrigerator
First I removed the old lightbulb from the socket and replaced it with a new one to confirm that the bulb was not the problem. I then pryed the socket out with a flat-head screwdriver. I could tell that the socket was anchored in its hole with clips so it was relatively easy to pry it out. Once the socket was out, I disconnected the le
... Read more
ad wires and ordered a replacement socket kit from Partselect. When the new one arrived, I reconnected the lead wires to it, snapped it back into its hole, screwed in a new lightbulb, and presto!! The light was back on with no further problem. Thank you, Partselect!! A $15.00 part saved me what probably would have been at least a $100. service call and heaven knows what the technician would have told me I needed!!!
Read less
Parts Used:
-
DANIEL from MINNEAPOLIS, MN
-
Difficulty Level:Easy
-
Total Repair Time:Less than 15 mins
-
Tools:Screw drivers
61 of 80 people
found this instruction helpful.
Was this instruction helpful to you?
Thank you for voting!
Light Switch broke
An easy job for smaller hands. Removed the two bolts holding the light cover. Removed two electrical connections from the old switch by pinching the retaining clip,removed the switch, snapped in the new one and re-attached the connectors. Your online illustrations helped me to know that the plastic housing for the light switch would only
... Read more
swing down so far and was not intended to be removed. Saved me from breaking that plastic cover's tabs. This home repair saved me more than 5 times the cost of hiring a professional to do it. Very happy homeowner.
Read less
Parts Used:
-
James Richard from St. Cloud, MN
-
Difficulty Level:Easy
-
Total Repair Time:Less than 15 mins
-
Tools:Socket set
47 of 73 people
found this instruction helpful.
Was this instruction helpful to you?
Thank you for voting!