


GFDS265GF0RR General Electric Dryer - Overview
Sections of the GFDS265GF0RR
[Viewing 6 of 6]


Keep searches simple, eg. "belt" or "pump".


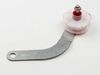
Hinge Cover Screw
PartSelect #: PS783750
Manufacturer #: WR01X10379
Sold individually.
$13.95
Special Order

Lint Filter
PartSelect #: PS10054661
Manufacturer #: WE18X20428
Upgrade the efficiency of your dryer with the GE Lint Screen ASM. This lint screen is specifically designed to trap lint and debris from the exhaust air released by your appliance, maintaining the mac...
$95.98
In Stock


Screw - 10-32 b trt-25 5/8
PartSelect #: PS960581
Manufacturer #: WH02X10139
Sold Individually.
$13.95
Special Order


GRILL ASSEMBLY
PartSelect #: PS8756763
Manufacturer #: WE18X10021
Screws are not included
$81.29
In Stock

Cycling Thermostat
PartSelect #: PS8756670
Manufacturer #: WE04X10190
Introducing the GE Cycling Thermostat, an essential part for your dryer's impeccable functioning. This robust backup thermostat operates by shutting off the dryer heat if the primary controls happen t...
$27.95
In Stock
 – Part Number: WE12X10019")
 – Part Number: WE12X10018")
Manuals & Care Guides for GFDS265GF0RR
Click to downloadQuestions And Answers for GFDS265GF0RR
We're sorry, but our Q&A experts are temporarily unavailable.
Please check back later if you still haven't found the answer you need.
Common Symptoms of the GFDS265GF0RR
[Viewing 1 of 1]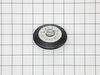
Keep searches simple. Use keywords, e.g. "leaking", "pump", "broken" or "fit".
Loud banging/thumping noise when dryer was running. Bearings on tub rollers worn out. Poor design.
Could tell from the sound it was making that it was related to drum rotation. Searched online videos on how to disassemble this model GE Dryer. The Dryer drum rides on 4 rollers. 2 of the 4 of mine were very noticeably loose and made a similar noise when I spun them by hand. Simply replace the rollers and re-assembled.
I ... Read more could type out instructions, but it's much simpler to just search for the right video online.
I ... Read more could type out instructions, but it's much simpler to just search for the right video online.
Read less
Parts Used:
-
Marsha from BRAZIL, IN
-
Difficulty Level:Easy
-
Total Repair Time:1- 2 hours
-
Tools:Nutdriver, Pliers
19 of 52 people
found this instruction helpful.
Was this instruction helpful to you?
Thank you for voting!
The edge of the original lint filter had separated causing lint to fall inside.
-
Pearl from PORT GIBSON, MS
-
Difficulty Level:Very Easy
-
Total Repair Time:Less than 15 mins
2 of 2 people
found this instruction helpful.
Was this instruction helpful to you?
Thank you for voting!
After much use the screen eventually wears out from the heat and it tears
Just have to pull out the old screen assembly from the dryer slot and install the new one.
Parts Used:
-
John from DARTMOUTH, MA
-
Difficulty Level:Very Easy
-
Total Repair Time:Less than 15 mins
2 of 4 people
found this instruction helpful.
Was this instruction helpful to you?
Thank you for voting!