


GFW650SPN3SN General Electric Washer - Overview
Sections of the GFW650SPN3SN
[Viewing 10 of 10]


Keep searches simple, eg. "belt" or "pump".

Drain Pump and Filter
PartSelect #: PS16217203
Manufacturer #: WH11X29539
This drain pump and filter assembly is a genuine OEM replacement assembly that is designed for washing machines. It is responsible for removing water from the washing machine tub at the end of each wa...
$67.95
In Stock

DOOR LOCK
PartSelect #: PS12749276
Manufacturer #: WH01X29528
This genuine OEM door lock is a replacement part specially designed for front-load washing machines. It is a safety mechanism designed to prevent the door from being opened during the wash cycle. When...
$60.71
In Stock


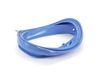
Door Boot Gasket
PartSelect #: PS12743601
Manufacturer #: WH05X29514
This door gasket, also known as a door boot, is a genuine OEM replacement made for front-load washing machines. It is blue and made of rubber. The gasket helps to seal the area between the washer tub ...
$124.95
In Stock

MAIN CONTROL BOARD
PartSelect #: PS17874601
Manufacturer #: WH22X37840
This main control board is a vital component for managing the core functions of your home appliance. It processes commands from the user interface and ensures accurate execution of settings such as te...
$188.23
In Stock


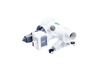
WATER VALVE
PartSelect #: PS12743643
Manufacturer #: WH23X29553
Introducing the Water Inlet Valve from the trusted brand, GE. This essential component facilitates the accurate and efficient flow of water into your washer, enhancing its overall performance. It's cr...
$104.71
In Stock


Inverter Board Flat Washer
PartSelect #: PS17063448
Manufacturer #: WH22X35837
$163.71
Special Order


Questions And Answers for GFW650SPN3SN
We're sorry, but our Q&A experts are temporarily unavailable.
Please check back later if you still haven't found the answer you need.
Common Symptoms of the GFW650SPN3SN
[Viewing 8 of 8]Will not drain
Fixed by
these parts
these parts
Show All
Leaking
Fixed by
these parts
these parts
Show All
Locking Issues
Fixed by
these parts
these parts

Show All
Will Not Start
Fixed by
these parts
these parts
Show All
Water Filling Issues
Fixed by
these parts
these parts

Show All
Spinning Issues
Fixed by
these parts
these parts

Show All
Draining Issues
Fixed by
these parts
these parts
Show All
Lid or door won’t close
Fixed by
these parts
these parts
Show All
Keep searches simple. Use keywords, e.g. "leaking", "pump", "broken" or "fit".
Squealing Water Valve When Water Is Filling Washer Tub
Sediment in your water will ruin these water inlet valves over time. It will reduce the amount of water filling the tub & will be very noisy making a squealing sound.
You’ll need a #2 Philips screwdriver & a standard set of pliers.
UNPLUG ELECTRIC SUPPLY FROM WASHER, TURN OFF WATER VALVES, THEN DISCONNECT WATER LIN ... Read more ES & DRAIN HOSE. Pullout the detergent dispenser drawer. Remove 2 self-tapping screws and & 3 sheet metal screws. Slide front control panel to the right and let it rest on the machine. Remove 3 sheet metal screws to release the top lid cover. Pull the lid towards you and lift off. You’ll see water inlet valves in the left rear. Remove Philips head screws securing water inlet valve. Disconnect electrical wires from the water inlet valve solenoids. Using pliers, squeeze hose clamps and slide down small hoses. Pull off or twist the small hoses from the old water inlet valve. Install the small hoses onto the new Walter inlet valve and reconnect electrical harness to water inlet valve solenoids. Mount new water inlet valve, reconnect water supply hoses & turn on water supply. Check for any leaks before going any further. If no leaks, reinstall top lid & front panel. CONTROL PANEL IS DIFFICULT TO LINE UP WHEN SLIDING IT TO THE LEFT TO REINSTALL. LINE UP THE SLOTS FOR THE SCREWS WHEN REINSTALLING THE CONTROL PANEL. Refasten all screws and slide dispenser drawer back into dispenser pocket. Reconnect electrical supply. Washer should operate normally.
Read less
Parts Used:
-
Patrick from GLEN ALLEN, VA
-
Difficulty Level:Easy
-
Total Repair Time:30 - 60 mins
-
Tools:Pliers, Screw drivers
10 of 10 people
found this instruction helpful.
Was this instruction helpful to you?
Thank you for voting!
Low H20 alert & loud screeching noise when filling
I'd recommend a second set of hand for the repair. First we unplugged the washer. We removed the top panel of the washer using a Phillips head screwdriver. We disconnected all hoses. Then un-screwed the existing valve from the back of the machine and removed all clamps and hoses from the old valve. We then reversed the process for the
... Read more
valve install (attached hoses, attached to the machine, etc.) We then ran a test cycle to check for leaks. We then closed everything up and our alert and noise went away.
Read less
Parts Used:
-
Kevin from LOUISVILLE, KY
-
Difficulty Level:Easy
-
Total Repair Time:30 - 60 mins
-
Tools:Pliers, Screw drivers, Wrench (Adjustable)
1 person
found this instruction helpful.
Was this instruction helpful to you?
Thank you for voting!
No spin, no drain
Disassemble according to instructions then remove pump...my only issue was I ordered the pump and paid $11.95 for t
2 to 3 days shipping. I didn't get the part until the following Saturday which was like 6 to 7 days...horrible delivery
2 to 3 days shipping. I didn't get the part until the following Saturday which was like 6 to 7 days...horrible delivery
Parts Used:
-
Peter from CLAYTON, NC
-
Difficulty Level:Easy
-
Total Repair Time:30 - 60 mins
-
Tools:Nutdriver, Pliers
3 of 10 people
found this instruction helpful.
Was this instruction helpful to you?
Thank you for voting!