Your coupon for will be reflected when you check out!
✖
Your coupon for
✖
Hello!
You're visiting the PartSelect site in U.S.
Would you like to shop on the Canadian site?
Stay on this site
Go to Canadian site
✖
Model Number Locations
1Select Category Type
Select Category Type
2Select Product Type
Select Product Type
3Select {MODEL} Type
Select {MODEL} Type
Sample Model Number Tags
Model numbers can be made up of numbers (1005400, for example) or a combination of letters and numbers (LAT1000AAE). The model number will most likely appear on either a paper sticker or a metal plate. Your appliance's model number tag may look similar to the sample model number tags shown here (model number highlighted in yellow):
Model has been saved to My Models. If you're not signed in, your lists are available on this device and will expire within 30 days.
Model has been saved to My Models.
This water tube, or plastic tube, is used in refrigerators and freezers. The tube ensures water is directed to parts of the refrigerator that need it, such as the water dispenser and ice maker. If you...
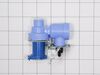
Enhance the functionality of your LG refrigerator with our Primary Water Valve - Single Coil. This genuine OEM part is crucial in supplying water to the device's icemaker and water dispenser, ensuring...
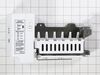
The wire harness is NOT available separately. Refrigerator ice maker kit AEQ36756901 is an original equipment manufacturer (OEM) part that fits some refrigerators in these series: Kenmore 795; Kenmore...
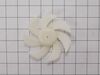
This is a genuine OEM evaporator motor that directly powers the evaporator mechanism within your refrigerator. This mechanism is responsible for pulling air over the evaporator coils, which are cold, ...
This LG Basket Assembly Door is an essential accessory for your refrigerator. Attaching to the inside of your appliance door, it's an efficient way to store bottles and jars. Primarily white with a to...
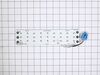
Enhance the performance of your LG refrigerator with the genuine OEM Defrost Sensor Assembly. This product plays an essential role in maintaining the correct temperature within your refrigerator, as i...
The Refrigerator now runs very quite. After watching several videos I started on mine and found that it was a bit different than any in the videos. However all but the back panel was shown and that was helpful. The back panel was a bit difficult but a hair dryer seemed to help . All in all it was a good choice to do it myse
... Read morelf as it was done quicker than waiting on a repair man.
Turn off power, remove upper and lower drawers (may need to open upper refrigerator doors to remove large freezer bin,) remove drawer supports (upper and lower), remove rear freezer panel (trick is to loosen 4 screws on fan bumpout to get the panel to come free from the freezer side wall), test thermistor with multimeter (should have cont
... Read moreinuity or near zero resistance across 2 orange fuse wires) before cutting zip ties, cut zip ties holding Thermistor in place, remove old Thermistor, install new Thermistor, install new zip ties, replace rear freezer panel, install upper and lower drawer supports, install drawers, turn on power, should be fixed if error code doesn't return after 6 hours.
Shut off water supply. Disconnect main supply line. Remove rear lower panel on back of refrigerator. Remove all tubing clamps on back. Disconnect leaking tubing from water supply valve. Remove water filter and unscrew/remove water filter housing. Replace tubing - connect to water filter housing then to water supply valve. Reconnect filter
... Read more housing and filter. Reinstall lower panel, then main water supply line, then all tubing clamps. Turn water back on and check for leaks after discarding several glasses of water to fill filter. Job complete!