


JBV42G1J1 General Electric Range - Overview
Sections of the JBV42G1J1
[Viewing 1 of 1]
Keep searches simple, eg. "belt" or "pump".

Range Trim Ring
PartSelect #: PS244475
Manufacturer #: WB31X5013
This 6 inch high rise burner trim ring is intended for use with detached style low rise tilt lock surface mount burners on ranges.
$13.95
In Stock

Range Trim Ring 8
PartSelect #: PS244479
Manufacturer #: WB31X5014
This 8 inch high rise burner trim ring is intended for use with detached style low rise tilt lock surface mount burners on ranges.
$15.95
In Stock

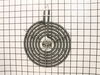
Range Surface Element 8 2350w
PartSelect #: PS243868
Manufacturer #: WB30M2
The surface element, also known as the coil surface element, transfers heat to the area on top of range. The element is 8 inches in diameter. If your surface element does not heat, over heats, or heat...
$55.39
In Stock
 – Part Number: 40A15")
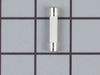
Light Bulb (40W)
PartSelect #: PS217532
Manufacturer #: 40A15
This 40-Watt light bulb is sold individually and is a genuine OEM replacement option for your home appliances. It is specially designed to withstand extreme temperatures, so this bulb is compatible wi...
$19.10
In Stock

Range Surface Element
PartSelect #: PS243867
Manufacturer #: WB30M1
If you notice that your surface element will not heat properly, you may need to replace it. This surface element is 6 inches in diameter and 240V. It is a Y-frame surface burner element with five turn...
$48.95
In Stock

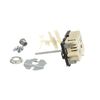
Range Infinite Heat Switch Kit
PartSelect #: PS16216966
Manufacturer #: WB21X36771
The infinite switch controls the stove top surface burner. This switch will work with most of the electrical range models with coil burner elements.
$50.44
In Stock

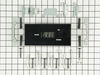
Range Terminal Block
PartSelect #: PS232646
Manufacturer #: WB17X5113
This kit includes one ceramic block with 6" wire leads, 2 wire nuts and 2 heat shrink with mounting bracket.
$35.95
In Stock

RECEPTACLE PUSH-IN
PartSelect #: PS752188
Manufacturer #: WB08T10026
This part is the replacement light socket for your oven. The oven light socket provides power to the light, and at the same time holds the light bulb in place.
$15.95
In Stock

Broiler Pan - Large
PartSelect #: PS1517612
Manufacturer #: WB48X10056
This large broiler pan is found in the bottom of your oven and is used to catch drippings from broiling foods. This part includes the grate and bottom pan and is made of porcelain. The grate measures ...
$40.95
In Stock


Questions And Answers for JBV42G1J1
We're sorry, but our Q&A experts are temporarily unavailable.
Please check back later if you still haven't found the answer you need.
Common Symptoms of the JBV42G1J1
[Viewing 4 of 4]Element will not heat
Fixed by
these parts
these parts

Show All
Won’t turn on
Fixed by
these parts
these parts
Show All
Timer will not advance
Fixed by
these parts
these parts
Show All
Little to no heat when broiling
Fixed by
these parts
these parts
Show All


Keep searches simple. Use keywords, e.g. "leaking", "pump", "broken" or "fit".
Electronic Timer went out and Top Oven No Longer worked
There are about 12 wires behind the panel...and this was the second time I've replaced the electronic clock in the past four years. I replaced the analog clock four years ago with the digital version because the analog was no longer available, so I knew what I was in for. There are four screw (top of the frame and lower frame) to remove b
... Read more
efore the frame holding the clock will come out. First DISCONNECT the power! You've have to remove the clock control knobs, and the plastic lever on the self cleaning handle. The first time I ordered this replacement part from PartsSelect there was a diagram included on which wire goes where. This time there wasn't! So it gets a little complicated. Make sure you label all the wired before you disconnect the old clock panel. Anyway, remove the four nuts holding the old clock in place; put the new clock panel in; replace the four nuts. I'll be glad to talk anyone through the rest and I have photos of the whole repair.
Read less
Parts Used:

-
David from Owings Mills, MD
-
Difficulty Level:Difficult
-
Total Repair Time:1- 2 hours
-
Tools:Pliers, Screw drivers
60 of 73 people
found this instruction helpful.
Was this instruction helpful to you?
Thank you for voting!
Replacement of Coils
Removed by slightly wiggling out of the coupling. No tools needed, seriously, (and I'm a contractor). Basically, pull out and snap back in.
Parts Used:
-
Joseph from South Plainfield, NJ
-
Difficulty Level:Really Easy
-
Total Repair Time:Less than 15 mins
35 of 42 people
found this instruction helpful.
Was this instruction helpful to you?
Thank you for voting!
Heating element required continuous adjustments to work.
I removed old 8" surface element and terminal block. Some of old wiring had to be cut off because of harding/cracking of old wiring. Stove was 23 years old and this burner was the most frequently used one. I soldered the new and remaining old wires together. I used the shirnk wrap that came with the terminal block to cover the solder join
... Read more
t. I screwed the new terminal block (one screw holds it in place - used same screw from old terminal block that was removed). I finished by inserting the new surface element. Everything works fine. In the next week or two after we use it a while, I will check wiring again to make sure there are no changes. You need to be very careful as it gets very hot under the burner.
Read less
Parts Used:
-
Richard from Apex, NC
-
Difficulty Level:Really Easy
-
Total Repair Time:30 - 60 mins
-
Tools:Pliers, Screw drivers
29 of 32 people
found this instruction helpful.
Was this instruction helpful to you?
Thank you for voting!