Your coupon for will be reflected when you check out!
✖
Your coupon for
✖
Hello!
You're visiting the PartSelect site in U.S.
Would you like to shop on the Canadian site?
Stay on this site
Go to Canadian site
✖
Model Number Locations
1Select Category Type
Select Category Type
2Select Product Type
Select Product Type
3Select {MODEL} Type
Select {MODEL} Type
Sample Model Number Tags
Model numbers can be made up of numbers (1005400, for example) or a combination of letters and numbers (LAT1000AAE). The model number will most likely appear on either a paper sticker or a metal plate. Your appliance's model number tag may look similar to the sample model number tags shown here (model number highlighted in yellow):
Model has been saved to My Models. If you're not signed in, your lists are available on this device and will expire within 30 days.
Model has been saved to My Models.
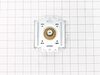
This micro-switch is designed for use in your microwave. The function of this part is to monitor the door latch position and communicate to the electronic control board whether the latch is open or cl...
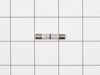
The fuse-time delay may also be known as a line fuse or a microwave fuse, and it is a piece for your microwave. The function of this part is to shut off the microwave if there is a power surge, in ord...
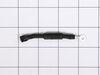
This magnetron in your microwave creates the radiation needed for cooking or warming your food. It is located inside the main cavity, typically near the transformer or waveguide. When the magnetron be...
$129.10
In Stock
Order now and your part arrives in 2-3 business days!
Over the stove microwave installed in top cabinet row. 1. Unplug device. 2. Two people to remove from wall/cabinet (remove two, large, top mounting screws and rotate entire microwave down and off the wall mount). Should be some wood spacers between top of device and bottom of cabinet. 3. Remove screws from sheet metal cover
... Read more. 4. Remove one screw holding blowers in place and rotate out of the way, in order to gain access to 2 of 5 screws that hold the magnetron in place. 5. Unplug magnetron and remove the 5 screws. 6. Drop in new magnetron and re-assemble microwave in reverse order (steps 5-3). 7. Two people restore micro to wall/cabinet. Replace wood spacers, re-install two, large mounting screws (finger-tight). Test device. Secure the two large screws.
Unplug the microwave. Remove the Philips head and safety Torx head screws along the bottom of the sides and rear of the microwave which hold the black cover on. Lift the cover up at the rear and slide it backwards to disengage the tabs on the front top. Remove the cover. Discharge the capacitor by shorting the terminals to each other
... Read moreand then ground. Do this with a well insulated object and be aware there may be a pop when you do this. Keep hands, etc. on the insulated part of the object (screwdriver handle, etc). There's a lot of stored energy in that capacitor. I'd advise first checking the diode to make sure its not bad. Replace it if it is. The Magnatron is held in with a couple of screws on the top and sides. Unplug the connector and remove the screws. Remove the Magnatron. Installation is the reverse of removal.
I want to preface this review by stating that I do some DIY from YouTube, but have no experience in electronic repair. The microwave is over the stove with the extendavent. First I unplugged the microwave, removed the vent and started to unscrew the microwave from the mount. I used a power drill to speed things up. I was able to remove
... Read morethe microwave on my own. I unscrewed the lid on the microwave and took the lid off and there is the magnetron. I opened up needle nose pliers to have each end touch the terminals of the capacitor (holds the power, Dangerous). I made sure to keep my hands on the rubber handles and avoid touching the metal part of the pliers. I used the pliers to remove the plug of the capacitor to the magnetron as well. The magnetron has 4 screws (2 top, 2 bottom). There is a magnet that can hold the screws to keep from falling but I’d still recommend a screwdriver with a magnet on the end. The magnetron has another set of wires connected by a metal bracket like a holder, not really connecting any wiring to the magnetron itself. I had to unscrew 1 screw to removed that. Adding everything back on was easy, same steps back. I plugged in the microwave and tested a cup of water before I mounted it back above the stove. Voila! I did need my wife’s help to hold the microwave on the hinge while screwing into the mount. It doesn’t take a lot of muscle for the help. $85 for the part and ~40 mins to fix a $400 microwave!