Your coupon for will be reflected when you check out!
✖
Your coupon for
✖
Hello!
You're visiting the PartSelect site in U.S.
Would you like to shop on the Canadian site?
Stay on this site
Go to Canadian site
✖
Model Number Locations
1Select Category Type
Select Category Type
2Select Product Type
Select Product Type
3Select {MODEL} Type
Select {MODEL} Type
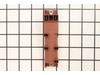
Sample Model Number Tags
Model numbers can be made up of numbers (1005400, for example) or a combination of letters and numbers (LAT1000AAE). The model number will most likely appear on either a paper sticker or a metal plate. Your appliance's model number tag may look similar to the sample model number tags shown here (model number highlighted in yellow):
Model has been saved to My Models. If you're not signed in, your lists are available on this device and will expire within 30 days.
Model has been saved to My Models.
The Grate Foot is a black rubber part which attaches underneath the grate in order to protect your stovetop from being scratched, which it does by cushioning the grate on your gas range. If this part ...
$13.95
In Stock
Order now and your part arrives in 2-3 business days!
The top burner spark electrode, also known as a range surface burner igniter, is designed for use in your gas range. The function of this part is to provide the spark that lights the surface burner. I...
This burner cap is for your gas range, and acts as a cover for the burner head. It is black in color and just over 3 inches in diameter. If your old burner cap is damaged or missing, this is the part ...
$34.95
In Stock
Order now and your part arrives in 2-3 business days!
This is a burner cap for your gas range. The cap acts as a cover for the burner head. If your old burner cap is damaged or missing, this is the part that will replace it. The cap is black in color and...
$33.95
In Stock
Order now and your part arrives in 2-3 business days!
This burner head, or surface burner, is used in ranges and ovens. The burner sends gas through the holes and slots to create an equal flame across the cooking area. If the gas igniter glows but will n...
$49.95
In Stock
Order now and your part arrives in 2-3 business days!
This is a burner cap for your gas range. The cap is black in color and about 3 inches in diameter. The cap acts as a cover for the burner head. If your old burner cap is damaged or missing, this is th...
$21.95
In Stock
Order now and your part arrives in 2-3 business days!
This part is the replacement surface burner head for your gas range. It is silver in color and is approximately 3.5 inches in diameter. This burner is sold individually. The burner head distributes ga...
$44.95
In Stock
Order now and your part arrives in 2-3 business days!
This genuine small burner is an original replacement part from GE, designed for use with a wide range of gas ranges. Positioned between the rangetop and bracket assembly and the burner cap, it plays a...
$44.95
In Stock
Order now and your part arrives in 2-3 business days!
This Genuine OEM GE Electrode Clip is a precision-engineered component designed for use across a wide range of gas ranges. Constructed from durable metal, the clip plays a critical role in securing th...
$16.95
In Stock
Order now and your part arrives in 2-3 business days!
Ask our experts a question about this model and we'll get back to you as soon as possible!
2 questions answered by our experts.
Sort by:
< Prev
1
Next >
Search filter:
Clear Filter
Your search term must have 3 or more characters.
Keep searches simple. Use keywords, e.g. "leaking", "pump", "broken" or "fit".
Sorry, we couldn't find any existing answers that matched.Try using some different or simpler keywords, or submit your new question by using the "Ask a Question" button above!
Bill
January 12, 2020
How do i replace the burner control valve
For model number JGP945SEK2SS
Hello Bill and thank you for writing.
Carefully lift off the burner grates and remove all of the burner caps using Phillip's head screwdriver unthread the screws securing
the burner heads disconnect all of the
spark wires from the surface igniters
attached to the heads
now insert a putty knife under the main
top to release the retaining clips
detach the main top and use a quarter
inch wrench to unthread the screw to
release the grounding wire you can now
set the main top aside next remove all
of the burner control knobs unthread the
mounting screws securing the burner
valves to the front manifold panel open
the oven door and remove the screws
securing the bottom of the manifold
the panel now remove the screws on top set
the front manifold panel aside next
unthread the screws to release the
support bracket detach the appropriate
spark switch
use a half-inch wrench to unthread the
nut securing the gas tube to the burner
valve now unthread the screws securing
the mounting clamp and remove the old
valve before you install the new burner
valve confirm that the gasket is intact
align the new valve on the manifold
position the mounting clamp then thread
and tighten the screw attach the gas
tube to the valve then thread and
tighten the nut snap the spark switch
onto the new valve reposition the
support bracket and secure it with the
screws reposition the front manifold
panel replace the mounting screws on top
secure the two mounting screws on the
bottom as well
align the manifold in the panel and
replace the screws to secure the burner
valves replace the burner control knobs
before you reinstall the main top
we recommend inserting the spark wires
in the orifice, holders to secure them
now set the main top on the frame and
secure the grounding wire with the screw
reposition the right side of the main
top first by hooking the rear edge on
the mounting tab so the top is seated
under the vent now position the rear
edge on the left mounting tab making
sure the officeholders protrude through
the holes in the main top snap the front
edge into place when replacing the
burner heads first connect the spark
wires to the surface igniters align the
heads and rethread the screws to secure
replace the burner caps and reposition
the grates with the repair completed. We hope this helps. Please contact us anytime if you require further assistance.
Was this helpful?
Thank you for voting!
Malcolm
May 5, 2024
When igniting any burner, the Valve Lockout (P/N PS1022340) clicks rapidly, not stopping until the burner is turned off. All the burners will light, but the clicking will not stop. I am guessing that it’s some type of solenoid malfunctioning. I notice this part is no longer available. If this is the problem, is there a replacement part.
For model number JGP945SEK2SS
Hello Malcolm, thank you for your inquiry. Based on our understanding of the issue, we would suggest you checking the spark module, part number PS952864, to get to the root of the problem. We hope this is helpful!
A rubber grate foot on my range top had worn out. I pulled the worn foot out and installed the new grate foot with no tools or accessories. Good as new! Now I don't have to worry about the grate scraping my range top and scratching the paint. I also ordered extras so I won't have to wait if another wears out.