


JJW2530WS00 Jenn-Air Wall Oven - Overview
Sections of the JJW2530WS00
[Viewing 7 of 7]


Keep searches simple, eg. "belt" or "pump".

Dryer Screw
PartSelect #: PS11746840
Manufacturer #: WP90767
This screw is sold individually.
$7.95
In Stock
 – Part Number: 72017")
Refrigerator Touchup Paint (White)
PartSelect #: PS385132
Manufacturer #: 72017
This touch-up paint can be used on a wide variety of household appliances. It is most often used on washers, dryer, refrigerators, dishwashers, ranges, freezers, trash compactors, or microwaves. It is...
$12.58
In Stock

Light Bulb
PartSelect #: PS11749457
Manufacturer #: WPW10169757
This is a replacement light bulb to illuminate the inside of your oven. It is 25 watts and 120 volts. Please wear gloves during replacement if your existing bulb is shattered. Consider ordering a spar...
$44.07
In Stock
 – Part Number: 350930")
White Appliance Paint (12oz)
PartSelect #: PS347819
Manufacturer #: 350930
Appliance spray paint is a great way to cover up any chips and scratches that have appeared on your appliances. Instead of replacing the part entirely, this is an easy fix. This is also a great way to...
$26.17
In Stock

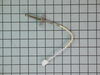
Range Sensor
PartSelect #: PS11744233
Manufacturer #: WP74008369
This sensor detects the temperature within the oven cavity.
$94.63
In Stock

Refrigerator Screw
PartSelect #: PS11742751
Manufacturer #: WP489464
Sold individually.
$9.95
In Stock

Broil Element
PartSelect #: PS11749783
Manufacturer #: WPW10184147
This broil element is found on the roof of the oven.
$94.63
In Stock

Range High Limit Thermostat
PartSelect #: PS11744498
Manufacturer #: WP7403P899-60
L280-110F
$86.24
In Stock

Refrigerator Paint
PartSelect #: PS334404
Manufacturer #: 285006
This is a 12oz (about 355 ml) can of black spray paint that is compatible with a variety of different home appliances and is used to cover and conceal any visible scuffs, scratches or chips. This can ...
$47.22
In Stock


Oven Rack
PartSelect #: PS11749621
Manufacturer #: WPW10176138
Presenting the premium Oven Rack by Whirlpool, your reliable partner for outstanding cooking results. This genuine OEM component is meticulously designed for a robust performance, enhancing your bakin...
$86.24
In Stock

Questions And Answers for JJW2530WS00
We're sorry, but our Q&A experts are temporarily unavailable.
Please check back later if you still haven't found the answer you need.
Common Symptoms of the JJW2530WS00
[Viewing 2 of 2]Little to no heat when baking
Fixed by
these parts
these parts

Show All
Oven not heating evenly
Fixed by
these parts
these parts
Show All
Keep searches simple. Use keywords, e.g. "leaking", "pump", "broken" or "fit".
Scratches in Surface
This product comes in a bottle with a brush like Liquid Paper. It goes on incredibly easy. A second coat might be needed. I wanted to prevent rust from setting in so I covered the scratches and dings. The paint is a little brighter since my washer is 10 years old but it still looks great.
Parts Used:
-
Michelle from Richardson, TX
-
Difficulty Level:Really Easy
-
Total Repair Time:Less than 15 mins
75 of 181 people
found this instruction helpful.
Was this instruction helpful to you?
Thank you for voting!
oven temp wrong
Remove the oven door. Remove 3 self tappers on rear wall of oven to take off a round access panel. Pull out a pre-cut rectangle of insulation. Next I removed the 2 screws holding the sensor in place. Pulling the sensor out a bit told me I was "touching" the correct wires in the SMALL rectangular opening. The wires are not visable and 2 h
... Read more
ands do not fit in this small opening.I looked at the NEW sensor to see the release on the sensor plug. Slip the angled needle nose into the opening and grasp the plug/release side. The plug pulled apart easily. The sensor wire pulls out with a little bit of twisting to fit it out the hole. The new plug pushes in and has to be worked down to where you can reach it. The same angled plier works to re-attach it. It takes longer to read this than to do the job. Best of luck, Al
Read less
Parts Used:
-
Alan from Wallkill, NY
-
Difficulty Level:Easy
-
Total Repair Time:Less than 15 mins
-
Tools:Nutdriver, Pliers
12 of 13 people
found this instruction helpful.
Was this instruction helpful to you?
Thank you for voting!
Replace KitchenAid oven light bulbs
Pull the end of the lens nearest the oven door out of the oven wall. Because our oven is several years old and the bulbs had not been previously changed, I could not pull the lens out with my hand, so used two small screwdriver under the metal tabs which hold the lens in place, the metal holder came out with the lens. Once the lens is r
... Read more
emoved, simply pull out the old bulb and, either while wearing surgical gloves or holding the bulb with a cloth (do NOT allow bare skin to touch the bulb or you will be replacing it again sooner rather than later), push the new bulb's pins into the socket. The lens then is simply pushed back into place.
Read less
Parts Used:
-
Doris from NEW JOHSONVLE, TN
-
Difficulty Level:Really Easy
-
Total Repair Time:Less than 15 mins
-
Tools:Screw drivers
7 of 7 people
found this instruction helpful.
Was this instruction helpful to you?
Thank you for voting!