Your coupon for will be reflected when you check out!
✖
Your coupon for
✖
Hello!
You're visiting the PartSelect site in U.S.
Would you like to shop on the Canadian site?
Stay on this site
Go to Canadian site
✖
Model Number Locations
1Select Category Type
Select Category Type
2Select Product Type
Select Product Type
3Select {MODEL} Type
Select {MODEL} Type
Sample Model Number Tags
Model numbers can be made up of numbers (1005400, for example) or a combination of letters and numbers (LAT1000AAE). The model number will most likely appear on either a paper sticker or a metal plate. Your appliance's model number tag may look similar to the sample model number tags shown here (model number highlighted in yellow):
Model has been saved to My Models. If you're not signed in, your lists are available on this device and will expire within 30 days.
Model has been saved to My Models.
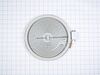
This is a dual ceramic surface burner for ranges. This burner, also known as a heating element, is used within electric ranges to act as a stovetop burner. This burner measures approximately 10 inches...
$98.89
In Stock
Order now and your part arrives in 2-3 business days!
This is foam tape and it is usually used in conjunction with your range, specifically on the cooktop. Its purpose is to help seal the edges of the cook top to the counter top. Another of its functions...
$47.95
In Stock
Order now and your part arrives in 2-3 business days!
This surface element is designed to deliver heat to a specific cooking zone on the top of an electric range, providing consistent and efficient performance for everyday meal preparation. Located benea...
$97.95
In Stock
Order now and your part arrives in 2-3 business days!
This surface element is designed to supply heat to a designated cooking area on the top of an electric range, enabling efficient and consistent heating for everyday meal preparation. Positioned beneat...
$102.77
In Stock
Order now and your part arrives in 2-3 business days!
This part is the replacement spring for the radiant element in your range. It is black in color, curved in shape, and is approximately 1 inch by 1/2 an inch. The radiant element spring is found beneat...
$13.95
In Stock
Order now and your part arrives in 2-3 business days!
Introducing the GE Indicator Light, a crucial feature for your cooktop safety. This small yet significant part is responsible for signalling when a cooking surface is heated or a burner is lit, allowi...
$33.95
In Stock
Order now and your part arrives in 2-3 business days!
Upgrade your kitchen range with this sleek and durable GE installation kit. Specifically designed to ensure a secure and precise fit, this essential kit includes everything you need for a successful r...
$33.95
In Stock
Order now and your part arrives in 2-3 business days!
Questions And Answers for JP3530SJ3SS
Be the first to ask our experts a question about this model!
✖
Ask a Question
Ask our experts a question on this model and we'll respond as soon as we can.
First; turn off breaker to stove. Second; remove two Phillips head screws that hold the top on, located in front, underneath, will have to open the oven door to see. Third; prop the top up. Four; disconnect wire clips of old element. Five; plug in new wire clips of new element. Six; unprop the top and realign
... Read more the top. Seven; replace the two Phillips head screws to secure the top, then close oven door. Eight; turn breaker back on. Done and Back in Action! You Can Do This!
1.- going online to orden part 2 disconnect the power from the aplaince shoot Dow the power 3 tear down the appliance and disconnect the four terminals from the damage part reconnect the terminals to th new part reensamble the appliance and ready to go save $275 bucks in handy man labor