Your coupon for will be reflected when you check out!
✖
Your coupon for
✖
Hello!
You're visiting the PartSelect site in U.S.
Would you like to shop on the Canadian site?
Stay on this site
Go to Canadian site
✖
Model Number Locations
1Select Category Type
Select Category Type
2Select Product Type
Select Product Type
3Select {MODEL} Type
Select {MODEL} Type
Sample Model Number Tags
Model numbers can be made up of numbers (1005400, for example) or a combination of letters and numbers (LAT1000AAE). The model number will most likely appear on either a paper sticker or a metal plate. Your appliance's model number tag may look similar to the sample model number tags shown here (model number highlighted in yellow):
Model has been saved to My Models. If you're not signed in, your lists are available on this device and will expire within 30 days.
Model has been saved to My Models.
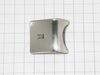
This handle screw, also known as a mounting bolt, is a mounting screw to help secure the door handle to your refrigerator door. If your handle is loose, you may just need to tighten the screw. If your...
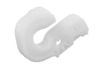
This door basket assembly is supplied by the original manufacturer to provide storage for various food items in refrigerators. It consists of a white plastic base and a transparent shield, measuring 1...
Refrigerator Air Filters are a key component for neutralizing odors and ensuring a fresh stream of air into your refrigerator. Swapping your old filter out for a fresh one isn’t difficult and should t...
The Water filter reduces contaminants such as lead, iron, and chlorine from drinking water. This OEM filter is a genuine part manufactured by LG for use in refrigerators. We recommend you replace eve...
This is the left crisper drawer, designed for use within LG refrigerators. This drawer is an OEM part that is made of clear plastic and features a pair of roller wheels on its rear to easily slide in ...
This is a vegetable crisper drawer designed for use with LG refrigerators. Crisper drawers are used to hold and store vegetables at a specific humidity level than the rest of the fridge, to prolong th...
This water dispenser button is a genuine OEM part designed for LG refrigerators. When you push the button, a valve is activated inside the refrigerator, which releases water from the internal water su...
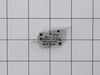
This is a micro switch for various models of LG refrigerators. This switch is responsible for turning the ice dispenser on and off within the freezer compartment of the fridge. If this switch is damag...
This part must be installed by a licensed and trained LG technician that is able to perform a software update, which is required for the installation of this compressor. Part number CJT30000002 is nee...
This is a door seal, also known as a door gasket, for LG refrigerators. This door gasket is used to seal the warmer room temperature from the cooler fridge interior. If the gasket for your refrigerato...
Enhance your LG refrigerator's functionality with this genuine OEM glass shelf. Designed specifically to fit select models, this shelf offers dependable and secure support for your stored produce and ...
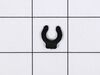
This water tubing clip holds the water fill tube in place in your refrigerator. The water fill tube attaches and supplies water to the ice maker/water dispenser in your fridge-freezer. If the tubing i...
$29.86
On Order
Questions And Answers for LFXC24796S
Be the first to ask our experts a question about this model!
✖
Ask a Question
Ask our experts a question on this model and we'll respond as soon as we can.
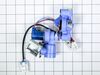
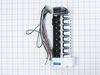
Before you begin, I'd recommend unplugging the refrigerator. You have to slip the putty knife in around the edge of the dispenser panel and carefully release the tabs all the way around and the entire panel pulls straight out. There are three wiring harnesses to unplug. You'll have to remove several screws and release the tabs around the
... Read moreelectronic panel and remove it from the main panel. It's a good idea to take note or even pictures of how the ice and water actuators are positioned on the panel, so you get them situated properly on the new panel. If the ice actuator is not fit correctly on a knob that sticks up it may dispense ice all the time (happened to me). After you transfer the actuators to the new panel and the ice and water dispensing levers, you can re-attach the electronic panel on the left side. make sure all of the wiring harnesses are plugged in and the wires situated out of the way, then re-install the panel by pushing it straight back in. Plug the refrigerator in and test it out.
For this model the ice maker is very easy to replace. All it takes is a phillips head screwdriver. There are two wire connections you have to unplug. Easy out easy in. You do not have to disconnect the water line, just make sure the line is lined up correctly when you reinstall the new icemaker. It seems to take approximately 8 hours befo
... Read morere you start getting ice again. If you have this same model, you already know this ice maker is very slow in making ice and is not able to keep up with daily usage of ice for a household of 3.
Watch YouTube videos on this topic if you are uncertain before tackling the job. The right door was easy to replace. Just pull the gasket with your fingers and it will come off easily. Place new gasket over door and use fingers to press it inside the groove few inches at a time. Pay attention to gasket orientation.
The left
... Read more door is a bit harder because you need to remove the mullion at the door edge using a screw driver. Remove two screws on the center hinge and then slide the mullion up to disengage. Then unplug the wires to remove the mullion. Replace the gasket as described above and replace the mullion reversing the directions shown above.