Parts That Fix Maytag Range MER8700DS1 Oven not heating evenly
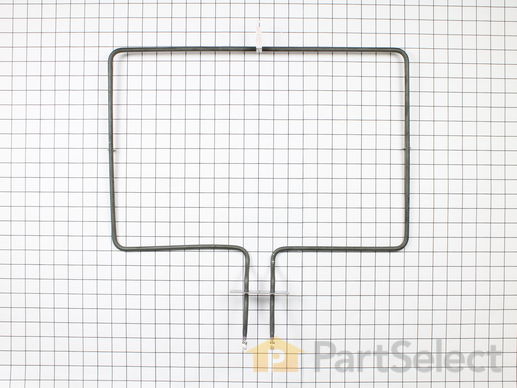
This is a heating element compatible with various makes of ranges and ovens and is sold as an individual part. Measuring 20.5-inches wide and 20.25-inches (with terminals) long, this heating element is a genuine OEM part. If your range is not heating during the bake setting, not heating evenly, or if the element is burnt out or damaged, the element will need to be replaced. This repair is simple and only requires that you disconnect your oven from the wall outlet and use an appropriate screwdriver to disassemble and replace the element with the additional support brackets to secure it.
Replacing your Whirlpool Range Bake Element

Customer Repair Stories
2. Removed two (2) screws from bottom panel in oven cavity
3. Lifted out bottom panel
4. Removed two (2) screws from bake element standoffs.
5. Removed two (2) screws from bake element (Rear of oven cavity)
6. Removed Terminal Block Cover Box by removing two (2) screws and lifting up on it.
... Read more >7. Removed lugs from the ends of the bake element.
8. Extracted bake element.
9 Inserted bake element through rear opening and attached the two lugs removed in step 7.
10 Inserted two screws removed in step 5.
11. This bake element only had a standoff bracket in the front. Used one (1) screw from step 4. for front standoff.
12 Replaced bottom panel and two screws.
13 Reinstalled Terminal Block Cover Box and two screws.
14. Plugged oven in and tested oven.
-
Bryan from ROME, NY
-
Difficulty Level:Really Easy
-
Total Repair Time:15 - 30 mins
-
Tools:Screw drivers
-
Helen from PURVIS, MS
-
Difficulty Level:Very Easy
-
Total Repair Time:Less than 15 mins
-
Tools:Screw drivers
This is a manufacturer-made oven temperature sensor for various models of range. This sensor is designed to accurately detect the internal temperature of your oven and communicate with the control board to control the level of heat inside of it. Over time and through extended exposure to hot temperatures, this sensor can fail and cause your oven to have issues heating or staying at a consistent heat level, at which point it needs to be replaced. This sensor features a wire harness to connect to the control board of the oven, as well as two mounting screws to install it. Replacing this sensor is easy and only requires a screwdriver to unthread it from the lower portion of your oven. This sensor is sold on its own, and does not come with any other necessary parts, like its securing screws.
Customer Repair Stories
The only remotely challenging part was disconnecting the old sensor. I had to figure out where to pres ... Read more s with the flat screwdriver to get it to release.
I had found a good YouTube video and didn't use the app.
-
Sarah from Raleigh, NC
-
Difficulty Level:Really Easy
-
Total Repair Time:15 - 30 mins
-
Tools:Screw drivers
This part is used as a safety feature. If your range overheats this part will shut the range down.
Replacing your Whirlpool Range Range Safety Thermostat

Customer Repair Stories
Works great again...without the light
-
Joseph K from PAHRUMP, NV
-
Difficulty Level:Very Easy
-
Total Repair Time:15 - 30 mins
-
Tools:Pliers, Screw drivers
-
Derek from Houston, TX
-
Difficulty Level:Very Easy
-
Total Repair Time:Less than 15 mins
-
Tools:Screw drivers
This part is for oven ranges, it connects individual wires and protects the device from electrical surges, voltages, and current. With this part, the house power is connected to the range wire harness. Some symptoms replacing the terminal block could be a solution for are little to no heat when baking, element will not heat and/or it will not start. This part will prevent loosening and will reduce damage caused by corrosion (by two different metals). Refer to the instructional diagram for further replacement guidance and exact placement. You must unplug the appliance before installing this part and wear gloves to protect your hands.
Replacing your Maytag Range Range Terminal Block

Customer Repair Stories
Then I removed the fire panel over the terminal block and the issue was apparent. The nuts on the terminal block were corroded. This had cause the resistance in the connection to raise and burn up the ... Read more wire to my oven plug at the terminal block.
I removed the whole back panel and everything else seemed OK visually.
1. I go new connectors for the oven plug, stripped the wires, and crimped on the new connectors.
2. The terminal block DOES NOT come with the nuts to connect the wire to the terminal block. Mine were so corroded they had to be replaced. So I went and purchased the correct ones and installed the terminal block and reconnected all the wires.
3. I applied some dielectric grease to the connections through out the process of reinstalling to prevent it from happening in the future.
-
Jared from UNION GROVE, AL
-
Difficulty Level:Really Easy
-
Total Repair Time:30 - 60 mins
-
Tools:Pliers, Screw drivers, Socket set
-
Joseph from Decatur, GA
-
Difficulty Level:Easy
-
Total Repair Time:30 - 60 mins
-
Tools:Nutdriver, Screw drivers, Socket set, Wrench set


