


PSB1000NWW01 General Electric Microwave - Overview
Sections of the PSB1000NWW01
[Viewing 5 of 5]


Keep searches simple, eg. "belt" or "pump".

Microwave Halogen Light Bulb 120v 20w
PartSelect #: PS2351821
Manufacturer #: WB25X10019
This light bulb is located on the inside of your microwave. The bulb is behind the top grill. It will need to be replaced when it has burnt out and no longer works. Unplug the unit before beginning th...
$22.95
In Stock

Microwave Fuse
PartSelect #: PS1481237
Manufacturer #: WB27X10928
This ceramic microwave fuse is just over an inch in length. It is white in the center, and metal on both ends. This is a 20-amp fuse, and is used to power your microwave. If the touch pad on the micro...
$19.95
In Stock

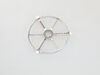
Microwave Rotating Ring Assembly
PartSelect #: PS12709805
Manufacturer #: WB02X32600
This glass tray support ring, also known as a rotating ring, is specially designed for microwaves. It is a genuine OEM part that is guaranteed to fit just like the original part. The support ring is f...
$70.51
In Stock

TRAY GLASS
PartSelect #: PS16873477
Manufacturer #: WB27X43590
This tray rotates in your microwave ensuring more even temperatures.
$117.07
In Stock

Microwave Magnetron
PartSelect #: PS12722595
Manufacturer #: WB26X32629
Genuine OEM magnetron for your microwave. Always use proper safety equipment and follow the manufacturers instructions while installing.
$229.95
In Stock


Microwave Thermostat
PartSelect #: PS2321365
Manufacturer #: WB21X10148
This part will trip once the inside of the cavity overheats and exceeds the recommended temperature.
$34.95
In Stock


Microwave Canopy Mica
PartSelect #: PS1017735
Manufacturer #: WB06X10638
Meet the GE Canopy Mica, a sturdy waveguide cover designed for your microwave. Made with high-quality materials, this essential part safeguards the waveguide channel from any debris, food splatters, a...
$27.95
In Stock

Microwave Thermostat
PartSelect #: PS2321366
Manufacturer #: WB21X10149
This GE Thermostat Thermal Cut-off is a crucial safety component for microwaves. Specifically designed to prevent overheating, it functions as a protective measure by shutting down the appliance if te...
$25.95
In Stock

Shaft Assembly
PartSelect #: PS1016776
Manufacturer #: WB06X10693
Upgrade your microwave with the GE turntable motor coupler. This crucial appliance part professionally connects the turntable motor to the turntable tray, offering smooth and seamless rotation for eve...
$75.41
In Stock

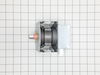
Microwave Motor
PartSelect #: PS1020855
Manufacturer #: WB26X10193
Enhance the functionality of your microwave with this genuine GE turntable motor. This essential component rotates the glass tray within your microwave oven to ensure an even heat distribution. Specif...
$96.97
In Stock
Manuals & Care Guides for PSB1000NWW01
Click to downloadInstall
Installation Instructions
(0.71MB)
Install
Installation Instructions
(1.70MB)
Manual
Owner's Manuals
(3.38MB)
Specs
Product Specifications Sheet
(0.23MB)
Care
Use and Care Manual
(3.97MB)
Questions And Answers for PSB1000NWW01
We're sorry, but our Q&A experts are temporarily unavailable.
Please check back later if you still haven't found the answer you need.
Common Symptoms of the PSB1000NWW01
[Viewing 4 of 4]No heat
Fixed by
these parts
these parts


Show All
Won’t turn on
Fixed by
these parts
these parts


Show All
Touchpad does not respond
Fixed by
these parts
these parts


Show All
Tray won’t turn
Fixed by
these parts
these parts


Show All

Keep searches simple. Use keywords, e.g. "leaking", "pump", "broken" or "fit".
Microwave completely stopped working
Turned out the issue was easily solved by replacing a single, inexpensive fuse.
First off, UNPLUG THE MICROWAVE.
The fuse is located under the plastic grill at the top of the microwave. It's held on by two screws. Once you've removed the screws and taken off the plastic grill, you go to the right side of the mic ... Read more rowave and remove another screw that holds a small metal grill in place. Removing the small metal grill is probably the toughest part of this repair. You kind of have to rock it back and forth a bit to get it to release. Once that's off, you can get to the fuse. I removed the burnt out one with a pair of needle nose pliers. I also put a small piece of cardboard under the fuse when I did this so I didn't accidentally drop it into the innards of the microwave. I did the same thing when I replaced the new fuse. I then plugged the appliance back in and made sure it worked. Once that was confirmed, I replaced both grills.
Read less
Parts Used:
-
Kim from Cliffside Park, NJ
-
Difficulty Level:Really Easy
-
Total Repair Time:15 - 30 mins
-
Tools:Screw drivers
962 of 1249 people
found this instruction helpful.
Was this instruction helpful to you?
Thank you for voting!
Under the vent light bulbs needed to be replaced
Turned of f the circuit breaker to the microwave. Unscrewed the cover (1 screw!) popped out the old bulbs and plugged in the new ones, using the bubblewrap as a handle to be sure my skin didn't touch the light bulbs so the oil from my hands didn't damage or shorten the life of the new bulbs. Turned the circuit back on. That's it!
Parts Used:
-
Robert from Naples, ME
-
Difficulty Level:Really Easy
-
Total Repair Time:Less than 15 mins
-
Tools:Screw drivers
65 of 86 people
found this instruction helpful.
Was this instruction helpful to you?
Thank you for voting!
No power to microwave, no heating.
Unpluged power cord!! Removed front control panel to expose electronics (need to remove top horizontal vent cover to expose mounting hardware). Unplugged leads to control panel board. Removed magnetron with Tstat (3- phillip heads, need stubby). Installed new parts and control panel, plugged it in tested. Done.
Parts Used:
-
Michael from Coulterville, CA
-
Difficulty Level:A Bit Difficult
-
Total Repair Time:30 - 60 mins
-
Tools:Screw drivers
48 of 80 people
found this instruction helpful.
Was this instruction helpful to you?
Thank you for voting!