


T1309ADFH6 LG Washer - Overview
Sections of the T1309ADFH6
[Viewing 1 of 1]
Keep searches simple, eg. "belt" or "pump".

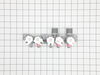
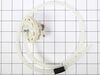
Water Inlet Valve
PartSelect #: PS12374721
Manufacturer #: AJU75152601
This is an authentic LG water inlet valve for a top-load washer. It is designed to control the flow of water into the washer. If your washer is filling slowly, making loud noises, overflowing, or stop...
$147.13
In Stock

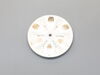
SENSOR ASSEMBLY
PartSelect #: PS16556422
Manufacturer #: 6501KW2002B
This is a replacement sensor assembly for your washer. It may also be known as a motor rotor position sensor. The sensor assembly monitors the direction and speed of the spinning rotor and communicate...
$63.22
In Stock

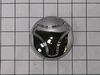
Washer Pulsator Cap
PartSelect #: PS3525704
Manufacturer #: 5006EA3009B
This part is known as a pulsator cap or washplate cap, and is designed for your LG washer. It fits over the washplate mounting bolt and prevents clothes from getting caught on the washplate during a w...
$44.83
In Stock

Washer Pulsator Assembly
PartSelect #: PS12588963
Manufacturer #: AGZ72909711
This is a pulsator assembly, also known as an agitator, for your washing machine. This pulsator sits at the bottom of your washer and is what is used as the main driving force to wash your clothes. Th...
$163.86
In Stock

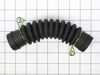
Washer drain Hose Assembly
PartSelect #: PS3617213
Manufacturer #: AEM73213001
This is a drain hose assembly for top-load models of LG washing machines. This hose specifically is used to allow water to drain from the tub to the drain pump of the washer. This hose is made of plas...
$40.88
In Stock

Washer Switch Assembly sensor
PartSelect #: PS3529177
Manufacturer #: 6501EA1001R
This water-level pressure switch in your wash monitors and regulates the water levels throughout the fill, wash, and rinse cycles. You will usually find it inside the control panel or near the tub. It...
$63.16
In Stock

Cap,Cover
PartSelect #: PS3534725
Manufacturer #: MBL62061401
Introducing the unique Cap Cover, a genuine OEM item exclusively crafted by LG. This remarkable component is best suited for specific LG models of washers, serving as a valuable part of the dispenser ...
$44.83
In Stock


Motor Assembly Clutch
PartSelect #: PS3579314
Manufacturer #: 4681EA1009C
Enhance the lifetime of your LG washing machine with the genuine Original Equipment Manufacturer (OEM) Motor Assembly Clutch. This crucial component aids in shifting the drive system between spin and ...
$122.93
In Stock

Main Electronic Control Board
PartSelect #: PS3624963
Manufacturer #: EBR62198104
No Longer Available

Dispenser Assembly
PartSelect #: PS3531202
Manufacturer #: ACZ72910401
This genuine OEM Dispenser Assembly, made exclusively by LG, is designed to enhance the efficiency of your laundry process. It is an integral component for some LG washer models, serving as a secure s...
$34.59
In Stock
Questions And Answers for T1309ADFH6
We're sorry, but our Q&A experts are temporarily unavailable.
Please check back later if you still haven't found the answer you need.
Common Symptoms of the T1309ADFH6
[Viewing 9 of 9]Leaking
Fixed by
these parts
these parts
Show All
Will not agitate
Fixed by
these parts
these parts

Show All
Water Filling Issues
Fixed by
these parts
these parts
Show All
Spinning Issues
Fixed by
these parts
these parts
Show All
Will Not Start
Fixed by
these parts
these parts
Show All
Will not drain
Fixed by
these parts
these parts

Show All
No hot or cold water
Fixed by
these parts
these parts
Show All
Spins slowly
Fixed by
these parts
these parts
Show All
Marks left on clothes
Fixed by
these parts
these parts
Show All
Keep searches simple. Use keywords, e.g. "leaking", "pump", "broken" or "fit".
LE Error Message and won't spin drum properly
I first tested the motor per the service manual. I checked the resistance between the terminals of the 3 pin connector. It's supposed to be 5-15 ohms. The motor checked out so I replaced the main electrical board. It turns out that wasn't the problem. After a brief web search I found out that the hall sensor (which is attached to the
... Read more
motor stator) was the likely cause of the failure. I replaced that and everything works great now. And now I have a spare main board in case that ever fails. I also want to mention that I took the time to remove the dispenser box (where the water comes in and is directed to the different cleaning products) and cleaned it with a very strong bleach solution. It got rid of the mildew and funky smell. It seems that the fabric softener caused a lot of mildew to form inside the dispenser directly above the fabric softener tray. The bleach took care of that. This is probably something that should be done routinely to keep the mildew from forming.
Read less
Parts Used:
-
Mark from Harrisburg, PA
-
Difficulty Level:Easy
-
Total Repair Time:30 - 60 mins
-
Tools:Screw drivers, Socket set
247 of 321 people
found this instruction helpful.
Was this instruction helpful to you?
Thank you for voting!
LE fail code
Removed back of washer with screw driver, Removed outer motor cover with a 17 mm socket (1 bolt), Removed motor stater using 10 mm socket (8 bolts). Left motor plugged in and and tipped to the side exposing the sensor. Unplug and snap off sensor. Reassembled in opposite order. Machine works great. Very easy fix, and perfect fit on part.
Parts Used:
-
scott from GODDARD, KS
-
Difficulty Level:Really Easy
-
Total Repair Time:30 - 60 mins
-
Tools:Screw drivers, Socket set
26 of 27 people
found this instruction helpful.
Was this instruction helpful to you?
Thank you for voting!
"Le" Fail Code on digital display ... Washer would not agitate and made an odd noise.
I first thought there was a mechanical problem but after checking everything mechanical I discounted that idea ... I researched and found out from others with a similar problem that the Le code display was probably a sensor problem ... I ordered a replacement sensor ... With the new sensor available, I removed the access panel to the back
... Read more
of the machine (phillips head screw driver - 4 screws) ... Remove the exposed motor half (1 bolt - 17mm scocket) ... Loosen the motor stator that has the wired coils (10mm socket - 6 bolts) ... Hold motor unit to the side without disconnecting the wiring harness ... Disconnect the sensor wire connector and remove the old sensor ... Clip the new sensor in place (same position as the old one) and re-connect ... Reverse the assembly procedures ... This fixed the problem and the washing machine works like a new one ... The wife is HAPPY!
Read less
Parts Used:
-
Ronny from GASTONIA, NC
-
Difficulty Level:Really Easy
-
Total Repair Time:30 - 60 mins
-
Tools:Screw drivers, Socket set
22 of 27 people
found this instruction helpful.
Was this instruction helpful to you?
Thank you for voting!