Your coupon for will be reflected when you check out!
✖
Your coupon for
✖
Hello!
You're visiting the PartSelect site in U.S.
Would you like to shop on the Canadian site?
Stay on this site
Go to Canadian site
✖
Model Number Locations
1Select Category Type
Select Category Type
2Select Product Type
Select Product Type
3Select {MODEL} Type
Select {MODEL} Type
Sample Model Number Tags
Model numbers can be made up of numbers (1005400, for example) or a combination of letters and numbers (LAT1000AAE). The model number will most likely appear on either a paper sticker or a metal plate. Your appliance's model number tag may look similar to the sample model number tags shown here (model number highlighted in yellow):
Model has been saved to My Models. If you're not signed in, your lists are available on this device and will expire within 30 days.
Model has been saved to My Models.
The hot water inlet valve on your washing machine controls the water flow into the washer. This inlet valve has a standard hose fitting inlet and one water outlet. The water inlet valve opens to allow...
$33.52
In Stock
Order within the next 10 hrs and your part ships today!
This hook locker, commonly referred to as a door lock strike is specially designed for LG washers. It is a small, metal plate that is attached to the washer door. When the door is closed it engages wi...
$38.99
In Stock
Order within the next 10 hrs and your part ships today!
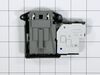
This is a door lock switch, compatible with various models of LG washing machines. This door lock switch is designed to communicate to the control board when the door of the washer is closed, so the d...
$138.56
In Stock
Order within the next 10 hrs and your part ships today!
Keep your LG washing machine operating in peak condition with this Vent Hose with Bellow. This is a genuine OEM item, crafted with high quality to ensure reliable performance and longevity. The vent h...
$44.83
In Stock
Order within the next 10 hrs and your part ships today!
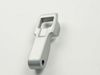
This is a locking pin, and it works in conjunction with your washer. The part measures to be roughly 3 inches long, and less than an inch wide. The pin is cylindrical, off-white in color, and made ent...
$16.73
In Stock
Order within the next 10 hrs and your part ships today!
This is a replacement shock absorber for your washer. The shock absorber is approximately 10 inches long and a little more than one inch wide. It is black and silver in color, and is sold individually...
$36.69
In Stock
Order within the next 10 hrs and your part ships today!
This levelling leg is a genuine replacement part. It is used to help keep your washing machine stable and balanced. It helps support your appliance. It screws into the base of your washer, and you can...
This washer door gasket, also known as a door boot, is specially designed for Samsung front-load washing machines. It is a rubber seal that is fitted around the opening of the washer. The gasket forms...
$151.74
In Stock
Order within the next 10 hrs and your part ships today!
Unplug the washer! Turn off the HOT water valve. Remove the hot water hose at the connection on the back of the washer. Remove the two Phillips head screws holding the top of the washer. Slide the lid toward the rear until you feel it disengage, then lift it off, setting it aside. Unplug the electrical connector on top of the hot wat
... Read moreer valve (just pulls off).using pliers compress the hose clamp, slide it away from the hot water valve and pull the hose off the valve fitting(it will have some water remaining so lift it up and secure it to the brace above the hoses). Remove the two phillips head screws that hold the valve in place. Pull the valve toward the front of the washer to remove it and compare it to the new valve. To install the new valve, reverse all steps insuring tight water hose clamp and electrical connection. Install hot water hose, plug it in and turn on water. Test run and check for leaks. Unplug it and reinstall top.
I removed the Wire and spring from the tub seal and then removed the seal on the side of the washer that contains the Door switch. I removed the two screws that held the door switch in place while holding the switch with my other hand. Once the screws where out I pulled the switch assembly out thru the gap and removed the wires from old
... Read more assembly. I then plugged the wires into the new assembly aligned the holes up and put the screws back in the new door switch assembly. I then put the door seal and tub seal holder back on. This took about 15 minutes. I do recomend that you unplug the washer before starting this process.