Your coupon for will be reflected when you check out!
✖
Your coupon for
✖
Hello!
You're visiting the PartSelect site in U.S.
Would you like to shop on the Canadian site?
Stay on this site
Go to Canadian site
✖
Model Number Locations
1Select Category Type
Select Category Type
2Select Product Type
Select Product Type
3Select {MODEL} Type
Select {MODEL} Type
Sample Model Number Tags
Model numbers can be made up of numbers (1005400, for example) or a combination of letters and numbers (LAT1000AAE). The model number will most likely appear on either a paper sticker or a metal plate. Your appliance's model number tag may look similar to the sample model number tags shown here (model number highlighted in yellow):
Model has been saved to My Models. If you're not signed in, your lists are available on this device and will expire within 30 days.
Model has been saved to My Models.
This is a replacement sensor assembly for your washer. It may also be known as a motor rotor position sensor. The sensor assembly monitors the direction and speed of the spinning rotor and communicate...
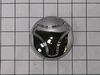
This part is known as a pulsator cap or washplate cap, and is designed for your LG washer. It fits over the washplate mounting bolt and prevents clothes from getting caught on the washplate during a w...
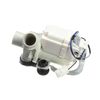
This drain pump is for washers. Drain pump removes water from the washer during the drain portion of the cycle. Unplug the washer before installing this part. Wear work gloves to protect your hands.
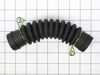
This is a drain hose assembly for top-load models of LG washing machines. This hose specifically is used to allow water to drain from the tub to the drain pump of the washer. This hose is made of plas...
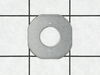
Introducing the customized screw designed exclusively for LG washers. Manufactured with safety and efficiency in mind, installation is straightforward when you adhere to correct safety regulations. Sh...
HOUSING ASSEMBLY,CLUTCH
This drive shaft and shifter assembly (part number AEN73131403) is for washers.
Drive shaft and shifter assembly AEN73131403 connects the motor with the washplate, and shif...
Ensure smooth functioning of your LG washer with our genuine LG Washer Shifter Coupling. This vital part helps your washer shift seamlessly between agitation and spin mode, enhancing the efficiency of...
Introducing the LG Washer Washplate Pulsator Assembly, a genuine OEM replacement part designed for select models of LG washing machines. This pulsator assembly is an integral component, designed to ef...
This genuine LG STATOR ASSEMBLY is designed to perfectly fit your washer and ensure it operates at optimal efficiency. This washer drive motor comes with a sensor and plays a crucial role in rotating ...
We're sorry, but our Q&A experts are temporarily unavailable.
Please check back later if you still haven't found the answer you need.
1 question answered by our experts.
Sort by:
< Prev
1
Next >
Search filter:
Clear Filter
Your search term must have 3 or more characters.
Keep searches simple. Use keywords, e.g. "leaking", "pump", "broken" or "fit".
Sorry, we couldn't find any existing answers that matched.Try using some different or simpler keywords, or submit your new question by using the "Ask a Question" button above!
John
September 5, 2022
Is there a compatible impeller or agitator that can replace the washer pulsator plate on this model ???? I have looked everywhere online about this and cannot find any info. Thanks in advance for any help.
For model number WT1001CW
Hello John, thank you for contacting us. We have pulsator assembly (part number: PS3636099) available which can fit LG WT1001CW. We hope this helps, please do not hesitate to contact customer service for follow-up queries. Thank you.
I first tested the motor per the service manual. I checked the resistance between the terminals of the 3 pin connector. It's supposed to be 5-15 ohms. The motor checked out so I replaced the main electrical board. It turns out that wasn't the problem. After a brief web search I found out that the hall sensor (which is attached to the
... Read more motor stator) was the likely cause of the failure. I replaced that and everything works great now. And now I have a spare main board in case that ever fails. I also want to mention that I took the time to remove the dispenser box (where the water comes in and is directed to the different cleaning products) and cleaned it with a very strong bleach solution. It got rid of the mildew and funky smell. It seems that the fabric softener caused a lot of mildew to form inside the dispenser directly above the fabric softener tray. The bleach took care of that. This is probably something that should be done routinely to keep the mildew from forming.
Removed back of washer with screw driver, Removed outer motor cover with a 17 mm socket (1 bolt), Removed motor stater using 10 mm socket (8 bolts). Left motor plugged in and and tipped to the side exposing the sensor. Unplug and snap off sensor. Reassembled in opposite order. Machine works great. Very easy fix, and perfect fit on part.
I first thought there was a mechanical problem but after checking everything mechanical I discounted that idea ... I researched and found out from others with a similar problem that the Le code display was probably a sensor problem ... I ordered a replacement sensor ... With the new sensor available, I removed the access panel to the back
... Read more of the machine (phillips head screw driver - 4 screws) ... Remove the exposed motor half (1 bolt - 17mm scocket) ... Loosen the motor stator that has the wired coils (10mm socket - 6 bolts) ... Hold motor unit to the side without disconnecting the wiring harness ... Disconnect the sensor wire connector and remove the old sensor ... Clip the new sensor in place (same position as the old one) and re-connect ... Reverse the assembly procedures ... This fixed the problem and the washing machine works like a new one ... The wife is HAPPY!