Your coupon for will be reflected when you check out!
✖
Your coupon for
✖
Hello!
You're visiting the PartSelect site in U.S.
Would you like to shop on the Canadian site?
Stay on this site
Go to Canadian site
✖
Model Number Locations
1Select Category Type
Select Category Type
2Select Product Type
Select Product Type
3Select {MODEL} Type
Select {MODEL} Type
Sample Model Number Tags
Model numbers can be made up of numbers (1005400, for example) or a combination of letters and numbers (LAT1000AAE). The model number will most likely appear on either a paper sticker or a metal plate. Your appliance's model number tag may look similar to the sample model number tags shown here (model number highlighted in yellow):
Model has been saved to My Models. If you're not signed in, your lists are available on this device and will expire within 30 days.
Model has been saved to My Models.
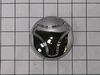
This part is known as a pulsator cap or washplate cap, and is designed for your LG washer. It fits over the washplate mounting bolt and prevents clothes from getting caught on the washplate during a w...
$44.70
In Stock
Order now and your part arrives in 2-3 business days!
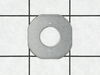
Introducing the customized screw designed exclusively for LG washers. Manufactured with safety and efficiency in mind, installation is straightforward when you adhere to correct safety regulations. Sh...
$20.61
In Stock
Order now and your part arrives in 2-3 business days!
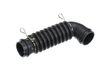
This drain hose is a genuine OEM replacement part supplied by LG for use in their washing machines. It is a light gray pipe with a diameter of 1.25 inches. The drain hose is connected to the drain pum...
$43.92
In Stock
Order now and your part arrives in 2-3 business days!
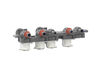
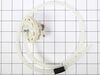
This water-level pressure switch in your wash monitors and regulates the water levels throughout the fill, wash, and rinse cycles. You will usually find it inside the control panel or near the tub. It...
$62.98
In Stock
Order now and your part arrives in 2-3 business days!
This part is the replacement switch assembly for your top-load washer. It contains the switch mechanism and the connecting wire that hooks the door latch to the electrical system of the washer. The li...
$146.72
In Stock
Order now and your part arrives in 2-3 business days!
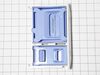
Introducing the LG Dispenser Drawer Assembly, a genuine OEM part designed to provide an exact fit and vibrant performance for your washing machine. This assembly not only houses the compartments for y...
$102.49
In Stock
Order now and your part arrives in 2-3 business days!
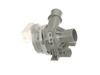
This inlet valve assembly in your washer controls the flow of hot and cold water into the machine, opening and closing as needed during the wash cycle to ensure the drum fills with water at the correc...
$135.30
In Stock
Order now and your part arrives in 2-3 business days!
Disconnect machine from power source. Then, disconnect any tubes from the back side (make sure you close any water valves before doing so). Then, lay the machine on its back to access the bottom of the machine. Then, locate the thermistor and replace it with the new one (the thermistor will have two screws holding it in place, simply remo
... Read moreve the screws and replace the thermistor, then screw it back in). After the new part is installed, stand the machine back up and make sure to connect any tubing to its proper place. Done.
raised the front of washer by hand (literally) and placed two 2x4 blocks under front lip for support. reached up inside washer cabinet and unscrewed the broken leg piece upwards into the cabinet. this was the only way I could get the broken piece out without some specialized tool to reach it from the underside. replacement with the new
... Read more leg was a breeze.
Our Samsung HE washer started making a grinding noise and stopping at the end of the rinse/spin cycle. I had replaced the clutch and seal 2 years ago and it sounded like it was going out again, however we were not getting the gunk inside the tub like before (seal) and the machine was throwing the tE error code when it stopped which it di
... Read mored not do last time. According to the manual this meant a thermistor error and the solution was "Call for Service". The machine is 9 years old and way out of warranty so....uh No! I ordered the new thermistor for $15 plus shipping to correct the tE code before looking to replace the clutch again or get a new machine. The new thermistor arrived, leaned the machine on its back, unplug one connector, remove two screws and pull the old one out of it's hole, push the new one in, replace two screws and the connector and GO! Problem fixed! No tE code, no stopping, no grinding noise. As best I can tell, the old thermistor was faulting during the spin cycle and the machine went into emergency stop mode which made the grinding noise. It was not the clutch or bearing at all. Most of the repair time was moving the machine out and disconnecting lines so I could lean it onto its back. Note: If your machine is stopping before draining, it will have water inside the tub which will drain out of the hole where the thermistor goes when you pull the old one out. It has an o-ring to seal it, so just expect a little water to come out and be ready to catch all the water or put the new one in quickly.