


WTW4880AW1 Whirlpool Washer - Overview
Sections of the WTW4880AW1
[Viewing 5 of 5]


 Diagram and Parts List for Whirlpool Washer")

Keep searches simple, eg. "belt" or "pump".

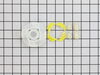
Agitator Directional Cogs
PartSelect #: PS388034
Manufacturer #: 80040
This kit is used for replacing the agitator directional cogs (Agitator Dogs, Agitator Repair Kit, Washer Agitator Dogs, Agitator Dog Ears). The agitator is what creates the thrusting motion in your wa...
$7.31
In Stock

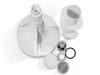
Washer Agitator Cam Kit
PartSelect #: PS334648
Manufacturer #: 285809
This kit included the cam, 4 dogs and bearing.
$13.95
In Stock

Washer Inner Cap Seal
PartSelect #: PS11748108
Manufacturer #: WPW10072840
This is an inner cap seal, but may also be known as an O-ring, and it is a part for your washing machine. Some symptoms replacing this part will fix include: leaking from your appliance, uncontrollabl...
$10.45
In Stock

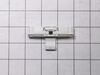
Washer Lid Latch Assembly
PartSelect #: PS3497627
Manufacturer #: W10404050
The point of the lid switch is for the tub to stop spinning when the washer lid is opened. It is a safety precaution just in case someone decides to stick their hand inside the washer while the tub is spinning.
$48.95
In Stock

Washer Drive Pulley
PartSelect #: PS10057144
Manufacturer #: W10721967
This is a replacement clutch assembly or cam kit for your washer. The clutch assembly is mounted on the drive shaft on the bottom of your washer. You may need to replace the clutch assembly if the spl...
$37.76
In Stock

Washer Agitator Cap Barrier w/Seal
PartSelect #: PS11748113
Manufacturer #: WPW10074580
The O-Ring is included with this cap. It can be purchased separately as Part #WPW10072840.
$16.74
In Stock

Washer Drive Belt
PartSelect #: PS11747978
Manufacturer #: WPW10006384
The main drive belt is designed to ride on the pulley until the basket gets up to speed.
$28.33
In Stock

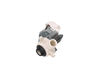
Agitator Kit
PartSelect #: PS334557
Manufacturer #: 285565
This agitator kit does NOT include the fabric softener dispenser (part 8575076A). That must be ordered separately.
$140.95
In Stock

Dryer Screw
PartSelect #: PS11746840
Manufacturer #: WP90767
This screw is sold individually.
$7.95
In Stock

Washer Suspension Rod Support
PartSelect #: PS3502189
Manufacturer #: W10440729
These parts are the replacement suspension rod supports for your washer. They are made of plastic and are approximately 1 ½ inches in diameter. This package will come with an 8-piece set of suspension...
$9.43
In Stock

Washer Washer
PartSelect #: PS11742027
Manufacturer #: WP3949550
This part goes on the agitator retaining bolt.
$12.58
In Stock

Washer Spacer Thrust
PartSelect #: PS11742044
Manufacturer #: WP3951608
Sits in between the agitator base and upper agitator.
$10.45
In Stock
Manuals & Care Guides for WTW4880AW1
Click to downloadInstall
Installation Instructions
(3.08MB)
Install
Installation Instructions
(5.5MB)
Install
Installation Instructions
(3.40MB)
Install
Installation Instructions
(2.43MB)
Manual
Owner's Manuals
(3.6MB)
Manual
Owner's Manuals
(9.40MB)
Specs
Product Specifications Sheet
(0.6MB)
Questions And Answers for WTW4880AW1
We're sorry, but our Q&A experts are temporarily unavailable.
Please check back later if you still haven't found the answer you need.
Sort by:
- < Prev
- 1
- Next >
Search filter:
Clear Filter
Your search term must have 3 or more characters.
Keep searches simple. Use keywords, e.g. "leaking", "pump", "broken" or "fit".
Sorry, we couldn't find any existing answers that matched.Try using some different or simpler keywords, or submit your new question by using the "Ask a Question" button above!
Don
April 1, 2023
Washer comes on by itself, lid can be up or down and no lights come on.
For model number WTW4880AW1
Hi Don, thank you for reaching out. According to our research, it might be the case that the washing machine was previously interrupted mid-cycle or needs to be reset. You need to reset it by unplugging it from the wall outlet or switching off the breaker for at least 10 minutes. If the issue still occurs, you may need to check the electric control board, part number PS3651448, to fix this issue. We hope this solves your problem!
Was this helpful?
Thank you for voting!
Related Parts:
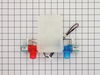
Electric Control Board


$310.88
Special Order
- < Prev
- 1
- Next >
Common Symptoms of the WTW4880AW1
[Viewing 18 of 18]Will not agitate
Fixed by
these parts
these parts

Show All
Leaking
Fixed by
these parts
these parts


Show All
Will Not Start
Fixed by
these parts
these parts


Show All
Spinning Issues
Fixed by
these parts
these parts


Show All
Spins slowly
Fixed by
these parts
these parts
Show All
Will not drain
Fixed by
these parts
these parts
Show All
Lid or door won’t close
Fixed by
these parts
these parts

Show All
Does not dispense fabric softener or detergent
Fixed by
these parts
these parts


Show All
Burning smell
Fixed by
these parts
these parts
Show All
Noisy and Marks Left on Clothes
Fixed by
these parts
these parts
Show All
Shaking and Moving
Fixed by
these parts
these parts
Show All
Marks left on clothes
Fixed by
these parts
these parts
Show All
No hot or cold water
Fixed by
these parts
these parts
Show All
Locking Issues
Fixed by
these parts
these parts
Show All
Cycle Not Advancing
Fixed by
these parts
these parts
Show All
Water Filling Issues
Fixed by
these parts
these parts
Show All
Not cleaning dishes properly
Fixed by
these parts
these parts
Show All
Draining Issues
Fixed by
these parts
these parts
Show All


Keep searches simple. Use keywords, e.g. "leaking", "pump", "broken" or "fit".
washer wouldn't agitate
First pry off the cap of the agitator. Then using a socket remove the bolt that holds the plastic cup in place. Remove this cup by prying it loose from the two tabs that hold it in place. Once this cup is removed you can get to the broken cogs.
Slip the new cogs into the underside of the cup, and slide the cup back down in the a ... Read more gitator housing using the slots on the side for a guide. (You may want to remove the entire agitator and assemble everything upside down, then flip it all back over to mount, so the cogs don't fall out).
Tighten the bolt, snap the cap back in place on top of the agitator and your'e done. Easy repair.
Read less
Parts Used:
-
mike from Kent, WA
-
Difficulty Level:Easy
-
Total Repair Time:15 - 30 mins
-
Tools:Screw drivers, Socket set
943 of 1036 people
found this instruction helpful.
Was this instruction helpful to you?
Thank you for voting!
Lid Lock light blinking, machine will not start
A detailed Service Technician Service Manual is hidden inside the machine on the front panel. It is hidden by the bleach dispenser input. It gives a list of fault codes and instructions for calibration after repair, resetting fault codes, and a manual test mode for stepping the machine through each mode on command. The Tachometer faile
... Read more
d which would not let the machine come up to maximum spin speed. The tachometer is part of the solenoid actuator that shifts the transmission. It is not specifically called out in the manual. Any failure causes the lid lock light to blink which gives the appearance of a lid lock failure
Read less
Parts Used:

-
David from Los Alamos, NM
-
Difficulty Level:A Bit Difficult
-
Total Repair Time:30 - 60 mins
-
Tools:Nutdriver, Screw drivers
319 of 398 people
found this instruction helpful.
Was this instruction helpful to you?
Thank you for voting!
top half of agitator did not move during wash cycle
pull off softner dispenser, pop off agitator cap by inserting straight screw driver into small slot, remove bolt inside agitator with socket wrench and long extension, pull agitator straight up off shaft, place agitator on floor, with feet holding bottom half pull top half apart from bottom half by pulling straight up, note direction of o
... Read more
ld cogs remove and replace with new, reassemble
Read less
Parts Used:
-
dennis from new stanton, PA
-
Difficulty Level:Really Easy
-
Total Repair Time:Less than 15 mins
-
Tools:Socket set
281 of 328 people
found this instruction helpful.
Was this instruction helpful to you?
Thank you for voting!