This an authentic OEM 40-Watt replacement light bulb, used in a number of household appliances. It is specially designed to withstand extreme temperatures, which is why these replacement bulbs are mos...
$11.72
In Stock
Order within the next 12 hrs and your part ships today!
This inner door glass is used in ranges. It creates a transparent heat barrier inside your oven door. For this installment, the only tool needed is a #2 Phillips screwdriver. To repair, first remove t...
$98.12
In Stock
Order within the next 12 hrs and your part ships today!
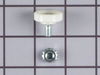
This knob allows you to turn the burner on your range or cooktop on, and it allows you to control the temperature of the burner. If your knob is broken, damaged, or lost, this is the replacement part ...
$24.09
In Stock
Order within the next 12 hrs and your part ships today!
This touch-up paint can be used on a wide variety of household appliances. It is most often used on washers, dryer, refrigerators, dishwashers, ranges, freezers, trash compactors, or microwaves. It is...
$8.00
In Stock
Order within the next 12 hrs and your part ships today!
This temperature sensor is used with self cleaning ovens. Its 1000 ohm resistance increases with temperature. This sensor has male leads and comes with ceramic wire nuts.
This is cookware designed for use in your range or oven. It is a two-piece dish that is used to grill or cook food while the broil function is on, meaning it can withstand high temperatures. This set ...
$37.47
In Stock
Order within the next 12 hrs and your part ships today!
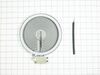
This is the replacement large surface element for your cooktop or range. It is approximately 10-inches in diameter and is 1200/2500 watts. The large surface element is installed under the cooktop and ...
$149.58
In Stock
Order within the next 12 hrs and your part ships today!
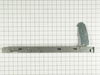
The light socket on your electric range connects the power source to the light bulb. If your oven light is malfunctioning, you may need to replace the light socket. The light socket is located in the ...
$59.58
In Stock
Order within the next 12 hrs and your part ships today!
This bottle of non-abrasive cooktop cleaner breaks down and gets rid of the hardest baked-on stains and residue without causing any harm to your appliance. The bottle is 10 oz and does not require a l...
$17.74
In Stock
Order within the next 12 hrs and your part ships today!
The light cover lens in your oven is designed to protect the light bulb. If your light cover lens is damaged, you will need to replace it. This part is made of clear glass and is roughly 3 inches in d...
$64.38
In Stock
Order within the next 12 hrs and your part ships today!
Questions And Answers for YKERC507HT3
We're sorry, but our Q&A experts are temporarily unavailable.
Please check back later if you still haven't found the answer you need.
This heating element is accessed from the right side of the range. The parts drawings are misleading, making you think that it can be accessed from below -- not so!
Remove the right side panel from the range by removing screws on back edge, and bottom center on the inside. Slide the panel forward to release from tabs on the fro
... Read morent edge, then pull out and off.
Separate the insulation that hides the terminals and access cover for the element., then remove one screw at the rear edge of this panel, and slide it toward the rear, then pull out.
Before disassembling the side, you can check to verify that the element is burned out by removing the rear panel and doing a continuity check on the wires leading to this element from the rear of the range. The wires on my range were a salmon or pink color with high temperature insulation.
1. The wiring diagram on the rear of the oven incorrectly shows a bi-metal element in the L2 side of the oven heating element circuit. There is no bi-metal element in the circuit. 2. There is a fast blow 20 Amp fuse with radial leads in the L2 side of the oven heating element circuit which is N
... Read moreOT shown on the oven wiring diagram on the rear of the oven. If you have a malfunctioning heating element this fuse is probably blown and you will need to replace it by removing the rear panel from the oven. The fuse is located toward the bottom, is shrink-wrapped and contained within a wire bundle. 3. The wiring diagram in the manual shows neither the fuse or the bi-metal element.
To replace the lower heating element (aka the hidden element) Disconnect power to the oven. Remove oven from it's location to gain access to the right side panel. Remove three screws holding the right side panel in place and remove panel Disconnect both wires connected to the element terminals. Carefully pull back fiberglass insulation to reveal element holding bracket. Remove one screw holding the element bracket in place and remove both element and bracket.
Installation is the reverse of these steps but make sure you replace the fiberglass insulation correctly or you will experience problems with heat transfer and a possible hot-spot on the side of the oven.
The quality of this KitchenAid oven is very bad. The parts are cheap and not well finished. No thought has been given to serviceability and the product's documentation is defective. The entire device has been designed for low-cost production and not for reliability or longevity. It is easy to see this when you study the documents and take the device apart. The morel of the story is: don't spend extra money on a KitchenAid oven because a less expensive brand will probably be of equal or better quality of design and/or parts quality. Access to the lower heating element could easily have been designed for front or rear removal. A service technician would charge around $250-$300 to perform this repair including parts.
Two screws remove the front of the sensor (put a pan under the sensor to catch the screws), One nut removes the rear cover to access the rear of the sensor. Separating the two halves of wiring harness takes a little dexterity. BIG TIP! Tie a string to the back of the sensor wire and pull the sensor out from the front making sure the strin
... Read moreg still shows thru the back. If you don't you have a 15 minute job trying to fish the wires at an angle thru the insulation (a very frustrating task). Untie the string from the old and tie it securely to the new. Pull the string from the back and Voila! your new sensor can be plugged in or wirer nutted to the old connection on the back of the stove. Replace the nut and the two screws and you're done!