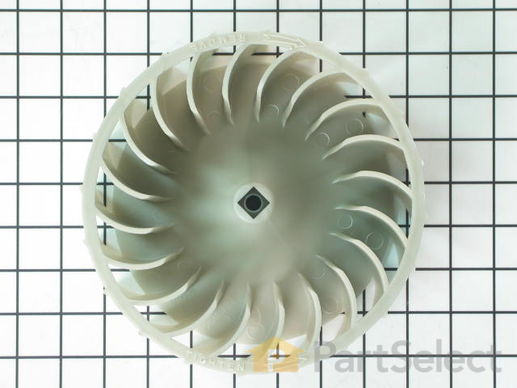
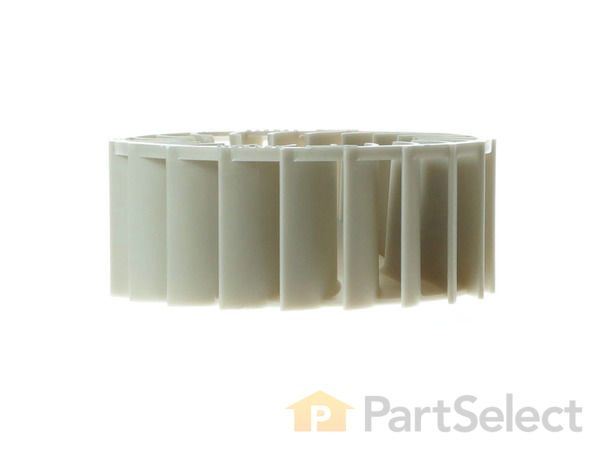
Part Location Diagram of WP697772 Whirlpool Blower Wheel
See part 37 in the diagram
Replacing your Whirlpool Dryer Blower Wheel
( Grid squares measure 1x1 inch )
Customer Service Representative

Get in touch, we're here to help!

Monday to Saturday
8am - 9pm EST

customerservice@partselect.com

Blower Wheel WP697772

★★★★★
★★★★★
7 Reviews

Rated by 3 customers 

Easy 

1- 2 hours 

Ratings submitted by customers like you who bought this part.

$ 70.95
  In Stock
Get FREE EconoShip on orders over $100! T&C apply

Get this part fast! Average delivery time for in-stock parts via standard shipping: 1.8 days.

Does this part fit my model?

Need help finding your model number?
PartSelect Number PS11743811
Manufacturer Part Number WP697772
Manufactured by Whirlpool for Whirlpool, Kenmore, Maytag, KitchenAid
Product Description

Blower Wheel Specifications

The blower wheel pulls air over the heat source, through the clothes drum, and past the thermostats, then pushes it out the exhaust duct. The blower wheel, which is usually plastic, may wear out over time. But if it's noisy, it may simply be clogged with lint. Clean the blower and test to see if the dryer is still noisy. If it is, you probably need to replace it.
How Buying OEM Parts Can Save You Time and Money

How Buying OEM Parts Can Save You Time and Money

Part Videos

Replacing your Whirlpool Dryer Blower Wheel

Replacing your Whirlpool Dryer Blower Wheel
Troubleshooting
This part fixes the following symptoms:
Noisy
This part works with the following products:
Dryer, Washer Dryer Combo.
Part# WP697772 replaces these:
AP6010627, 697772, W10211915, W10874014, WP697772VP, WPW10211915
Back to Top
Customer Reviews
Average Rating:
★★★★★
★★★★★
7 Reviews
5.0
Filter By Rating:
  • 5 Stars
    7
  • 4 Stars
    0
  • 3 Stars
    0
  • 2 Stars
    0
  • 1 Star
    0
Sort by:
  • 1
Sorry, we couldn't find any existing reviews that matched. Try using some different or simpler keywords.
  • 1
Customer Repair Stories
 Average Repair Rating: 2.6 / 5.0, 3 reviews. What's this?
Sort by:
  • 1
Sorry, we couldn't find any existing installation instruction that matched.
Unit not spent
Just replaced part
Other Parts Used:
Blower Wheel Blower Housing Seal Multi Rib Belt Drive Motor with Threaded Shaft - 120V 60Hz Idler Pulley
  • Boonkham from SMYRNA, TN
  • Difficulty Level:
    Really Easy
  • Total Repair Time:
    30 - 60 mins
  • Tools:
    Nutdriver
2 of 2 people found this instruction helpful.
Was this instruction helpful to you?
Thank you for voting!
The blower wheel had fractured due to ingesting some metal objects (previous owner)
Followed instructions for standard blower wheel replacement and repair kit installation, which were straight forward. The only real issue I ran into was removing the blower wheel, The instructions say to turn it clockwise and remove it, however this wheel had been on there for a long time and it also has a taper shoulder so it was not coming off without a fight which is why the dremel tool is listed. I had to cut the old bower wheel out in pieces so I could remove the electric motor, which was easy. Once out and on the bench and only the metal hub left on the shaft a 7/16" wrench and large vise-grips got it to break loose. The good side of this is it allowed me to blow out any lint that had built up on the motor, like new again.
Other Parts Used:
Blower Wheel Dryer Repair Kit
  • virgil from BRECKENRIDGE, MI
  • Difficulty Level:
    A Bit Difficult
  • Total Repair Time:
    More than 2 hours
  • Tools:
    Nutdriver, Pliers, Screw drivers, Socket set, Wrench (Adjustable), Wrench set
1 of 2 people found this instruction helpful.
Was this instruction helpful to you?
Thank you for voting!
craked blower motor
somthing fell down in the blower motor compartment and busted up the bloewr motor fan,and was making noise and out of balance.i changed the blower motor and runs like a charme
  • joe from cheswick, PA
  • Difficulty Level:
    A Bit Difficult
  • Total Repair Time:
    15 - 30 mins
  • Tools:
    Nutdriver, Pliers, Screw drivers, Socket set, Wrench (Adjustable), Wrench set
63 of 142 people found this instruction helpful.
Was this instruction helpful to you?
Thank you for voting!
  • 1
Questions and Answers

We're sorry, but our Q&A experts are temporarily unavailable.
Please check back later if you still haven't found the answer you need.

8 questions answered by our experts.
Sort by:
  • 1
Sorry, we couldn't find any existing answers that matched.Try using some different or simpler keywords, or submit your new question by using the "Ask a Question" button above!
Linda
September 21, 2017
My fan blower was not turning. I put wd40 in it and it started to turn. I was cleaning the area with the vacuum cleaner, lost my balance and the end of the vacuum went into the cage and broke several fins. How do you remove the cage?
For model number 110.70992990
PartSelect logo
Hi Linda, Thank you for your inquiry. I have found a video on our website that you may reference on how to replace the blower wheel. You will find it under part number PS11743785. I hope this helps. Thank you and have a great day!

7 people found this helpful.

Was this helpful?
Thank you for voting!
Rick
January 3, 2019
Do i need a special tool to remove and replace the blower wheel ??
For model number MAYTAG DRYER Model MEDC700VW0.
PartSelect logo
Hello Rick, thank you for your question. You will not need any special tool. You would take a 7/16 wrench and put it on the motor shaft behind the blower wheel housing to hold the blower wheel in place. Then you would take a 1/2 inch ratchet with extension and put it into the blower wheel. There should be arrows on the blower wheel that tell you which way to turn it. I hope this helps!

7 people found this helpful.

Was this helpful?
Thank you for voting!
Bill
January 27, 2018
How do I remove the blower fan?
For model number MEDX700XW0
PartSelect logo
Hello Bill, Thanks for your question. Unplug the dryer. Remove the screws on the top and remove the top panel. Remove the front console. Release the locking tabs from the wire harness to pull it off the board. Remove the  panel that holds the control board at the back of the dryer - unscrew it and set it aside. Take out the screws that hold the console mount plate on. Remove the access panel at the bottom of the dryer. Remove the two lower screws on the front panel and the door switch wiring harness, taking the plug apart in the process. Open the dryer door and remove the screws for the lint housing. Close the door and take the top screws off of the panel (be careful that the panel does not fall). Pull the panel off slowly so you do not tear the seal behind it. Disconnect the moisture sensor wire harness, then remove the front bulkhead by lifting it out of the dryer. Clean out any lint in the fan. Remove the belt from the idler pulleys. Remove the drum. Use a wrench and a ratchet to help remove the fan (you may need a chisel if it is stuck badly). Pull the extension out and then you can remove the blower wheel. Reverse this process to install. I hope this helps.

3 people found this helpful.

Was this helpful?
Thank you for voting!
Ron
November 13, 2018
The video you ref. To remove a blower is of a rear unit. My blower is in the front, and appears to have some alan head screw holding it on. Or does the blower itself screw off just like the one in the video? I don't see why i'd need to unmount the motor, can't i just hold it somehow if the blower does just need unscrewed, and reverse threaded im sure.
For model number MEDX500XW0
PartSelect logo
Hello Ron, Thank you for the question. Use a wrench and a ratchet to help remove the fan (you may need a chisel if it is stuck badly). Pull the extension out and then you can remove the blower wheel. Reverse this process to install. I hope this helps.

1 person found this helpful.

Was this helpful?
Thank you for voting!
Sandy
November 5, 2017
My fan turns freely on the shaft (it's stripped apparently) so how do i get it off? The video instructions listed under this part are not correct.
For model number 11085081401
PartSelect logo
Hi Sandy, Thank you for your question. The part number referenced in the previous question is meant as a general video to give information on how to install the part. For more information regarding on how to remove the blower wheel from your dryer, you will need to consult your owner's manual or check with the manufacturer. I hope this helps.

1 person found this helpful.

Was this helpful?
Thank you for voting!
Corinda
June 24, 2021
I’m looking for this part can you help me ? I’m looking for a blower fan.
PartSelect logo
Hello Corinda, Thank you for contacting us. Please feel free to contact Customer Service at 1-888-738-4871 from 8:00 AM to 10:00 PM Eastern time, 7 days a week if you need help placing an order. We are looking forward to hearing from you!

Was this helpful?
Thank you for voting!
Martha
November 26, 2022
The check vent sensor comes on and the vent is clear.
For model number Medb385dw3
PartSelect logo
Hello Martha, thank you for reaching out. If the check vent sensor is on, it means that the airflow to the dryer is limited or the lint filter is clogged. We suggest that you clean the lint filter, part number PS11731421. If the lint filter is warped or damaged then you will need to replace it to resolve the issue. If you require assistance to place an order, please contact customer service. We hope that helps!

Was this helpful?
Thank you for voting!
Related Parts:
John
January 29, 2023
Can you tell me if this part Y-303836 3-12913 is compatible with my model number Maytag dryer?
For model number MEDX700XW0
PartSelect logo
Hello John, We are glad you asked! Yes, the Blower Wheel PS11743811 you had chosen is compatible with your model. The part Y-303836 3-12913 is not compatible. We are pleased to have been able to help.

Was this helpful?
Thank you for voting!
  • 1
You May Also Need ?
Model Cross Reference
This part works with the following models:
PartSelect Number: PS11743811
Manufacturer Part Number: WP697772
Brand
Model Number
Description
Kenmore
10687884100
Dryer
Kenmore
10687884300
Dryer
Kenmore
10687884600
Dryer
Kenmore
10697502820
Dryer - Kenmore Dryer Model 106.97502820 (10697502820, 106 97502820) Parts
Kenmore
11060052990
Dryer
Kenmore
11060052991
Dryer
Kenmore
11060056990
Dryer
Kenmore
11060056991
Dryer
Kenmore
1106007299
Dryer - Kenmore Dryer Model 110.6007299 (1106007299, 110 6007299) Parts
Kenmore
11060072990
Dryer
Kenmore
11060072991
Dryer
Kenmore
11060092990
Dryer
Kenmore
11060092991
Dryer
Kenmore
11060094990
Dryer
Kenmore
11060094991
Dryer
Kenmore
11060096990
Dryer
Kenmore
11060096991
Dryer
Kenmore
11060097990
Dryer
Kenmore
11060182000
Dryer
Kenmore
1106090199
Dryer - Kenmore Dryer Model 110.6090199 (1106090199, 110 6090199) Parts
Kenmore
11060901990
Dryer
Kenmore
1106090299
Dryer - Kenmore Dryer Model 110.6090299 (1106090299, 110 6090299) Parts
Kenmore
11060902990
Dryer
Kenmore
11060904990
Dryer
Kenmore
1106090799
Dryer - Kenmore Dryer Model 110.6090799 (1106090799, 110 6090799) Parts
Kenmore
11060907990
Dryer
Kenmore
11060912990
Dryer
Kenmore
1106092299
Dryer - Kenmore Dryer Model 110.6092299 (1106092299, 110 6092299) Parts
Kenmore
11060922990
Dryer
Kenmore
11060924990
Dryer
Customer Service Representative

Get in touch, we're here to help!

Monday to Saturday
8am - 9pm EST

Contact Customer Service