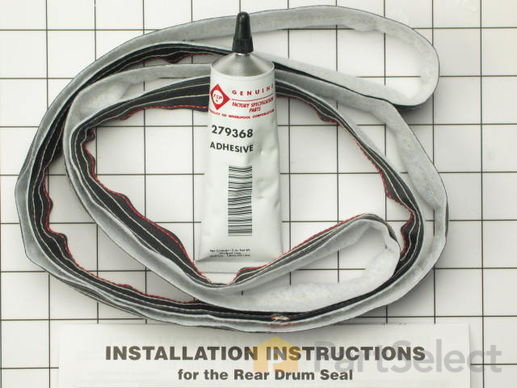
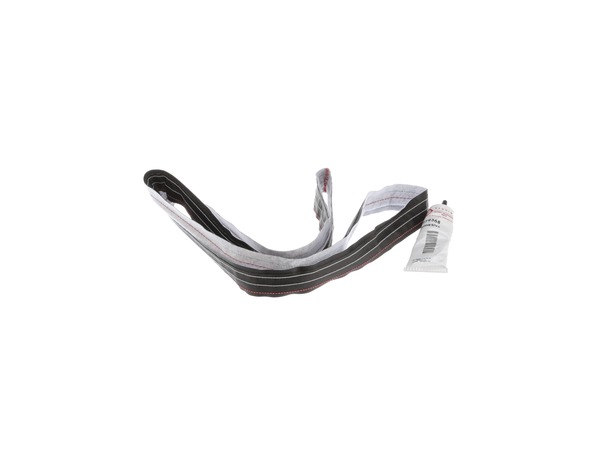
This seal kit for large capacity gas and electric clothes dryers includes a seal, an adhesive, and an instructions sheet. This felt seal for the back of the drum is sewn with red thread.
How Buying OEM Parts Can Save You Time and Money
Troubleshooting
This part fixes the following symptoms:
Noisy | Marks left on clothes
This part works with the following products:
Dryer.
Part# 279408 replaces these:
AP3094149, 3028, 2018, 279408, 279408VP, 347885
Customer Reviews
Average Rating:
★★★★★
★★★★★
10 Reviews
4.9
Filter By Rating:
5 Stars
9
4 Stars
1
3 Stars
0
2 Stars
0
1 Star
0
Sort by:
< Prev
1
Next >
Search filter:
Clear Filter
Your search term must have 3 or more characters.
Keep searches simple. Use keywords, e.g. "leaking", "pump", "broken" or "fit".
Sorry, we couldn't find any existing reviews that matched. Try using some different or simpler keywords.
★★★★★
★★★★★
Allan A - November 14, 2022
Verified Purchase
Easy
The job went well from start to finish. The website was easy to navigate. I found the correct part quickly and it was in stock. The order process was smooth and I had the part in a few days. The part arrived undamaged and matched the original. The adhesive tube had leaked a little but was not a problem. There was still more than enough adhesive to complete the job. The installation video was clear and very helpful. The installation went well. The seal fit well and the dryer is performing normally. The worst part of the job was removing the old adhesive from the drum.
★★★★★
★★★★★
Robert M - July 21, 2022
Verified Purchase
Part fit and installation was easy
Part fit and installation was easy. Youtube video showed how to remove the old seal and how to install the new one.
★★★★★
★★★★★
Steve A - May 1, 2022
Verified Purchase
right stuff
They make it as easy as they can for you!
★★★★★
★★★★★
Bruce B - May 20, 2021
Verified Purchase
Easy repair. Worked like it was supposed too.
We didn't know it was the old drum seal staining our clothes. No staining now that the drum seal has been replaced.
★★★★★
★★★★★
James P - March 4, 2021
Verified Purchase
Keeping the heat in
I was able to correctly repair my 20+yr old dryer with the parts ordered from PartSelect. They arrived in a timely manner and my down time was cut to a minimum.
★★★★★
★★★★★
Rod L - October 3, 2019
Verified Purchase
Would purchase from again
Ordered a drum seal kit for an aging clothes dryer. Part came in a timely manner as expected. I had the drum prepped for the install and took me 30 minutes to complete. After allowing a day for the adhesive to set up, the dryer is working great.
★★★★★
★★★★★
Bob C - May 28, 2019
Verified Purchase
Debated on replacing the dryer. The old girl is running like new. Thanks!
The seal fit perfectly and was relatively easy to install. I'll keep it going as long as there are parts to do so. I'm glad I found Parts Select. They seem to have all the common parts.
★★★★★
★★★★★
DAVE P - November 11, 2018
Verified Purchase
great outcome!
The part came on time, and the instructions were very clear. The adhesive makes this repair a bit messy, and my first reassembly attempt went badly - seal folded over in a couple of places - but after a quick fix, perfection. I hope this lasts as long as the original - if so, we're all set until 2048.
★★★★★
★★★★★
Chris T - March 22, 2018
Verified Purchase
Easy repair
Easy to put on no problem.
★★★★★
★★★★★
Mike C - March 21, 2018
Verified Purchase
Easy repair, was able to utilize previous comments in aiding in repair.
My 25 year old Kenmore is back to running like new after installing a new motor and replacing the seals.
< Prev
1
Next >
Customer Repair Stories
Average Repair Rating: 2.9 / 5.0, 26 reviews.
What's this?
Sort by:
< Prev
1
2
3
Next >
Search filter:
Clear Filter
Your search term must have 3 or more characters.
Keep searches simple. Use keywords, e.g. "leaking", "pump", "broken" or "fit".
Sorry, we couldn't find any existing installation instruction that matched.
My old dryer drum had become noisy and loose and prone to getting stuck while running.
I replaced the front seal and bearing, split ring bearing and rear seal. It was technically pretty easy. The thing to do is watch the videos provided by PartsSelect AND go to Youtube and watch a couple of others. Once you see several guys do the job and look over your own machine, it all becomes obvious. Some tips: Work cleanly, you will
... Read more be dealing with dryer dust and shredded gasket material. Use a vacuum and put down newspaper or a drop cloth. While you have it apart, clean the inside of the machine, and check the other moving parts (eg, rear bearing and drive belt). The glue for the rear drum seal is runny and dries fast so work reasonably quickly. I held the seal on with clothes pins and binder clips and glued about a foot of seal at a time. Everything else goes on easily. They dryer is like a new machine-good for another 30 years.
followed instruction on your website. It took more than 2 hours, but the active working time was ~20 minutes, plus ~ half hour to clean the inside of the dryer ( amazing amount of lint/dust/coins-still wondering how the coins got out of the rotating drum). The rest of the time was waiting for he glue to set.
s. from WALNUT CREEK, CA
Difficulty Level:
Really Easy
Total Repair Time:
1- 2 hours
Tools:
Screw drivers, Socket set
1 of 2 peoplefound this instruction helpful.
Was this instruction helpful to you?
Thank you for voting!
black streaking on white clothing
the repair was straight forward. I am a machine shop owner so I have a little knowledge about mechanics.the repair took 2 and 1/2 hours due to cleaning lint from everything that I could reach and removing all of the excellent factory adhesive. If someone could do this repair in less than one hour properly. .
We discovered that the front of the dryer popped off after removing screws at the bottom of the front panel. The tumbler seal had rotted away, the drum support rollers were frozen and the belt had broken. My husband did most of the work. I assisted, this was a 2 man job. We removed the old seal glue with Goo Gone, we put the new
... Read moreseal on with both of us working on it using clothes pins. Then we glued the new seal with one of us holding the seal up while the other put the glue under it. My husband replaced the drum support rollers, got the idler pulley ready and put the belt around the drum. He lifted and I guided the tumbler (drum) into position. I held the drum while he installed the idler pulley assembly. I kept holding the drum while he got the front panel, put it in position and re-connected the electrical wires on it. Once we had that done he was able to install the front panel. Then came the moment for the test drive, and what do you know but it worked!! We didn't have to spend $$ for a new dryer, it cost us some time (probably around 5 hours total, taking apart, ordering parts and putting together), and a little over $100!! We were happy!
Removed the top and front panel, removed the dryer drum. Removed the worn out rear drum seal. I scraped and sanded the old glue residue from the rear of the drum. I used "0000" steel wool to clean the "brown seal residue" from the rear panel where the new seal on the drum would rub/seal against the rear panel. I used spring clamps to
... Read morehold the seal in place prior to appling the glue. The glue was applied to the drum/seal and allowed to dry 30-45 min. I replaced the front drum seal (some of the other discussions in your forum had good hints on replacing this seal, better than the printed instructions), also replaced the belt and applied a light amout of lubrication (3 in 1 oil) to the idler pulley and the drum rollers. The dryer runs smoothly and quietly and most importantly no more brown streaks on clean clothes.
Opened up machine per instructions. After examining drum slides and rear drum bearing, determined that all should be replaced due to excessive wear. Drum slides were the chief cause of the squealing, and they were as simple to replace as removing 4 nut drive screws, pulling off the old parts, and replacing with new. The drum bearing
... Read more had to be coaxed out by tapping with a screwdriver, but the old was just able to be pushed in. All parts came with instructions, so the repair was easy. And no more squealing!
After reading about repairs to the drum rollers, it was suggested to change the rear drum seal at the same time. The drum rollers were very easy to change and took no time at all. The rear seal was a different story. The instructions in the packet could have been more explicit. The seal has to be streched around the drum at first. Then an
... Read mored only then can you install the seal on the drum edge. You should also have several clamps available to hold the seal in place as you glue the outside flap. Leave the clamps in place until the glue dries, then re-install the drum.
Dryer started making noises years ago. Finally it was intermittently starting, then...didn't start at all. It made a buzzing noise, like the motor was in over-torque. Then it over heated and wouldn't do anything until it cooled down. Then the cycle started all over again. I thought it best to change out all the worn parts. Found the belt,
... Read more the rear seal, the rollers and motor all needed to be replaced. All were very simple to do. Followed the instructions and videos from others located on this site.
We're sorry, but our Q&A experts are temporarily unavailable.
Please check back later if you still haven't found the answer you need.
4 questions answered by our experts.
Sort by:
< Prev
1
Next >
Search filter:
Clear Filter
Your search term must have 3 or more characters.
Keep searches simple. Use keywords, e.g. "leaking", "pump", "broken" or "fit".
Sorry, we couldn't find any existing answers that matched.Try using some different or simpler keywords, or submit your new question by using the "Ask a Question" button above!
Barbie
November 25, 2019
The rear roller drum is broke and i can replace that just fine. However i need to know if the roller support has to be replaced? At least on the one that the broken roller was on. The center of the roller has a bigger hole so it would have been dealing with a lot of weight and the drum hitting it. Should the rear bearing glide and seal also be replaced?
For model number 11086874100
Hello Barbie, thank you for your question. We would recommend replacing both of the rear rollers and supports for this unit. If the drum seal is worn and causing noise and friction, it should be replaced as well.
2 people found this helpful.
Was this helpful?
Thank you for voting!
Kurtland
November 11, 2019
I have an old Whirlpool dryer. Will this rear drum seal kit fit on my dryer?
For model number LZE7500W0
Hello Kurtland, thank you for your question. The rear drum seal for this unit is actually PartSelect Number: PS333333. Good luck with your repair!
1 person found this helpful.
Was this helpful?
Thank you for voting!
Phil
October 14, 2022
Looking for a Kenmore rear felt seal
For model number 110.86670100
Hello Phil,, thank you for writing. The Rear Drum Seal Kit is part PS334194 and we sell it here on our website. We hope this helps.
Was this helpful?
Thank you for voting!
Christian
December 3, 2023
Is the perimeter 79 inches? Would it fit my Kenmore dryer model number 110.C65902500 ser MS2701256
For model number 110.C65902500
Hello Christian, thank you for asking. We cannot confirm that this seal will fit your model. The length is 78.5" Fits drum which are 25" in diameter. We hope this helps.
Item is in stock and will ship today if your order is placed before 4:00 PM Eastern Standard Time.
If your order is placed after 4:00 PM EST, the in stock items will ship on the next business day.
On Order
Item is not in stock and usually ships 3-5 business days from the time you place your order.
Special Order
Item is not in stock and usually ships 10-15 business days from the time you place your order.
NLA - No Longer Available
This item is no longer being made by the manufacturer, and cannot be added to your shopping cart.
[{"position":0,"name":"Home","title":"Home","url":"/"},{"position":1,"name":"Dryer","title":"Dryer","url":"/Dryer-Parts.htm"},{"position":2,"name":"Seal or Gasket","title":"Seal or Gasket","url":"/Dryer-Seals-and-Gaskets.htm"},{"position":3,"name":"279408","title":"279408","url":""}]
You added 1 item to your cart
✖
$
Qty:
Total item(s) in cart:
Order Subtotal
$
*Taxes and shipping will be applied during checkout