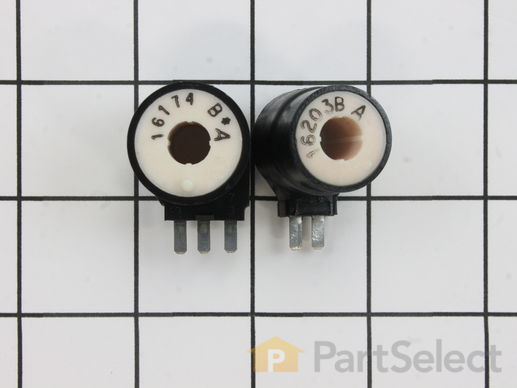
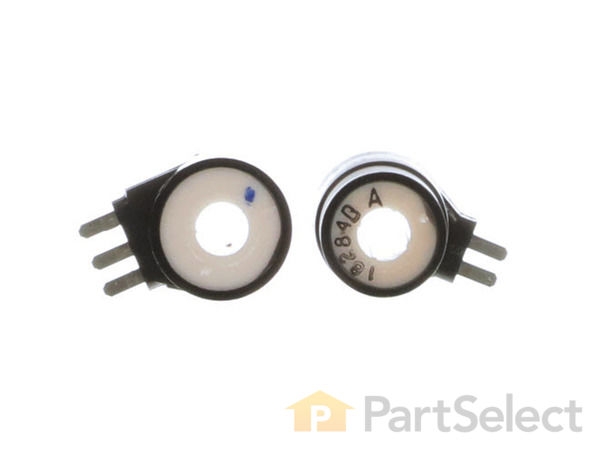
This kit contains two coils, one is a two-wire secondary coil and the other is a three-wire booster coil. Both coils in the ignition coil kit should be used together in the clothes dryer. Some of the symptoms that this kit could be a solution for are: If there is no heat, not enough heat, or clothes takes too long to dry. In this case, the gas valve coils can be defective and replacing this part will help. Customers rate this project as easy. Refer to the installation diagram for further instructions. For safety, unplug your dryer before repair.
Keep searches simple. Use keywords, e.g. "leaking", "pump", "broken" or "fit".
Sorry, we couldn't find any existing reviews that matched. Try using some different or simpler keywords.
★★★★★
★★★★★
Joseph D - August 4, 2021
Verified Purchase
GE Dryer Fix
. The coil kit fixed the issue. Easy installation. Awesome website to use for parts and guidance.
★★★★★
★★★★★
Lynda J - June 24, 2021
Verified Purchase
Easy repair no problem
The part came right on time and worked great and we were back in business
★★★★★
★★★★★
AJ M - January 15, 2020
Verified Purchase
Amazing Customer Service
I appreciate your troubleshooting help and the access to a manual and wiring schematic for an off-brand, 12 year-old dryer was mind-boggling. Bummed out that my parts took over a week to arrive (even with expedited service fees), but I suppose the weather impacted their arrival. The parts were exactly what was required and I had it up and running in about an hour.
★★★★★
★★★★★
Chris R - September 13, 2019
Verified Purchase
Fixed our dryer, easy!
Our dryer stopped working, I did a little troubleshooting, and isolated three areas that might have been the problem. I did an impedance test on the two coils for the gas control valve while they were cold, then ran the dryer. The gas would only kick on one time, and then remain off. After the dryer kicked on and warmed the coils, I did an impedance test on the coils and found that one of them had zero impedance or an open circuit. This meant that the coil had a break down that only occurred while it was warm. I ordered new coils, installed them in less than 10 minutes and now the dryer look works like new! Great company, great help tips too!
★★★★★
★★★★★
John J - August 16, 2019
Verified Purchase
Great part worked as expected
Received parts in a week. Installed them and my dryer is back up and functioning!
★★★★★
★★★★★
Robert T - August 9, 2019
Verified Purchase
Past worked great
I love this site for fixing small problems. My dryer was not heating , so I found an answer in the question section that had the ohm reading for what a working could should have. I checked mine and the two pin coil was good (proper readings) but my three pin coil gave no reading at all. I knew it was a bad coil. So I ordered this set of coils, replaced them and everything works good now.
★★★★★
★★★★★
Dennis V - January 7, 2019
Verified Purchase
Easy & Correct Repair Listed
Read up on PartSelect's symptoms of dryer heat stopping during cycle; these fixed the concern. Very easy repair, more importantly the PartSelect web site 'hit the nail on the head'.
Awesome performance all-around!
★★★★★
★★★★★
James B - December 2, 2018
Verified Purchase
The right part.
It was the right part to repair my dryer. I first Goggle the repair problem with my dryer and it gave me different videos. I figure out what was wrong with my dryer from the videos. I then order the parts from PartSelect. It only took me less than 20 mins. to replace the part. I have order before from PartSelect and always got the right part and delivered on time. Thanks PartSelect.
★★★★★
★★★★★
Michele C - November 18, 2018
Verified Purchase
Easy repair!
I used the website to tell me that 90% of the problems were caused by either the ignition coils or the sensor. Not wanting to wait, I bought them both. Shipping took longer than promised, but the company said they'd reimburse me the difference in cost for I paid for expedited service. We installed both and the problem was fixed saving us hundreds of dollars!!!
★★★★★
★★★★★
GORDON D - November 8, 2018
Verified Purchase
Easy repair,
I replaced these and flame sensor,dryer works like it should again
< Prev
1
2
3
Next >
Customer Repair Stories
Average Repair Rating: 3.8 / 5.0, 41 reviews.
What's this?
Sort by:
< Prev
1
2
3
Next >
Search filter:
Clear Filter
Your search term must have 3 or more characters.
Keep searches simple. Use keywords, e.g. "leaking", "pump", "broken" or "fit".
Sorry, we couldn't find any existing installation instruction that matched.
No heat to dry clothes.
There was a lot of screws. And I cleaned everything well. The one part was bad so I replaced them all to make sure it'll last.
Flame would come on and go out,and little or no heat
Unhooked power,shut off gas, pulled top cover off,two Philips screws one on each side hold the front panel in.took belt off, pulled drum,than change out, flame sensor,M coils,and igniter,be careful igniter breaks very easy,I broke my new one so had to use my old one so really the problem with no heat was either the Mcoils or the flame sen
... Read moresor
Gas dryer would generate heat at the beginning of the cycle but would stop after 5 min and would start making a buzzing noise.
Unplug from electric outlet. Use putty knife to press on two brackets holding the top cover. Raise top cover. Unscrew two screws holding the front panel. Raise front panel up and move to the right (careful with the wires). Disconnect wires from coils. Unscrew two screws holding a small bracket holding the coils. Replace coils and reassemb
... Read morele everything. (HINT: make sure you drum is empty. Mine contained dump clothes, and it turned out front panel actually provides support to the drum, so mine was hanging there with some weight in it - probably not good).
Read less
Denis from LONGMEADOW, MA
Difficulty Level:
Easy
Total Repair Time:
15 - 30 mins
Tools:
Screw drivers
1 personfound this instruction helpful.
Was this instruction helpful to you?
Thank you for voting!
Gas burner worked sometimes only.
Dryer was working, only burner was working occasionally only. So, in result the drying time was very long, and clothes were cold and still not satisfactionally dry; occasionally only it was hot. It became obvious to me that gas burner only occasionally is working. On the Internet I found some instructables, mostly on YouTube, but also on
... Read morethis site (the Burner diagram): thus I have learned that the culprit must be the two tiny ignition coils: they worked only sometimes, so it was only a jeopardy when checking them using a continuation meter (voltmeter with continuation feature). For the access to the burner combo I used a small checking door right below the large door, in front wall of the dryer. There are only two small screws which hold a small piece of metal which cover these tiny coils. However, I had to disconnect the burner from gas pipe to get better access to those screws. (Of course, I also disconnected the dryer from power and I had to disconnect those wire connections on the burner combo to get access to the burner). It works perfectly after this repair.
Read less
Marek from CHICAGO, IL
Difficulty Level:
Really Easy
Total Repair Time:
30 - 60 mins
Tools:
Screw drivers, Socket set, Wrench (Adjustable)
1 personfound this instruction helpful.
Was this instruction helpful to you?
Thank you for voting!
Dryer did not completely dry the clothes. It required several cycles to dry clothes.
I unplugged the dryer and pryed open the top by inserting a screw driver in the space 1inch from the top on the side. After i opened it and lifed it up, I removed the one screw on both sides found in the inner part towards the front top. I then removed the front panel. The coils are toward the bottom left side. They are held in by a brac
... Read moreket which is held in by 2 screws. I removed the outer screw and loosened the inner screw. ( you can remove both screws but it was not necessary).I then swumg the bracket around and was able to lift out the coils. I removed the connectors and relaced the coils. Once done I re-assembled the dryer. The problem was solved.
Read less
Lester from CHICAGO, IL
Difficulty Level:
Really Easy
Total Repair Time:
30 - 60 mins
Tools:
Screw drivers
1 personfound this instruction helpful.
Was this instruction helpful to you?
Thank you for voting!
No heat
Raise the top and remove the front panel assembly. One philips screw, 24mm gas line coupler and 3 electrical connectors frees the burner assembly. Slid the old igniter out and the new one in.2 philips screws to remove the coil retainer and replace the coils.
My dryer was heating up very briefly blowing hot air initially then cool. I have a stacking washer/dryer set (2002). I initially turned off the gas valve at the wall, ran the dry for several minutes to clear the gas line, then unplugged the power. I was then able to pop the top using a flathead screw driver, securely prop it open, unhook
... Read morethe wiring harness to the front panel, unscrew the two front panel screws, and remove the entire front without having to unstack the units. From there, you remove the two screws holding the bracket over the coils (2 of them), remove the electrical connectors attached to both coils and replaced them with the new ones. I then replaced all brackets, screws, and such (you'll need to lift the drum when putting the front back on and make sure it is lined up), plugged it back into power and turned on the gas to test the unit which worked perfectly. The 62% of the time seems to be an accurate figure as nothing else had to be done to the unit. Pretty easy stuff...good luck.
Read less
Case from Los Angeles, CA
Difficulty Level:
Easy
Total Repair Time:
15 - 30 mins
Tools:
Screw drivers
0 of 2 peoplefound this instruction helpful.
Was this instruction helpful to you?
Thank you for voting!
No heat/intermittent heat. Ignitor glowed but no gas flame.
White Westinghouse WDG547PB Dryer. Removed access panel (lower left front of dryer) by removing phillips head screw below access panel. Removed two phillips head screws holding bracket that holds coil in place. Removed coil, disconnected electrical connector. Connected electrical connector to new coil and set in place. Repeat for second c
... Read moreoil. Reinstall bracket and access panel. Job complete. Dryer back in service with no problems.
Read less
Jeffrey from Richmond, TX
Difficulty Level:
Easy
Total Repair Time:
15 - 30 mins
Tools:
Screw drivers
11 of 12 peoplefound this instruction helpful.
Was this instruction helpful to you?
Thank you for voting!
No heat.
As others have described in more detail... I lifted the top, removed the 2 screws holding the front panel (one on each side, inside the control panel on either side - not the easiest to get at, but not too bad), popped the clips holding the front panel in place and removed it. With the front panel off, the location of the coils is obviou
... Read mores (lower left side). The only challenging aspect of this repair is that the 2 screws holding the coils in place are really torqued in so it was crucial to use the exactly correct size screwdriver and not let the screwdriver slip while unscrewing those screws. Actually swapping out the coils took seconds, of course they have to go in exactly the same way as the old ones. I did take a few minutes extra to vacuum out years of lint from the inside of the dryer. Overall, much easier and cheaper than I was expecting and now I know where everything is inside the cabinet.
Read less
Steven from San Francisco, CA
Difficulty Level:
Easy
Total Repair Time:
Less than 15 mins
Tools:
Screw drivers
2 of 3 peoplefound this instruction helpful.
Was this instruction helpful to you?
Thank you for voting!
no heat to dryer at startup
Very easy fix on this system as described in other reviews. Simply unplug, lift top, remove two retaining screws on the dryer face, remove face from front of drum. Locate both coils at the lower left corner of the gas valve assembly.
DAN from FELCH, MI
Difficulty Level:
Easy
Total Repair Time:
15 - 30 mins
Tools:
Screw drivers
0 of 1 peoplefound this instruction helpful.
Was this instruction helpful to you?
Thank you for voting!
< Prev
1
2
3
Next >
Questions and Answers
We're sorry, but our Q&A experts are temporarily unavailable.
Please check back later if you still haven't found the answer you need.
14 questions answered by our experts.
Sort by:
< Prev
1
2
Next >
Search filter:
Clear Filter
Your search term must have 3 or more characters.
Keep searches simple. Use keywords, e.g. "leaking", "pump", "broken" or "fit".
Sorry, we couldn't find any existing answers that matched.Try using some different or simpler keywords, or submit your new question by using the "Ask a Question" button above!
Sam
December 13, 2017
I change the igniter because was not lighting and then was still the same, I check for power to the igniter and was going power but still not lighting.
For model number fgq332es2
Hi Sam, Thank you for the question. I suggest trying to replace the 'M' Series Ignition Coil Kit,PartSelect Number PS470049. You can also test them with a Multi-Meter. The two prong coil will read 1,000-1,300 ohms, and the three prong coil will read 1,300-1,400 ohms across prongs 1&2, and 500-600 ohms across prongs 1&3. Hope this helps.
12 people found this helpful.
Was this helpful?
Thank you for voting!
John
August 12, 2017
My dryer will not light. I see the heating coil come on and get hot, but no Flame. Could it be the ignition coil kit? Thanks.
For model number FGQ1442ES0
Hi John,
Thank you for your inquiry. In most cases this part is the problem and needs to be replaced. You could also check your radiant flame sensor with a multi-meter to see if that part is malfunctioning at all. That is the second most likely part to cause a problem like this. While you are testing parts I would also suggest testing your control thermistor as well. Good luck with your repair!
My dryer is not heating up. I had the issue of it not turning and ordered a drum belt from you and got that issue fixed. I read your previous replies about checking the coils with a multi meter to see if they are bad. Before I remove the coils to check them, do I need to turn off the gas to the dryer? I have a multi meter to check with.
For model number FDGB23RGS1
Hello Bob, Thank you for the question. Yes, the gas should be turned off before checking the coils. Hope this helps!
4 people found this helpful.
Was this helpful?
Thank you for voting!
Ron
March 4, 2018
Dryer will dry for awhile then shut off. Have been using dryer on touch up setting. This dries but only cycles for 15 minutes at low heat setting. Is my issues in the moisture sensor? Thank you.
For model number AGQ7000ES0
Hi Ron, Thank you for the question. Sounds like you will need to replace the Interface Board/Timer, PartSelect Number PS1152216. This board tells the element when to heat up. Hope this helps!
3 people found this helpful.
Was this helpful?
Thank you for voting!
Jim
February 22, 2018
Hi, i am replacing the coils on a combo dryer. The instructions above seem to be for a stand alone. How do i replace these coils and also the starter switch? Thanks for any help.
For model number GLGT1142CS1
Hello Jim, thank you for your question. Even though the repair video is for a stand alone dryer, the installation on your unit would be the same. Once you gain access to the heater section, by removing the slanted panel under the dryer control panel, there will be a safety cover that can be removed. All the heater, coils, thermostats should be visible from there. You could then follow the following instructions for installing the coils:
Remove 2 Phillips screws with short handled Phillips driver that hold the gas valve coil bracket in place. Unplug and remove both coils, installed new coils and bracket. Re installed safety panel, screws and slanted cover.
I hope this helps!
2 people found this helpful.
Was this helpful?
Thank you for voting!
Rich
February 20, 2019
I replaced the Flame sensor and the coils at the same time still takes over 3 hours long to dry. What can I do?
For model number FAQG7001LW0
Hello Rich, Thank you for the question. I suggest checking the Control Thermistor, PartSelect Number PS1149368.This part controls the temperature of the inside of the dryer drum. This part is located in the blower housing. This part can be tested with a multi-meter. It should ready 50K ohms of resistance at 77 degrees F. Thank you for your inquiry, good luck with this repair!
Will this kit work with propane? If not do you have one that will? Thank you
For model number AGQ7000ES1
Hi John,
Thank you for your question. Yes it will. Good luck with your repair.
1 person found this helpful.
Was this helpful?
Thank you for voting!
Boris
November 30, 2017
How many 'm' series ignition coil kit i need
For model number DG400AXW2
Hi Boris,
Thank you for your question. You will just need to buy one 'm' series ignition coil kit for your appliance. I hope this helps. Thank you and have a great day!
Was this helpful?
Thank you for voting!
Mike
January 11, 2018
I replaced this part igniter still doesnt glow and cant here gas turn on whats next?
For model number FAQG7011LW0
Hi Mike,
Thank you for your question. If you have already replaced the coils, there are some other parts that you will need to check to see which one is causing the issue. You will need to check the flame sensor, the control thermistor, the igniter, the limiter, the blower housing and wheel, and the thermostat. I hope this helps. Thank you and have a great day!
Was this helpful?
Thank you for voting!
Karen
July 8, 2019
I have changed the ignition coil kit, Flame sensor, and igniter. My dryer spins but no heat. Any thoughts on what to trouble shoot next? Thank you
For model number FDG336RES0
Hello Karen, thank you for your question. It sounds like the issue is a thermostat. We would recommend testing the thermostats in the unit to determine if one of those are the issues. I hope this helps!