White-Westinghouse Washer Parts

Westinghouse Appliance Parts

Popular White-Westinghouse Washer Parts

Your Price
$13.75
   In Stock
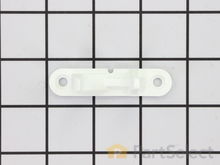
Westinghouse Washer Door Strike
★★★★★
★★★★★
63 Reviews
PartSelect Number PS890617
Manufacturer Part Number 131763310
The door strike on your washing machine allows your washer door to lock properly, and operate efficiently. If you notice that your washer door will not open or close, leaks or the washer will not start or spin, you may need to replace the door strike. This part is for front load washers and is white in color. The part is made of plastic and is roughly 2 inches in length. To complete this repair, you will only need a Phillips screwdriver. Most of our customers found this repair to be easy and took less than 15 minutes to complete it. This part is sold individually, not as a part of a kit, and is a genuine part approved by the original manufacturer.
Fixes these symptoms
  • Door latch failure
  • Door won’t close
  • Leaking
  • See more...
Installation Instructions
Joy from Columbia, MO
Broken Door Catch
This was one of the simpliest repairs I have ever done taking less than 5 minutes to complete. On the inner door I removed the two screws that hold the plastic catch in place. I then removed the broken catch and put the new catch in place. Finally I replaced the two screws that hold the catch in place and it was done. Read more...
Your Price
$24.91
   In Stock
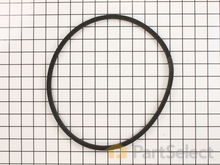
Westinghouse Washer Drive V-Belt
★★★★★
★★★★★
28 Reviews
PartSelect Number PS1146950
Manufacturer Part Number 134511600
This rubber V-style drive belt slips on the motor pulley to bring the basket to the required speed. If you notice a burning rubber smell or grinding noises coming from your washer, your washer does not start, drain, spin properly (will not spin/spins slowly/will not agitate properly), or if your washer shakes or moves during the cycle; check your drive belt for signs of wear and tear. Replace the drive belt if you notice that the belt looks damaged. This OEM part is approximately 35 inches in length, and sold individually.
Fixes these symptoms
Installation Instructions
rodney from fairfield bay, AR
replace broken drive belt
carefully pry up on front washer top to release plastic keeper pins,remove 2 phillips screws from beneath lower front washer panel,slightly lift upward on panel to release.remove old broken belt,push new belt beneath large tub pulley,put belt on small motor pulley,push back belt tension /idler arm,start belt on large tub pulley,turn tub pulley by hand to run belt on,release tension on idler arm.replace front panel and lower top.WALAAH!!!! you are done. Read more...
Your Price
$39.64
   In Stock
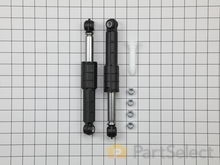
Westinghouse Washer Shock Absorber Kit
★★★★★
★★★★★
22 Reviews
PartSelect Number PS3508101
Manufacturer Part Number 5304485917
This shock absorber kit is an authentic OEM part that is sourced directly from the manufacturer. The kit includes two dual-stage shock absorbers, one spare shock mounting pin, and four locking nuts. These shock absorbers keep your front-load washer from shaking vigorously by absorbing and reducing vibrations from the wash and spin cycles of your appliance. This kit comes with two shock absorbers because it is recommended to replace both at the same time, as they wear at the same rate. To access your washer shock absorbers, simply remove the lower access panel after disconnecting the power to the appliance.
Fixes these symptoms
Installation Instructions
Douglas from Medical Lake, WA
Both vibration shock absorbers broken
removed 2 screws and removed top access cover. removed 2 screws and removed front access cover. removed 4 retaining pins (one with nammer and punch because it was stuck) connected lower ends of new shocks with plastic pins, extended each shock to slip fit and connected upper ends to wash tub mounts. Reinstalled panels. I wish I could say that it all went well from there but......when the shocks broke, apparently the hit the motor took was enough to cause an electronic failure of the speed cycle control chip. Now Im waiting for that part. Read more...
Your Price
$127.79
   In Stock
Westinghouse Washer Front Load Door Lock and Switch Assembly
★★★★★
★★★★★
30 Reviews
PartSelect Number PS12364048
Manufacturer Part Number 131763256
This door lock and switch assembly is manufactured to lock the door on your front load washer to prevent it from opening while it is running. You may need to replace the door lock and switch if the door does not open or lock. Your washer will not start if the door does not lock. This part is also known as a washing machine door lock assembly. As per the manufacturer, some models require a new wire harness and a door strike for this door lock assembly to work on the appliance. The original style lock would require the door lock kit.
Fixes these symptoms
  • Leaking
  • Lid or door won’t close
  • Locking Issues
  • See more...
Installation Instructions
DOUG from KING FERRY, NY
Door on washer wouldn't lock or start
1. Unplug unit.
2. Unscrew 2 nuts holding top in place in rear of unit using phillips head screwdriver.
3.Slide top back and remove.
4. Open door of washer and unscrew 2 screws holding in door lock unit.
5.Pull out unit from the top and install new unit reconnecting the 3 wire connections.
Read more...
Your Price
$152.40
   In Stock
Westinghouse Washer Drain Pump - 120V 60 Hz.
★★★★★
★★★★★
23 Reviews
PartSelect Number PS7783938
Manufacturer Part Number 137221600
This is a 120 volt, 60 hertz drain pump that is manufactured to remove water from the tub of your washer once your clothes are washed. This part is the pump and motor assembly, which includes a red flapper to prevent drain backflow. You will need to remove the front panel of your washer to access the drain pump. The tools you will need for the repair are a Phillips screw driver, a putty knife, a pair of slip joint pliers, and a 5/16 nut driver. Be sure to disconnect the water supply from your washer before doing the repair. The metal edges on the appliance are sharp, so use work gloves to safely complete the repair.
Fixes these symptoms
Installation Instructions
kenneth from willard, OH
would't spin all water out or rinse out clothes
uplugged washer took front off washer 2 screws pryed up top pump was mounted with 2 screws and 2 wires took off found change in pump and the fins to pump worn off ordered part off line the wait for part was longer than the amount of time to fix problem and cost of part saved me about $25-35 if I was to buy local worth wait save money and fix problem washes like new spins and drains all water from tub. Read more...
Your Price
$163.16
   In Stock
Westinghouse Washer Drain Pump - 60Hz 120V
★★★★★
★★★★★
14 Reviews
PartSelect Number PS2342445
Manufacturer Part Number 137108000
This pump helps expel water from the washing machine and is activated after the spin speed is maintained for a specific period of time.
Fixes these symptoms
Installation Instructions
Charles from Raleigh, NC
drain pump motor had seized as result of foreign objects
After turning off water, disconnecting power, and sucking water out of the tub and drain hose with a shop vac, I removed the front kick panel (took out two sheet metal screws). Then I removed two mounting screws from the pump assembly, and disconnected two hose clamps (inlet and outlet hoses) with a pair of pliers. Very simple, very easy. The pain in the fanny came when I tried to reattach the hoses. The hose clamps apparently require either a special tool or a technique I'm not familiar with. I finally tossed them and purchased two standard screw and band hose clamps which made the final connections a breeze. The surprise came when I found that the motor had seized because of a pair of tweezers that had somehow worked into the motor impeller. Free of tweezers and coins, the new motor works great! To quote another one of your contributors: wife happy! Read more...
Your Price
$284.82
   In Stock
Westinghouse Washer Bellow Kit
★★★★★
★★★★★
4 Reviews
PartSelect Number PS1148773
Manufacturer Part Number 134515300
Also known as a Door Boot Seal and is used in front load washers. This part is used to keep the clothes inside the tub during the wash cycle. The folds in the bellow allow the tub to move separately from the door during the spin cycle. NOTE: This part has been redesigned by the manufacturer and is interchangeable with the old design.
Fixes these symptoms
Installation Instructions
Peggy from New Castle, PA
Old Bellow Ripped
remove top of machine by removing 3 screws along the top edge in the back of your machine and then sliding the top back and up. Then loosen the screws holding on the control panel enough to get to the 2 screws at the top of the door panel. Next remove bottom panel by removing 2 screws along bottom edge then pulling it free from snaps. Then along the outside lip of the bellow, just inside the door, is a wire clip that is easily removed by prying it past rubber lip with a screw driver and lifting it away. Remove the door panel by removing the 2 screws you exposed by loosening the control panel and 2 more along the bottom that were exposed when removing bottom panel. After the door panel is removed and the bellow is completely exposed, you will find that it is held in place by a circular spring which wraps the whole way around the drum opening. Again it can be removed by prying it out away from the groove in which it sits with a screw driver. Now your machine is broken down as far as it needs to be. From here you can follow the directions included in your new bellow kit and put it back together by following these instructions in reverse. Read more...
Your Price
$57.78
   In Stock
Westinghouse Washer Selector Knob
★★★★★
★★★★★
44 Reviews
PartSelect Number PS2330885
Manufacturer Part Number 134844410
This selector knob, also be known as the laundry appliance control knob, is meant for your washer or dryer. This model is sold individually and takes a D-shaped shaft. The purpose of this part is to attach to the shaft of a rotary or starter switch, which is located on the control panel. To install this part, remove your old selector by grabbing it with a firm grip and pulling it straight off. If the metal insert came off with the old part, pull it off as well, making sure the new knob will have enough room to snap in its place. No tools are required to make this repair.
Fixes these symptoms
Installation Instructions
charles from new holland, OH
Dryer squealed like a pig and at times the drum stopped rotating
First thought the problem was a stretched drum belt or bad idler pulley. Ordered a new belt and idler assy plus spring. Replaced those items with relative ease following suggestions obtained at this site.However, problem persisted and I now suspected a bad drum bearing. Odered the bearing kit and replaced same using the following procedure.
1. Removed the cover from the back of the dryer (held in place via two phillip head screws)
2. Pushed down on the idler assy and removed the idler spring to release the drum belt.
3. Inserted flat tip screwdriver between the top panel and the dryer main body in the front of the dryer to pry the top loose from the two retaining clips.
4. used phillips screwdriver to remove the two retaining screws (one left, one right) that hold the front panel to the main body of the dryer. (about a foot down from the top of the dryer).
5. disconnected the wiring plug on the top right hand side at the top of the dryer.
6. lifted the front panel slightly removing it from the main body and placed it to the side.
7. lifted the rear of the drum to release it from the bearing bracket and removed the drum belt.
8. Pulled the drum through the front of the dryer body and moved it to an open work area.
9. Reached into the Dryer and loosened the two
bearing bracket screws with a nut driver. Here's where another pair of hands would have come in handy. Holding the ground bar on the back of the drum with on hand, reached into the dryer and finished removing the bracket screws somehow managing not to drop the tiny grounding ball (size of a BB) Removed the badly damaged plastic bracket, grounding bar, and grounding ball and set
them aside to be discarded later.
10. Used impact driver with phillips attachment to remove two of the three screws that hold the bearing to the back of the drum (these are on the inside) The third screw's head stripped out and I had a very difficult time removing it. Had it not been for that, the job would have taken less than an hour.
11. I had my wife hold the bearing in place while I started the three retaining screws.
12. My wife also got behing the dryer and held the grounding bar in place while I installed the new bearing bracket . (this kept me from loosing the grounding ball)
I just reversed the rest of the procedures to install the drum belt, drum, front panel, etc.
The dryer works like new now, doesn't squeal.
Also replaced the on/off switch knob (just pulled the old one from the stem and slid the new one on.
Read more...
Your Price
$13.30
   In Stock
Westinghouse Washer Drive Belt - 6 ribs
★★★★★
★★★★★
2 Reviews
PartSelect Number PS419285
Manufacturer Part Number 134051000
This is a drive belt for your washing machine. This part spins the basket in your appliance by connecting the drive motor to the drive system. You will need to replace the drive belt if your pumps are not spinning, your washer is not agitating, or you are noticing excess noise and/or a burning smell. This belt is black with six ribbings. To replace this part, you will need a Phillips screwdriver.
Fixes these symptoms
  • Burning smell
  • Spins slowly
  • Will not agitate
  • See more...
Installation Instructions
Carmen from Foreston, MN
motor burned out, tub quit going around
First I turned off the water and disconnected the hoses. I took off the back panel and unscrewed the 4 bolts holding the motor in place. The grounding screw was impossible to remove, so I had to cut the wire off. Took out motor and disconnected the electrical connector. Put new motor in (ordered new belt, figuring it would need replacing - was still in excellent shape, but replaced it anyway), bolted in the motor (socket set works best on further away bolts, screwdriver for closer ones). Put the belt on the motor first and then pulled it up over the side of the tub and turned the tub to get it around the whole tub - took alittle bit of turning to get it on. Plugged in electrical connector and screwed grounding wire into hole. Replaced back panel and water hoses. Got a bit dirty and sweaty but not too hard to do it yourself, as I am a 48 yr woman and don't usually do this kind of thing. Read more...
Your Price
$53.43
   In Stock
Westinghouse Washer Water Inlet and Dispenser Valve
★★★★★
★★★★★
10 Reviews
PartSelect Number PS1145692
Manufacturer Part Number 134371220
The water inlet and dispenser valve is used in washing machines. The function of this part is to control and monitor the amount of water flow into the washer. If there is leaking during use, your machine will not fill with water, or there is no hot or cold water entering the washer, it is important to replace the water valve to solve the problem. For this repair, you will need a Phillips head screwdriver and a flathead screwdriver. For installation instructions, refer to the manual provided by the manufacturer. Remember to unplug your appliance from the power source before beginning this repair.
Fixes these symptoms
Installation Instructions
Robert from Schenectady, NY
Leak in the big hose connecting the pump to the washer
The top, control panel and front and back of the machine are removed - all by just removing simple sheet-metal screws. NOTE: remove the soap drawer, because there are two longer screws behind the drawer front. When replacing these later, get them just snug because "tight" will crush the supporting plastic. Don't bother to unplug all the wires to the control panel - just tape it to the top of the machine so it doesn't fall. The rubber part to be replaced is held to the machine by three large spring-held bellows clamps. Squeeze the ends with a pair of pliers and slide them off the tubing. When putting the new part on, I found that the cramped space and difficult access made getting two of the spring-held bellows clamps impossible to get back on, so I used automotive-style stainless hose clamps, which screw tight from the side. Be cautious to get them very snug but not super tight because, you can crush the plastic tubing to which you are fastening. Reassembly of the panels on the machine is the reverse. Read more...

Westinghouse Washer Appliance Types

Related Westinghouse Washer Parts

Popular Westinghouse Washer Models

Below are the most popular Westinghouse Washer models we have. Enter your model number in the search box to find your model.