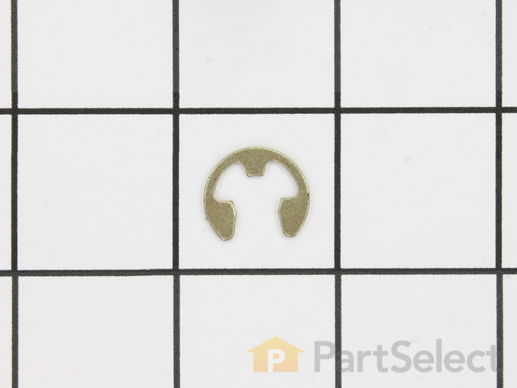
Part Location Diagram of WP354987 Whirlpool Idler Shaft Retaining Ring
See part 9 in the diagram
Replacing your Maytag Dryer Idler Shaft Retaining Ring
( Grid squares measure 1x1 inch )
Customer Service Representative

Get in touch, we're here to help!

Monday to Saturday
8am - 9pm EST

customerservice@partselect.com

Idler Shaft Retaining Ring WP354987

Rated by 18 customers 

Easy 

1- 2 hours 

Ratings submitted by customers like you who bought this part.

$ 14.36
  In Stock

Get this part fast! Average delivery time for in-stock parts via standard shipping: 1.8 days.

Does this part fit my model?

Need help finding your model number?
PartSelect Number PS11741848
Manufacturer Part Number WP354987
Manufactured by Whirlpool for Maytag, Whirlpool, Kenmore, KitchenAid
Product Description

Idler Shaft Retaining Ring Specifications

This idler shaft retaining ring is well under an inch long and is made of metal.
How Buying OEM Parts Can Save You Time and Money

How Buying OEM Parts Can Save You Time and Money

Part Videos

Replacing your Maytag Dryer Idler Shaft Retaining Ring

Replacing your Maytag Dryer Idler Shaft Retaining Ring
Troubleshooting
This part fixes the following symptoms:
Noisy
This part works with the following products:
Dryer, Washer, Washer Dryer Combo, Mixer.
Part# WP354987 replaces these:
AP6008708, 3-12958, 312958, 354987, 3934678
Back to Top
Customer Repair Stories
 Average Repair Rating: 3.1 / 5.0, 18 reviews. What's this?
Sort by:
  • 1
  • 2
Sorry, we couldn't find any existing installation instruction that matched.
Bearing and shaft noise.
Followed the directions of the video and all went smooth. Cleaning the lint and parts was the more time consuming than the actual repair. 30 minutes for the repair and an hour for the clean. All and all very easy.
Other Parts Used:
Idler Pulley Wheel and Bearing Roller Shaft Idler Shaft Retaining Ring Idler Arm Screw Sleeve
  • Franklin from YPSILANTI, MI
  • Difficulty Level:
    Really Easy
  • Total Repair Time:
    1- 2 hours
  • Tools:
    Nutdriver, Pliers, Screw drivers
1 person found this instruction helpful.
Was this instruction helpful to you?
Thank you for voting!
Dryer emitted a squeaky noise every time it started
We inherited this dryer three years ago upon purchasing our current house. At that time I found this website to purchase and install a couple of the baffles that were missing. This time, I checked the troubleshooting for my current problem and ordered all of the parts I felt I needed to resolve the problem. Once I received the parts, I followed the great how-to videos by Steve to disassemble the front of the dryer and remove the drum. I could not get to the repairs right away since the interior of the dryer was quite dirty and I took a lot of time to clean it out. Once I got to removing and replacing the drum rollers, idler pulley, rear drum felt shaft, and drum belt, everything went smoothly and was just as easy as Steve described in the videos. If I didn't have such a dirty machine interior, removing the old parts and installing the new parts would have taken less than an hour. I had to hold off on installing the front glide kit and front drum felt seal since I forgot to order two of each (I'll install these at a later date. I proceeded to putting everything back together and testing the dryer. The dryer now runs quietly and works great.
Other Parts Used:
Idler Pulley Shaft Washer Retaining Ring Idler Pulley Wheel and Bearing Roller Shaft Idler Shaft Retaining Ring Multi Rib Belt - 91-5/8 Inches Dryer Drum Felt Seal Front Glide Kit Drum Support Roller Kit
  • Robert W from OTSEGO, MI
  • Difficulty Level:
    Easy
  • Total Repair Time:
    More than 2 hours
  • Tools:
    Nutdriver, Screw drivers, Socket set, Wrench (Adjustable)
2 of 2 people found this instruction helpful.
Was this instruction helpful to you?
Thank you for voting!
Blower Wheel was damaged
I followed all of the instructional videos and things went very smoothly. Easy to follow. I replaced several other parts to avoid having to do other repairs later. I hope this should get us another 20+ years from this dryer.
Other Parts Used:
Tumbler and Motor Belt Retaining Ring Roller Shaft Idler Pulley Wheel Idler Shaft Retaining Ring Blower Wheel with Clamp Front Glide Kit Drum Support Roller Kit
  • Fred from COLUMBIA FLS, MT
  • Difficulty Level:
    Easy
  • Total Repair Time:
    1- 2 hours
  • Tools:
    Nutdriver, Pliers, Screw drivers, Socket set, Wrench (Adjustable)
1 person found this instruction helpful.
Was this instruction helpful to you?
Thank you for voting!
Squeeky dryer
Okay, first of all, just let me say, if I can do this, ANYONE can. I am not very handy when it comes to things like this. I watched online videos and they will walk you through everything. I am so pleased with the results. Quiet as can be now. Before, we would have to shut the door when it was on because the scretching was so loud! The parts on this site were far more affordable than at my local repair store and they all came right to my doorstep. Overall it took me about 45 minutes and three beers :) Good luck!
Other Parts Used:
Idler Pulley Shaft Washer Screw Idler Arm and Shaft Idler Shaft Retaining Ring Multi Rib Belt - 91-5/8 Inches Idler Arm Screw Sleeve Idler Spring with Rubber Dampener
  • Phil from PROCTORVILLE, OH
  • Difficulty Level:
    Really Easy
  • Total Repair Time:
    30 - 60 mins
  • Tools:
    Screw drivers, Wrench (Adjustable)
4 of 4 people found this instruction helpful.
Was this instruction helpful to you?
Thank you for voting!
Noisy & Drum stop working
Replaced damaged parts and recommended parts normally causing the problem. Dryer is working again like new. I expended $112 rather than $600 for a new equipment. Good deal!
Other Parts Used:
Retaining Ring Idler Pulley Wheel and Bearing Roller Shaft Idler Shaft Retaining Ring Multi Rib Belt - 91-5/8 Inches Dryer Drum Felt Seal Drum Support Roller Kit
  • Tulio from ASHLAND, MA
  • Difficulty Level:
    Really Easy
  • Total Repair Time:
    30 - 60 mins
  • Tools:
    Nutdriver, Pliers, Screw drivers, Socket set, Wrench set
5 of 10 people found this instruction helpful.
Was this instruction helpful to you?
Thank you for voting!
Horrible squeaking when running
I did it exactly the way the video showed it. I thought I would have to take it out to the pole barn and spend 5-6 hours on it. Because of the excellent video, it was much easier than I thougt it would be.
Other Parts Used:
Idler Pulley Wheel Idler Pulley Arm Tumbler and Motor Belt Idler Pulley Shaft Washer Idler Spring Idler Bracket Spacer Drum Support Roller Kit Idler Shaft Retaining Ring
  • Orson from Harrisburg, IL
  • Difficulty Level:
    Really Easy
  • Total Repair Time:
    1- 2 hours
  • Tools:
    Nutdriver, Pliers, Screw drivers
1 of 4 people found this instruction helpful.
Was this instruction helpful to you?
Thank you for voting!
The drier tumbler stopped spinning, and my wife noticed a burning smell when it ran.
1) Took off the front door of the drier (first unscrewed it in the sides, then lifted the door to lift the hinges up and pulled the door off)
2) Pulled the front panel down and off
3) I checked the belt to see if it was broken and it wasn't
4) I tried to turn the drier barrel manually to see if I can move the belt... it didn't move. Not knowing if there was just too much resistance, I tested the drier while looking at the motor and motor pulley as it ran.
5) I noticed that the motor pinion rotated, but the belt was slipping against it... that's why it smelled. The rubber was burning
6) Then I found that the idler pulley had stopped rotating, and the belt actually cut a channel into part of the plastic... That's when I realized that I had to replace at least the idler pulley.
7) Not knowing whether the bushing and other parts were going to be salvageable, I ordered parts for the whole assembly... but I wasn't sure how to best approach the repair...
8) Then I found partselect.com, and they had both diagrams of the assembly, all the parts easy to order, and best of all, a video of someone actually going through this repair! I was dumbfounded! :)
9) For swapping the parts I just watched the video on how to pull out the drier barrel... the only difference is that I didn't see a need to unplug the cables from the front top panel before removing the drier tumbler. (Obviously the power was turned off :P)
10) when I removed the barrel, I swapped the whole idler pulley assembly, just keeping the original spring.
11) Put everything back together, and it ran like a champ!

The video helped me save a lot of time though... it showed me how the whole thing is most easily serviced and made the repair a breeze!
Other Parts Used:
Idler Arm and Shaft Idler Pulley Wheel and Bearing Idler Pulley Shaft Washer Screw Idler Arm Screw Sleeve Idler Shaft Retaining Ring
  • Mark from Shelburne, VT
  • Difficulty Level:
    Really Easy
  • Total Repair Time:
    15 - 30 mins
  • Tools:
    Screw drivers, Socket set
40 of 1348 people found this instruction helpful.
Was this instruction helpful to you?
Thank you for voting!
drum stopped rotating
Removed idler arm,& pulley wheel, then re-installed.
Other Parts Used:
Idler Arm and Shaft Idler Pulley Wheel and Bearing Idler Pulley Shaft Washer PLUG FOR S Idler Spring with Rubber Dampener Idler Shaft Retaining Ring
  • Jonathan from Marietta, GA
  • Difficulty Level:
    Easy
  • Total Repair Time:
    15 - 30 mins
  • Tools:
    Pliers, Screw drivers
1 of 3 people found this instruction helpful.
Was this instruction helpful to you?
Thank you for voting!
Dryer made very loud squealing, screeching noise. (Sometimes Intermittent, sometimes constant)
Note: You may want to consider replacing the 2 Drum Support rollers at this time (while your in there)

1. UNPLUG YOUR DRYER FIRST.

2. Using a phillips head screw driver - Remove 2 screws that secure the dryer door hinges to the frame, Lift door very slightly to unhook hinges and pull out door with hinges attached as straight as possible, set aside. Remove the 2 plastic tabs from the opposing side of the door hinge also secured by screws.

3. Remove the front panel (panel is shaped like a football goal post) by tilting out the top ends of the front panel toward you, then lift up to remove panel from the bottom metal retaining tabs.

4. Remove the 2 hexhead screws from the 2 retaining clips (security hooks) that secure the top
of the dryer closed.

5. Systematically remove the hexhead screws from the rest of the front of "shroud" (it holds (suspends) the drum in place between the front and back of the dryer).

*** I didn't disconnect any wires, I carefully swung out each piece that had wires attached, propped up those parts vertically ensuring no strain on the attached wires. Others may want to disconnect wires to avoid breaking or damaging them.

6. Vacuum out any dust/lint that may be present.

7. Draw a quick diagram of how the underside of the belt is threaded on the idler pulley and motor pully first. Release the tension of the belt from the underside of the drum. The easiest way is to push the idler pulley arm away from the belt and slide off the belt from the idler pulley and motor pulley. Slide the drum out.

8. Remove the hexhead screw from the bottom of the idler arm. Disconnect from retaining spring.

9. You may only need to replace just the Idler Pulley Wheel. I recommend replacing as a "unit" the Idler Pulley Wheel, Idler Arm, Ring-E and Idler Shaft Washer(s) - then you can just swap out the old one for the new one.

10. Reassemble

(When reassembling the belt - place around drum first and slide drum in place. Now from the underside-place (drape) belt around the motor pulley (it will be very loose) Now push the idler pulley arm toward the motor pulley, engage the left side of the belt around the idler pulley and slowly allow idler pulley to increase its tension on the belt) You can test manually by rotating the drum by hand to ensure proper movement.)
Other Parts Used:
Idler Arm and Shaft Idler Pulley Wheel and Bearing Idler Pulley Shaft Washer Idler Shaft Retaining Ring
  • Lisa from Trenton, NJ
  • Difficulty Level:
    Easy
  • Total Repair Time:
    1- 2 hours
  • Tools:
    Pliers, Screw drivers, Socket set
18 of 19 people found this instruction helpful.
Was this instruction helpful to you?
Thank you for voting!
Loud noise
Removed the door and front sub-assy. Opened the top. Removed the drum and belt.

Removed the arm assembly and replaced with new parts. Reassembled in the reverse order and my wife is now happy with her QUIET dryer.
Other Parts Used:
Idler Arm and Shaft Idler Pulley Wheel and Bearing Idler Pulley Shaft Washer Idler Shaft Retaining Ring
  • Steven from Kirkwood, MO
  • Difficulty Level:
    Easy
  • Total Repair Time:
    15 - 30 mins
  • Tools:
    Pliers, Wrench set
0 of 2 people found this instruction helpful.
Was this instruction helpful to you?
Thank you for voting!
  • 1
  • 2
Questions and Answers

Ask our experts a question about this part and we'll get back to you as soon as possible!

1 question answered by our experts.
Sort by:
  • 1
Sorry, we couldn't find any existing answers that matched.Try using some different or simpler keywords, or submit your new question by using the "Ask a Question" button above!
Jeri
May 1, 2018
What is the size of the e-clip that holds the idler pulley assembly wheel on?
For model number LDG5005AAE
PartSelect logo
Hi Jeri, Thank you for the question. Very sorry but Whirlpool has not provided the size of the e-clip. I can verify the PartSelect Number: PS11741848 is the correct part for the model number provided. Hope this helps!

Was this helpful?
Thank you for voting!
  • 1
You May Also Need ?
Model Cross Reference
This part works with the following models:
PartSelect Number: PS11741848
Manufacturer Part Number: WP354987
Brand
Model Number
Description
Kenmore
11020112000
Washer
Kenmore
1102011200A
Washer
Kenmore
11020132000
Washer
Kenmore
11020132001
Washer
Kenmore
11020172000
Washer
Kenmore
11020172001
Washer
Kenmore
11020272000
Washer
Kenmore
11020272001
Washer
Kenmore
11026071690
Washer
Kenmore
11026071691
Washer
Kenmore
11026152500
Washer
Kenmore
11027112600
Washer
Kenmore
11027112601
Washer
Kenmore
11027172600
Washer
Kenmore
11027172601
Washer
Kenmore
11027272600
Washer
Kenmore
1102870090
Washer
Kenmore
11029012990
Washer
Kenmore
11029032990
Washer
Kenmore
11029072990
Washer
Kenmore
1102970093
Washer
Kenmore
11042182200
Washer
Kenmore
11042182201
Washer
Kenmore
11042722200
Washer
Kenmore
11042722201
Washer
Kenmore
11048182790
Washer
Kenmore
11048182791
Washer
Kenmore
11048184790
Washer
Kenmore
11048184791
Washer
Kenmore
11048722790
Washer
Customer Service Representative

Get in touch, we're here to help!

Monday to Saturday
8am - 9pm EST

Contact Customer Service