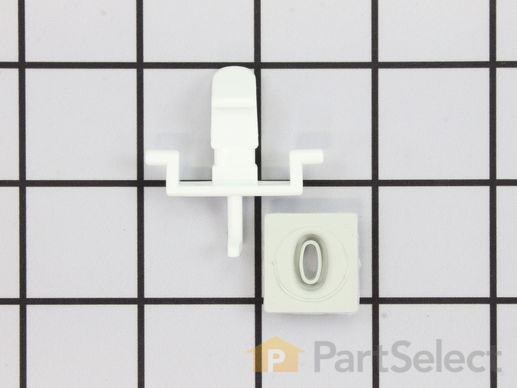
Part Location Diagram of W10131752 Whirlpool Soap Cup Door Latch and Gasket
See part 2 in the diagram
( Grid squares measure 1x1 inch )
Customer Service Representative

Get in touch, we're here to help!

Monday to Saturday
8am - 9pm EST

customerservice@partselect.com

Soap Cup Door Latch and Gasket W10131752

★★★★★
★★★★★
2 Reviews

Rated by 26 customers 

Easy 

30 - 60 mins 

Ratings submitted by customers like you who bought this part.

$ 10.89
  In Stock
Get FREE EconoShip on orders over $100! T&C apply

Get this part fast! Average delivery time for in-stock parts via standard shipping: 1.8 days.

Does this part fit my model?

Need help finding your model number?
PartSelect Number PS1960445
Manufacturer Part Number W10131752
Manufactured by Whirlpool for Maytag, Magic Chef, Jenn-Air, Crosley
Product Description

Soap Cup Door Latch and Gasket Specifications

If the soap cup door latch and gasket is malfunctioning, the dishwasher door will leak. You will find this part mounted to the inside inner door panel. To access this part you will need to take off the door panel. Once you have this removed you should be able to see how the old part is in place. You will need to remove the wax motor to complete the installation of this part. Consider applying a small amount of sealer to the flat part of the latch, which will ensure a tighter seal.
How Buying OEM Parts Can Save You Time and Money

How Buying OEM Parts Can Save You Time and Money

Troubleshooting
This part fixes the following symptoms:
Leaking | Will not dispense detergent
This part works with the following products:
Dishwasher.
Part# W10131752 replaces these:
AP4264467, 1266643, 9-12559, 9-12674, 9-4021, 904021, 912559, 912674, 99001551, W10131752, Y912674
Back to Top
Customer Reviews
Average Rating:
★★★★★
★★★★★
2 Reviews
5.0
Filter By Rating:
  • 5 Stars
    2
  • 4 Stars
    0
  • 3 Stars
    0
  • 2 Stars
    0
  • 1 Star
    0
Sort by:
  • 1
Sorry, we couldn't find any existing reviews that matched. Try using some different or simpler keywords.
  • 1
Customer Repair Stories
 Average Repair Rating: 3.3 / 5.0, 26 reviews. What's this?
Sort by:
  • 1
  • 2
  • 3
Sorry, we couldn't find any existing installation instruction that matched.
Dishwasher leaked from lower right side of the door
First i bought inner door seal and that didnt work,so i read some of the other repair reviews and found that it was the soap cup latch gasket.When i removed the cover from the door you could see where the water and soap was getting in and running down to the lower right side of the door.Once i looked at the door latch gasket it was easy to see it was torn and worn out.I did replace all four gasket's just for assurance down the road.
Other Parts Used:
Inner Door Foam Insulation Strip Reservoir O-Ring Soap Cup Door Latch and Gasket
  • larry from NILES, MI
  • Difficulty Level:
    Easy
  • Total Repair Time:
    15 - 30 mins
  • Tools:
    Screw drivers
2 of 2 people found this instruction helpful.
Was this instruction helpful to you?
Thank you for voting!
Slight leak out the door onto floor
Removed the inside door panel. Removed the 2 mounting screws to release the latch retainer assembly. Used needle nose pliers to squeeze the posts to release the rinse aid actuator. THIS was the most difficult part since they are made of plastic (didn't want to break it). Removed the spring. Mine did not have a "pivot" to remove since it was a older model, but this would be removed next. Removed old gasket around soap door latch. Pulled tabs hugging the square wax motor actuator and remove. Removed the clear plastic slider. Pulled out the old door latch. Reversed process to put back together. Make sure the gasket around the door latch is pushed all the way down onto the slot of the latch. As a precaution, I also replaced the reservoir O-ring for the rinse aid tank which was quite worn as well. When it's all apart take the cap off the rinse aid reservoir and the reservoir container drops out super easy. That is where the O-ring is. Very glad they had the parts I needed!!
Other Parts Used:
Rinse Aid Nut Reservoir O-Ring Soap Cup Door Latch and Gasket
  • Shannon from PARKERS PR, MN
  • Difficulty Level:
    Easy
  • Total Repair Time:
    1- 2 hours
  • Tools:
    Nutdriver, Pliers
2 of 2 people found this instruction helpful.
Was this instruction helpful to you?
Thank you for voting!
Dishwasher Leaked after soap dispenser opened
I read your website and followed the GREAT directions that others provided. Repair complete! Dishwasher working and not leaking!
Other Parts Used:
Door Gasket Soap Cup Door Latch and Gasket
  • Susan from Savannnah, GA
  • Difficulty Level:
    Easy
  • Total Repair Time:
    1- 2 hours
  • Tools:
    Pliers, Screw drivers, Wrench set
0 of 1 people found this instruction helpful.
Was this instruction helpful to you?
Thank you for voting!
Water Leak at right side bottom of the dishwasher door
After dissassembling the unit to discover the leakage source I determined that it would do best to replace the top three contributors to the problem as listed by you. Disassembly, parts replacement and reassembly was straight forward and a few hints garnered from your good instructions and assembly blow-up drawings made the job simple with the most difficult task being the removal of the adhesive foam gasket at the bottom of the door's interior. After scraping as much of the deteriorated foam away as possible with a plastic scraper I used some of my wife's nail polisher remover and a clean-up rag (being careful not to get the remover on plastic parts)and soon I had the adhesion area surface clean and ready to receive the new seal. With close attention to clean up of residues left behind from detergent and water and care taken with part installation and reassembly it no longer leaks and I hope to get another 10-15 years of leak free operation out of the dishwasher
Other Parts Used:
Inner Door Foam Insulation Strip Door Gasket Soap Cup Door Latch and Gasket
  • Bernard from Williamsport, PA
  • Difficulty Level:
    Easy
  • Total Repair Time:
    1- 2 hours
  • Tools:
    Screw drivers, Socket set
466 of 481 people found this instruction helpful.
Was this instruction helpful to you?
Thank you for voting!
Leaking water bottom right door
Read this site before ordering a door gasket for the problem, which wouldn't have fixed it, thank you! Removed 7 torx screws on inside door panel. Removed 2- 1/4" self tapping screws holding latch assembly. Pull of old gasket from latch. Observe which way it came off. Put on new one and reassemble. It worked. No more water on floor. The gasket doesn't look that bad for a new one to do any good...but it does.
  • Carl from Covington, LA
  • Difficulty Level:
    Really Easy
  • Total Repair Time:
    Less than 15 mins
  • Tools:
    Nutdriver
0 of 1 people found this instruction helpful.
Was this instruction helpful to you?
Thank you for voting!
Leak around soap dish latch gasket
Removed dishwasher door liner and removed soap dish door latch assembly. Removed latch from assembly and replaced with new latch. Had trouble replacing assembly in correct sequence. Had to go on line and look at sequence picture to replace assembly correctly. Installed new gasket and replaced liner in door. The new gasket and latch solved my leak problem.
Thank you PartSelect
  • Fred from Medford, OR
  • Difficulty Level:
    A Bit Difficult
  • Total Repair Time:
    30 - 60 mins
  • Tools:
    Nutdriver, Screw drivers
2 of 3 people found this instruction helpful.
Was this instruction helpful to you?
Thank you for voting!
Leaking water at bottom left of dishwasher door
Initially thought this issue was the dishwasher door gasket, but after reading post on this site about door latch grommet, removed 7 "hex screws" pulled inside of dishwasher door away and traced water from leak back to soap dispenser latch/grommet area so instead of ordering door gasket ordered door latch and grommet. Replaced grommet only (in addition to 7 "hex screws" had to remove 2 additional screws to get to it) which took some maneuvering. Re-aligned grommet and latch, inserted and tightened all screws that had been removed. Works great - no more water leaking!
  • Ted from portland, OR
  • Difficulty Level:
    Easy
  • Total Repair Time:
    15 - 30 mins
  • Tools:
    Nutdriver, Screw drivers
3 of 4 people found this instruction helpful.
Was this instruction helpful to you?
Thank you for voting!
detergent cup not opening
Replaced cup lid spring first no luck then replaced detergent cup motor problem fixed complete part replacement took less then 30 min.
Other Parts Used:
Detergent Cup Lid Spring Wax Motor for Detergent Cup Actuation Soap Cup Door Latch and Gasket
  • Stephen from New York, NY
  • Difficulty Level:
    Really Easy
  • Total Repair Time:
    15 - 30 mins
  • Tools:
    Nutdriver, Screw drivers
2 of 4 people found this instruction helpful.
Was this instruction helpful to you?
Thank you for voting!
Leakage around front part of dishwasher's floor.
You know, my friend actually did it. But I know he took the door off, took off the old gasket, put on the new, and did the same with the door latch and grommet. The toughest part was putting the door back on. That took several tries but it works perfectly again, and no leaks!
Other Parts Used:
Door Gasket Soap Cup Door Latch and Gasket
  • Phyllis from Portland, OR
  • Difficulty Level:
    Easy
  • Total Repair Time:
    1- 2 hours
  • Tools:
    Nutdriver, Pliers, Screw drivers, Wrench set
0 of 1 people found this instruction helpful.
Was this instruction helpful to you?
Thank you for voting!
Water leak right side
I fiest replaced the door latch and grommet. Thanks to other's repairs, I purchased the latch and grommet as well as the door gasket. It took a bit longer to replace the grommet and latch as it was covered in scale and the entire assembly needed cleaning first. The door gasket installed very easily and I am happy to say no more leaks. Great site and very helpful with the customer comments as well as the videos available witht he parts list detailing installation procedures. Excellant site I will revisit if I need any parts for other appliances. Thank you.
Other Parts Used:
Door Gasket Soap Cup Door Latch and Gasket
  • Bill from Clarksburg, WV
  • Difficulty Level:
    A Bit Difficult
  • Total Repair Time:
    15 - 30 mins
  • Tools:
    Nutdriver, Pliers, Screw drivers
1 of 2 people found this instruction helpful.
Was this instruction helpful to you?
Thank you for voting!
  • 1
  • 2
  • 3
Questions and Answers

We're sorry, but our Q&A experts are temporarily unavailable.
Please check back later if you still haven't found the answer you need.
You May Also Need ?
Model Cross Reference
This part works with the following models:
PartSelect Number: PS1960445
Manufacturer Part Number: W10131752
Brand
Model Number
Description
Crosley
CDC5J
Dishwasher
Crosley
CDU20J
Dishwasher
Crosley
CDU2J
Dishwasher
Crosley
CDU2J3
Dishwasher
Crosley
CDU5J
Dishwasher
Crosley
CDU5JV
Dishwasher
Crosley
CDU8J
Dishwasher
Magic Chef
DC5J
Dishwasher
Magic Chef
DU20J
Dishwasher
Magic Chef
DU20J-CAN
Dishwasher
Magic Chef
DU20JV
Dishwasher
Magic Chef
DU2J
Dishwasher
Magic Chef
DU2J-C
Dishwasher
Magic Chef
DU2J-CAN
Dishwasher
Magic Chef
DU2JB
Dishwasher
Magic Chef
DU2JV
Dishwasher
Magic Chef
DU40J
Dishwasher
Magic Chef
DU40JV
Dishwasher
Magic Chef
DU4J
Dishwasher
Magic Chef
DU4J-C
Dishwasher
Magic Chef
DU4JV
Dishwasher
Magic Chef
DU4JV-C
Dishwasher
Magic Chef
DU4JV-CAN
Dishwasher
Magic Chef
DU4K
Dishwasher
Magic Chef
DU4K-C
Dishwasher
Magic Chef
DU4KV
Dishwasher
Magic Chef
DU4KV-C
Dishwasher
Magic Chef
DU4KV-CAN
Dishwasher
Magic Chef
DU5J
Dishwasher
Magic Chef
DU5J-CAN
Dishwasher
Customer Service Representative

Get in touch, we're here to help!

Monday to Saturday
8am - 9pm EST

Contact Customer Service