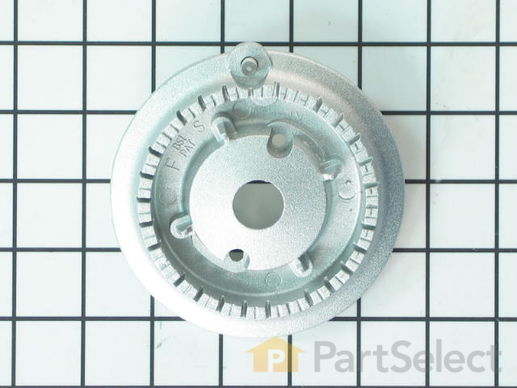
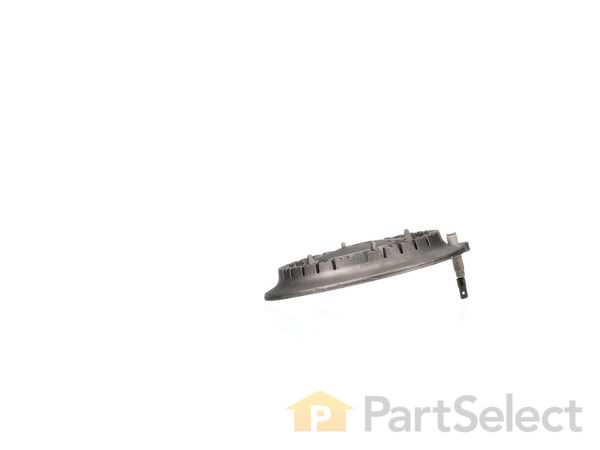
Part Location Diagram of 74007736 Whirlpool X-Large Burner Head with Electrode
See part 3 in the diagram
( Grid squares measure 1x1 inch )
Customer Service Representative

Get in touch, we're here to help!

Monday to Saturday
8am - 9pm EST

customerservice@partselect.com

X-Large Burner Head with Electrode 74007736

★★★★★
★★★★★
11 Reviews

Rated by 11 customers 

Easy 

30 - 60 mins 

Ratings submitted by customers like you who bought this part.

$ 81.02
  In Stock
Get FREE EconoShip on orders over $100! T&C apply

Get this part fast! Average delivery time for in-stock parts via standard shipping: 1.8 days.

Does this part fit my model?

Need help finding your model number?
PartSelect Number PS2085280
Manufacturer Part Number 74007736
Manufactured by Whirlpool for Jenn-Air, KitchenAid, Maytag
Product Description

X-Large Burner Head with Electrode Specifications

This is the burner head and electrode for your gas range. If your gas igniter glows but will not light, or if the element will not start or heat entirely, you may need to replace the burner head. This burner head is approximately 4¼ inches in diameter and is sold individually. Please note that the mounting screws for this burner head are sold separately. To replace the burner head, simply unscrew the old, defective burner head and screw in the new one.
How Buying OEM Parts Can Save You Time and Money

How Buying OEM Parts Can Save You Time and Money

Troubleshooting
This part fixes the following symptoms:
Gas igniter glows | but will not light | Will Not Start | Element will not heat
This part works with the following products:
Cooktop, Range.
Part# 74007736 replaces these:
AP4098508, 1009484, 74007736, 74007736, 7505P306-60
Back to Top
Customer Reviews
Average Rating:
★★★★★
★★★★★
11 Reviews
4.8
Filter By Rating:
  • 5 Stars
    10
  • 4 Stars
    0
  • 3 Stars
    1
  • 2 Stars
    0
  • 1 Star
    0
Sort by:
  • 1
  • 2
Sorry, we couldn't find any existing reviews that matched. Try using some different or simpler keywords.
  • 1
  • 2
Customer Repair Stories
 Average Repair Rating: 3.7 / 5.0, 11 reviews. What's this?
Sort by:
  • 1
  • 2
Sorry, we couldn't find any existing installation instruction that matched.
Auto igniter had gone bad.
Take out 2 T15 torx screws. Lift burner assembly, disconnect igniter. Make sure wire does not return into hole. I put A paperclip on it. Connect new burner assembly. Clean under old burner. Install burner assembly with screws. Test burner.
Voila!
  • Aubrey from EADS, TN
  • Difficulty Level:
    Easy
  • Total Repair Time:
    Less than 15 mins
  • Tools:
    Screw drivers
1 person found this instruction helpful.
Was this instruction helpful to you?
Thank you for voting!
Worn Burner Head Screws
Wanted to deep clean the range, but popped the worn screw heads on both the burner mounts and igniters embedded in the chassis. The way the range is designed, the bolts extend through the glass top and into the burner orifice. The bolts were unable to be extracted so replacement was the only option outside of a small third party machine shop. The double burner is discontinued and impossible to find, will replace this "High-End" POS when we remodel.

Removed Burner Heads
Disconnected igniter Leads
Extended range to remove glass top
Removed glass top mounting screws
CAREFULLY Removed Glass Top (REPLACEMENT = $800 Min)
Removed affected burner orifices
Tracked down parts list and maintenance manuals
Tracked down similar issue:
https://www.youtube.com/watch?v=YfCLJ1rXK6w&t=114s
Replacement bolts : #8 24 X 0.5" Sheet Metal Screws
Ordered Replacement parts and installed in reverse
Other Parts Used:
Door Gasket Holder, Surface Burner Orifice BURNR-TOP X-Large Burner Head with Electrode Large Burner Head
  • Stefan from HOUSTON, TX
  • Difficulty Level:
    Easy
  • Total Repair Time:
    30 - 60 mins
  • Tools:
    Pliers, Screw drivers, Socket set, Wrench (Adjustable)
2 of 2 people found this instruction helpful.
Was this instruction helpful to you?
Thank you for voting!
burners would not light
This is the 3rd burner head that was replaced . everyone had the screws break off , & had to be drilled out & re tapped .I would not purchase the replacement screws @$4.00 each . They were just plain sheet metal screws that were steel . Better going to a home center & purchasing brass or stainless machine screws at a 1/4 of the cost .If you are not familiar with drilling out broken screws ,then this is not the repair for you .
  • Mike from LIVINGSTON, NJ
  • Difficulty Level:
    Difficult
  • Total Repair Time:
    1- 2 hours
  • Tools:
    Nutdriver, Pliers, Screw drivers, Socket set
4 of 4 people found this instruction helpful.
Was this instruction helpful to you?
Thank you for voting!
Replace X-Large Burner Head with Electrode
Disassembly: Removed 2 screws with nutdriver. Pulled off electrode connection. Screws were rusted and needed replacement.

Assembly: Slipped on electrode attachment. Went to local hardware store and bought 5/8" 8/18 pan head screws. Used screwdriver to screw down burner head. The 3/8" inch screws on the tech sheet do not work. Too short and flange is too wide to fit in opening in burner head.
Other Parts Used:
Screw, 8/18 x 3/8 X-Large Burner Head with Electrode
  • Catherine from FAIRFAX STA, VA
  • Difficulty Level:
    Very Easy
  • Total Repair Time:
    30 - 60 mins
  • Tools:
    Screw drivers
5 of 6 people found this instruction helpful.
Was this instruction helpful to you?
Thank you for voting!
Replacing burning assemblies and rusted screws
Installing the 2 new burner assemblies worked great with the new screws. New screws however, did not work with the old burner assemblies that have rusted screws I wanted to replace. New burner assemblies are slightly taller that the old ones.
Other Parts Used:
Screw Dual Burner with Electrode X-Large Burner Head with Electrode
  • Gayle from COUPEVILLE, WA
  • Difficulty Level:
    Really Easy
  • Total Repair Time:
    15 - 30 mins
  • Tools:
    Screw drivers
7 of 10 people found this instruction helpful.
Was this instruction helpful to you?
Thank you for voting!
electrode clicked but failed to light burner
I first tried to remove the torx screws only to have them break off..soooo as with most home repairs it grew into a bigger task. 1) unhooked the gas line and unplugged the unit 2) place the unit upside down on workbench 3) used a socket set to remove the hex screws that held the top on 4)removed all the other burners and disconnected electrical wire connected to the igniters. 5) Removed the top 6) uses pliers to remove the screw parts left in the burner base (wd-40 and lock wrench)..Replaced the old gaskets 7) put the top back on and screwed the top back on (make sure you pull the igniter wires through the top before securing it) 8) Reseat and screw in the burners using a torx bit
Other Parts Used:
GASKET- FI X-Large Burner Head with Electrode Burner Knob - Stainless Color Torx Screw
  • bill from spokane valley, WA
  • Difficulty Level:
    A Bit Difficult
  • Total Repair Time:
    15 - 30 mins
  • Tools:
    Screw drivers, Socket set
9 of 12 people found this instruction helpful.
Was this instruction helpful to you?
Thank you for voting!
Burner would not light
Replaced burner assembly.
Other Parts Used:
X-Large Burner Head with Electrode Torx Screw
  • Mike from Big Canoe, GA
  • Difficulty Level:
    Easy
  • Total Repair Time:
    15 - 30 mins
3 of 5 people found this instruction helpful.
Was this instruction helpful to you?
Thank you for voting!
erratic spark from electode,gas would no ignate.
Removed the two fastening screws with a small square head screwdriver,lifted the burner head disconnected wire from damaged electrode. To install just reversed the steps,total time less than ten minutes.
  • jose from san juan bautista, CA
  • Difficulty Level:
    Really Easy
  • Total Repair Time:
    Less than 15 mins
  • Tools:
    Screw drivers
3 of 5 people found this instruction helpful.
Was this instruction helpful to you?
Thank you for voting!
electrode broke, screw broke
The ceramic on the electrode broke due to water over boiling the week of Thanksgiving. When i tried to loosen the screw to replace the electrode it broke off inside the threads. Ordered whole new unit overnight. Back in business in five minutes. Thanksgiving was back on!! Thanks!
Other Parts Used:
Burner Electrode X-Large Burner Head with Electrode Screw, Igniter
  • calvin from Edmond, OK
  • Difficulty Level:
    Really Easy
  • Total Repair Time:
    Less than 15 mins
  • Tools:
    Screw drivers
6 of 10 people found this instruction helpful.
Was this instruction helpful to you?
Thank you for voting!
electrode sparked but not enough to lite burner
Unscrewed burner assembly and removed wire. Unable to remove electrode screw. Striped head of screw. Tried penetrating oil but no luck. Tried to drill and use easy out bit but ruined burner assembly and had to order new burner assembly. When assembly came it had electrode in place but website does not show electrode with assembly except on one burner. With mail and all it took about a week to fix 2 burners. Returned unused electrode for credit. Overall, cheaper then a service call by far.
  • W E from Camden, NC
  • Difficulty Level:
    A Bit Difficult
  • Total Repair Time:
    30 - 60 mins
  • Tools:
    Screw drivers
4 of 7 people found this instruction helpful.
Was this instruction helpful to you?
Thank you for voting!
  • 1
  • 2
Questions and Answers

We're sorry, but our Q&A experts are temporarily unavailable.
Please check back later if you still haven't found the answer you need.

8 questions answered by our experts.
Sort by:
  • 1
Sorry, we couldn't find any existing answers that matched.Try using some different or simpler keywords, or submit your new question by using the "Ask a Question" button above!
Ellen
November 12, 2017
Is this the part for the front right burner (the larger of the 4 burners measure 4 1/4" across). That is the burner head we need to replace. The current igniter sparks but does not start the burner every time causing gas smell). (we did order the burner electrode part #ps11744318 back in july 2016 order #9022918 and tried to install it. But the bracket that holds the electrode cannot be removed from the old burner head to install the new part
For model number JGD8430ADS
PartSelect logo
Hi Ellen, Thank you for your inquiry. Yes, this is the correct burner for the right front. I hope this helps. Thank you and have a great day!

13 people found this helpful.

Was this helpful?
Thank you for voting!
Ron
January 13, 2018
Does the burner head with electrode come with the 2 screws to mount it to the cookktop?
For model number JDG8430ADN
PartSelect logo
Hi Ron, Thank you for your question. The screws for the burner heads are sold separately. The part number for the screw is PS11742240. I hope this helps. Thank you and have a great day!

6 people found this helpful.

Was this helpful?
Thank you for voting!
DALE
March 19, 2018
When we turn on a burner, the other three burners' electrodes will start sparking, too. The burner does light up but the other three continue to spark without ever going out.
For model number JGD8430ADB
PartSelect logo
Hi Dale, Thank you for the question. This sounds like an issue with the spark module, PartSelect Number: PS11744407. This Module controls the sparking to all the burners. Hope this helps!

3 people found this helpful.

Was this helpful?
Thank you for voting!
Judy
May 6, 2018
What is the best way to clean the burner rather than replace it?
PartSelect logo
Hi Judy, Thank you for the question. For daily maintenance and light grease stains, use vinegar in a spray bottle and spray the burner with vinegar and allow to sit for 10-15 minutes. Wipe down with a clean cloth. This method is most effective as ongoing daily maintenance, as it cuts through grease before it has a chance to be baked in. For harder grease stains and grime, wash all burners with lukewarm water and dish washing detergent to remove initial build up. Make a thick paste of baking soda and water. Coat all burners with paste and let stand for 20 minutes. Scrub with a sponge and rinse thoroughly. Make sure to remove the electrode when cleaning the burner. Hope this helps!

3 people found this helpful.

Was this helpful?
Thank you for voting!
Christopher Lotesto
February 5, 2020
My xl burner (mfg# 74007736) ignitor is clicking but not lighting...i see from other entries that i should replace the head/ignitor assembly but there is now also a faint smell of gas coming from center of the burner (no worries - turned it off at the valve) and i'm wondering if there is any advice regarding the gas "leaking out" as i don't think burner head replacement will solve that?
For model number Jenn-air JGD8430ADB
PartSelect logo
Hello Christopher, thank you for your question. If there is a small leak of gas that is usually caused by the burner valve that controls that burner. We would recommend replacing the burner valve as well as the head/igniter assembly. I hope this helps.

1 person found this helpful.

Was this helpful?
Thank you for voting!
Joyce
November 28, 2017
My Jenn-Air range right front burner sparks but doesn't ignite every time, sometimes get strong gas smell. It's a slide in 30" model, which part i need to purchase? Is that easy to replace myself? Thanks.
For model number JDS8860BDP
PartSelect logo
Hi Joyce, Thank you for your question. I would suggest checking your burner electrode or the igniter right behind the knob on your stove. It sounds like either one of those two parts could be your issue. I hope that helps. Good luck with your repair.

1 person found this helpful.

Was this helpful?
Thank you for voting!
Ron
January 20, 2018
What part number is the small, left front, burner head with electrode.
For model number JGD8430ADN
PartSelect logo
Hello Ron, Thank you for your inquiry. The left front burner head is part# WP7505P339-60, the electrode comes separately for this burner, part# WP74009336. Hope this helps!

Was this helpful?
Thank you for voting!
Bob
August 8, 2018
Will this part: Partselect number ps2085280 Manufacturer part number 74007736 manufactured by Whirlpool fit on the left front burner, which is the largest on the stove
For model number JGCP648ADP
PartSelect logo
Hello Bob, thank you for your question. Yes, this part X-Large Burner Head with Electrode 74007736 - is the largest burner on the unit and would fit that front left burner section. I hope this helps!

Was this helpful?
Thank you for voting!
  • 1
You May Also Need ?
Model Cross Reference
This part works with the following models:
PartSelect Number: PS2085280
Manufacturer Part Number: 74007736
Brand
Model Number
Description
Jenn-Air
JDS8850BDB
Range
Jenn-Air
JDS8850BDS
Range
Jenn-Air
JDS8850BDS19
Range - 30" SLIDE-IN DUAL FUEL RANGE
Jenn-Air
JDS8850BDW
Range
Jenn-Air
JDS8850BDW18
Range - 30" SLIDE-IN Dual Fuel Range
Jenn-Air
JDS8850CDB00
Range - 30" SLIDE-IN DUAL FUEL RANGE
Jenn-Air
JDS8850CDB01
Range - 30" SLIDE-IN DUAL FUEL RANGE
Jenn-Air
JDS8850CDR00
Range - 30" SLIDE-IN DUAL FUEL RANGE
Jenn-Air
JDS8850CDS00
Range - 30" SLIDE-IN DUAL FUEL RANGE
Jenn-Air
JDS8850CDS01
Range - 30" SLIDE-IN DUAL FUEL RANGE
Jenn-Air
JDS8850CDS02
Range - 30" SLIDE-IN Dual Fuel Range
Jenn-Air
JDS8850CDW00
Range - 30" SLIDE-IN DUAL FUEL RANGE
Jenn-Air
JDS8850CDW01
Range - 30" SLIDE-IN DUAL FUEL RANGE
Jenn-Air
JDS8860BDP
Range
Jenn-Air
JDS8860BDP16
Range - 30" GAS DUAL FUEL
Jenn-Air
JDS8860BDP17
Range - 30" DUAL FUEL GAS RANGE
Jenn-Air
JGC
Cooktop - JENNAIR COOKING
Jenn-Air
JGC8430BDB
Cooktop
Jenn-Air
JGC8430BDQ
Cooktop
Jenn-Air
JGC8430BDS
Cooktop
Jenn-Air
JGC8430BDW
Cooktop
Jenn-Air
JGC8536ADB
Cooktop
Jenn-Air
JGC8536ADQ
Cooktop
Jenn-Air
JGC8536ADS
Cooktop
Jenn-Air
JGC8536ADW
Cooktop
Jenn-Air
JGC8536BDB11
Cooktop - 36" GAS COOKTOP
Jenn-Air
JGC8536BDS11
Cooktop - 36" GAS COOKTOP
Jenn-Air
JGC8536BDW11
Cooktop - 36" GAS COOKTOP
Jenn-Air
JGC9430ADB
Cooktop
Jenn-Air
JGC9430ADF
Cooktop
Customer Service Representative

Get in touch, we're here to help!

Monday to Saturday
8am - 9pm EST

Contact Customer Service